Data Science and Data Proicessing

PYTHON PROGRAMMING

10 Crazy Cool Project Ideas for Python Developers

Crazy project ideas to challenge your Python skills

Image for post
Photo by Simon Abrams on Unsplash

Did you know Python is known as an all-rounder programming language?

Yes, it is, though it shouldn’t be used on every single project,

You can use it to create desktop applications, games, mobile apps, websites, and system software. It is even the most suitable language for the implementation of Artificial Intelligence and Machine Learning algorithms.

So, I spent the last few weeks collecting unique project ideas for Python developers. These project ideas will hopefully bring back your interest in this amazing language. The best part is that you can enhance your Python programming skills with these fun but challenging projects.

Let’s have a look at them one-by-one.

1- Create a Software GUI Using Voice Commands

Image for post
Interaction Sample — Original Photo by Headway on Unsplash — Edited by the Author

These days, massive progress has been made in the field of desktop application development. You will see many drag & drop GUI builders and speech recognition libraries. So, why not join them together and create a user interface by talking with the computer?

This is purely a new concept and after some research, I found that no one has ever attempted to do it. So, it might be a little bit more challenging than the ones mentioned below.

Here are some instructions to get started on this project using Python. First of all, you need these packages:-

Now, the idea is to hardcode some speech commands like:
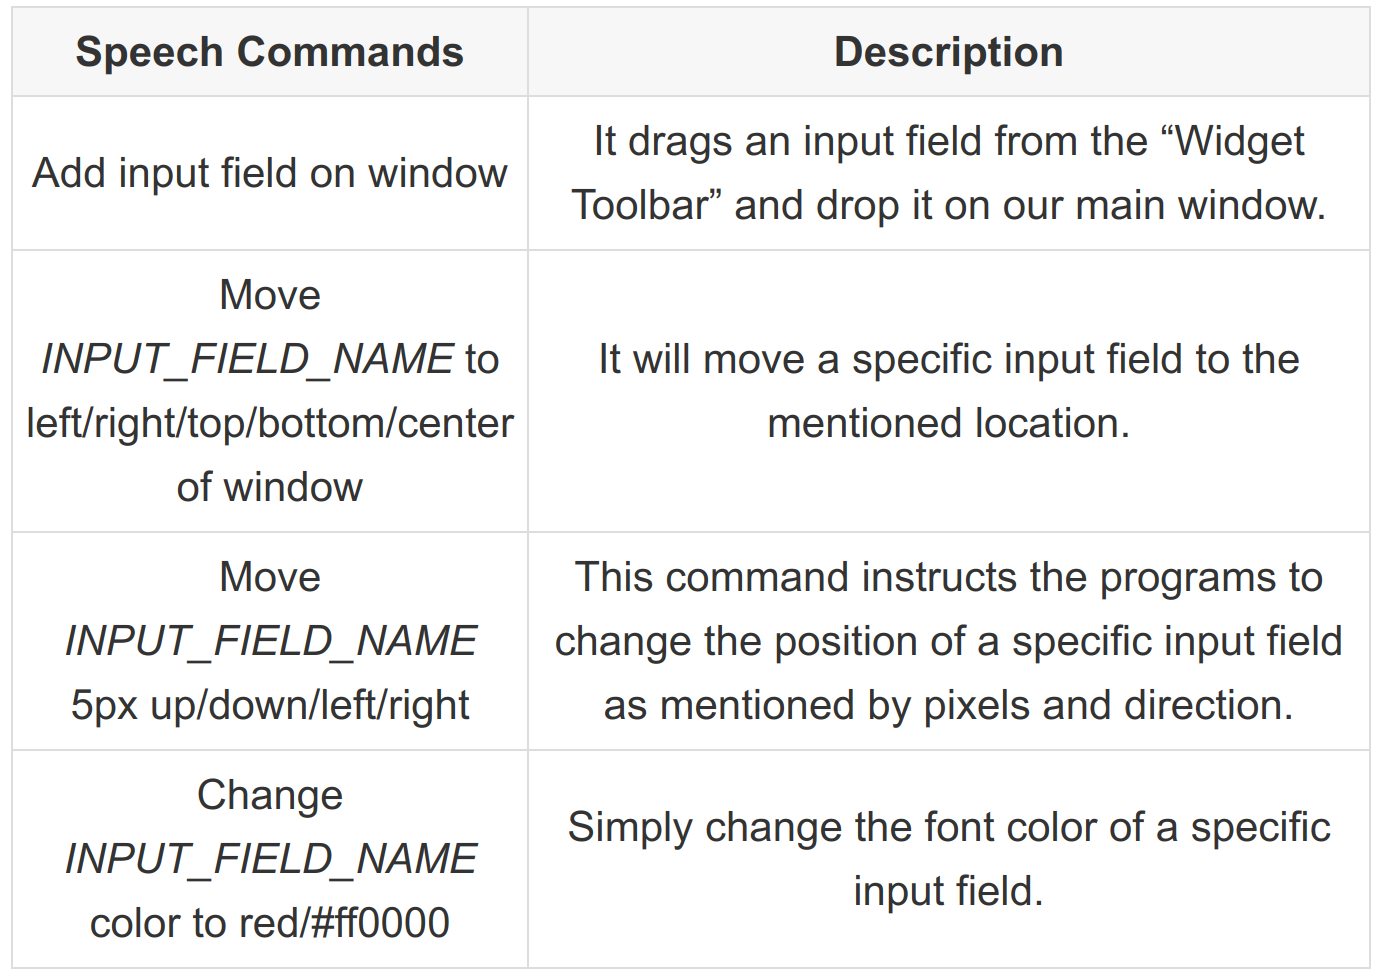
Image for post

You got the point, right? It’s very simple and straightforward to add more commands like these.

As this is going to be a Minimum Viable Product (MVP). So, it will be completely ok if you have to hardcode many conditional statements (e.g. if…else).

After setting up some basic commands, it’s time to test the code. For now, you can try to build a very basic login form in a window.

The major flexibility of this idea is that it can be implemented for game development, websites, and mobile apps. Even in different programming languages.

2- AI Betting Bot

Image for post
Tennis Match — Photo by Moises Alex on Unsplash

Betting is an activity where people predict an outcome and if they are right then they receive a reward in return. Now, there are many technological advances that happened in Artificial Intelligence or Machine Learning in the past few years.

For example, you might have heard about programs like AlphaGo Master , AlphaGo Zero , and AlphaZero that can play Go (game) better than any professional human player. You can even get the source code of a similar program called Leela Zero.

The point I want to convey is that AI is getting smarter than us. Meaning that it can predict something better by taking into account all the possibilities and learn from past experiences.

Let’s apply some supervised learning concepts in Python to create an AI Betting Bot. Here are some libraries you need to get started.

At first, you need to select a game (e.g. tennis, football, etc.) for predicting the results. Now search for historical match results data that can be used to train the model.

For example, the data of tennis matches can be downloaded in .csv format from tennis-data.co.uk website .

In case you are not familiar with betting, here’s how it works.

  • You want to bet $10 on Roger Federer with an odd of 1.3.
  • If he wins, you will receive $10 (actual amount), plus $3 (profit).
  • If he loses, you will lose your money (e.g. $10) too.

After training the model, we have to compute the Confidence Level for each prediction, find out the performance of our bot by checking how many times the prediction was right, and finally also keep an eye on Return On Investment (ROI).

Download a similar open-source AI Betting Bot Project by Edouard Thomas.

3- Trading Bot

Image for post
Trading — Photo by Nick Chong on Unsplash

Trading Bot is very similar to the previous project because it also requires AI for prediction.

Now the question is whether an AI can correctly predict the fluctuation of stock prices?

And, the answer is Yes.

Before getting started, we need some data to develop a trading bot.

These resources from Investopedia might help in training the bot.

After reading both of these articles, you will now have a better understanding of when to buy stocks and when not. This knowledge can easily be transformed into a Python program that automatically makes the decision for us.

You can also take reference from this open-source trading bot called freqtrade . It is built using Python and implements several machine learning algorithms.

4- Iron Man Jarvis (AI based Virtual Assistant)

Image for post
AI Assistant Interface — Photo by Joshua Sortino on Unsplash

This idea is taken from the Hollywood movie series Iron Man. The movie revolves around technology, robots, and AI.

Here, the Iron Man has built a virtual assistant for himself using artificial intelligence. The program is known as Jarvis that helps Iron Man in everyday tasks.

Iron Man gives instructions to Jarvis using simple English language and Jarvis responds in English too. It means that our program will need speech recognition as well as text-to-speech functionalities.

I would recommend using these libraries:

For now, you can hardcode the speech commands like:

You can also use Jarvis for tons of other tasks like:

  • Set alarm on mobile.
  • Continuously check the home security camera and inform in case someone is waiting outside. You can add more features like face detection and recognition. It helps you find out who or how many people are there.
  • Open/Close room windows.
  • Turn on/off lights.
  • Automatically respond to emails.
  • Schedule tasks.

Even the founder of Facebook, “Mark Zuckerberg” has built a Jarvis as a side-project.

5- Monitor a Website to Get Informed About an Upcoming Concert of Artist

Image for post
Tickets — Photo by Andy Li on Unsplash

Songkick is a very popular service that provides information about upcoming concerts. Its API can be used to search for upcoming concerts by:

  • Artist
  • Location
  • Venue
  • Date and Time

You can create a Python script that keeps checking a specific concert daily using Songkick’s API. At last, send an email to yourself whenever the concert is available.

Sometimes Songkick even displays buy tickets link on their website. But, this link could go to a different website for different concerts. It means that it is very difficult to automatically purchase tickets even if we make use of web scraping.

Rather, we can simply display the buy tickets link as it is in our application for manual action.

6- Automatically Renew Free Let’s Encrypt SSL Certificates

Image for post
Let’s Encrypt Logo — https://letsencrypt.org/

Let’s Encrypt is a certificate authority that offers free SSL certificates. But, the issue is that this certificate is only valid for 90 days. After 90 days, you have to renew it.

In my opinion, this is a great scenario for automation using Python. We can write some code that automatically renews a website SSL certificate before expiring.

Check out this code on GitHub for inspiration.

7- Recognize Individuals in Crowd

Image for post
Face Recognition — Image by the Author

These days, governments had installed surveillance cameras in public places to increase the security of their citizens. Most of these cameras are merely to record video and then the forensic experts have to manually recognize or trace the individual.

What if we create a Python program that recognizes each person in camera in real-time. First of all, we need access to a national ID card database, which we probably don’t have.

So, an easy option is to create a database with your family members’ records.

You can then use a Face Recognition library and connect it with the output of the camera.

8- Contact Tracing

Image for post
Contact Tracing App — Photo by Markus Winkler on Unsplash

Contact Tracing is a way to identify all those people that come into contact with each other during a specific time period. It is mostly useful in a pandemic like COVID-19 or HIV. Because without any data about who is infected we can’t stop its spread.

Python can be used with a machine learning algorithm called DBSCAN (Density-Based Spatial Clustering of Applications with Noise) for contact tracing.

As this is just a side-project, so we don’t have access to any official data. For now, it is better to generate some realistic test data using Mockaroo.

You may have a look at this article for specific code implementation.

9- Automatically Move Files From One Folder to Another

Image for post
Nautilus File Manager in Ubuntu — Image by the Author

This is a very basic Python program that keeps monitoring a folder. Whenever a file is added in that folder it checks its type and moves it to a specific folder accordingly.

For example, we can track our downloads folder. Now, when a new file is downloaded, then it will automatically be moved in another folder according to its type.

.exe files are most probably software setups, so move them inside the “software” folder. Whereas, moving images (png, jpg, gif) inside the “images” folder.

This way we can organize different types of files for quick access.

10- Gather Career Path Videos From YouTube

Image for post
YouTube Homepage — Photo by Kon Karampelas on Unsplash

Create an application that accepts the names of skills that we need to learn for a career.

For example, to become a web developer, we need to learn:

  • HTML5
  • CSS3
  • JavaScript
  • Backend language (PHP, Node.js, Python, ASP.NET, or Java)
  • Bootstrap 4
  • WordPress
  • Backend Framework (Laravel, Codeigniter, Django, Flask, etc.)
  • etc.

After entering the skills, there will be a “Generate Career Path” button. It instructs our program to search YouTube and select relevant videos/playlists according to each skill. In case there are many similar videos for skill then it will select the one with the most views, comments, likes, etc.

The program then groups these videos according to skills and display their thumbnail, title, and link in the GUI.

It will also analyze the duration of each video, aggregate them, and then inform us about how much time it will take to learn this career path.

Now, as a user, we can watch these videos which are ordered in a step by step manner to become a master in this career.

Conclusion

Challenging yourself with unique programming projects keeps you active, enhance your skills, and helps you explore new possibilities.

Some of the project ideas I mentioned above can also be used as your Final Year Project.

It’s time to show your creativity with Python programming language and turn these ideas into something you will proud of.

Thanks for reading!

7 Awesome Command-Line Tools

Some familiar tools and some you probably haven’t tried yet

Aug 24 · 6 min read
Image for post
Photo by Maxwell Nelson on Unsplash.

The terminal/command line is a sacred tool that developers have under their belt. It is possibly the most used tool for programmers. I believe that is because of how lightweight it is and also the unbelievable amount of things you can do with it. Some developers even go the extra mile to do everything inside of the terminal. Kudos to them.

I’ll be showing some of the CLI (Command-Line Interface) tools that I personally think are awesome and use pretty much on a daily basis. Granted, there are so many tools out there for the command line that this list barely scratches the surface.

1. vim

What kind of terminal list wouldn’t include vim? There are tons of debates about whether or not vim is the editor for programming or if it’s a tool invented for lunatics, but we will not be discussing that here.

For those of you who are not familiar with vim, it is a text editor that improves on the out-of-the-box vi tool shipped with any UNIX system. It allows you to edit or create a file through your terminal.

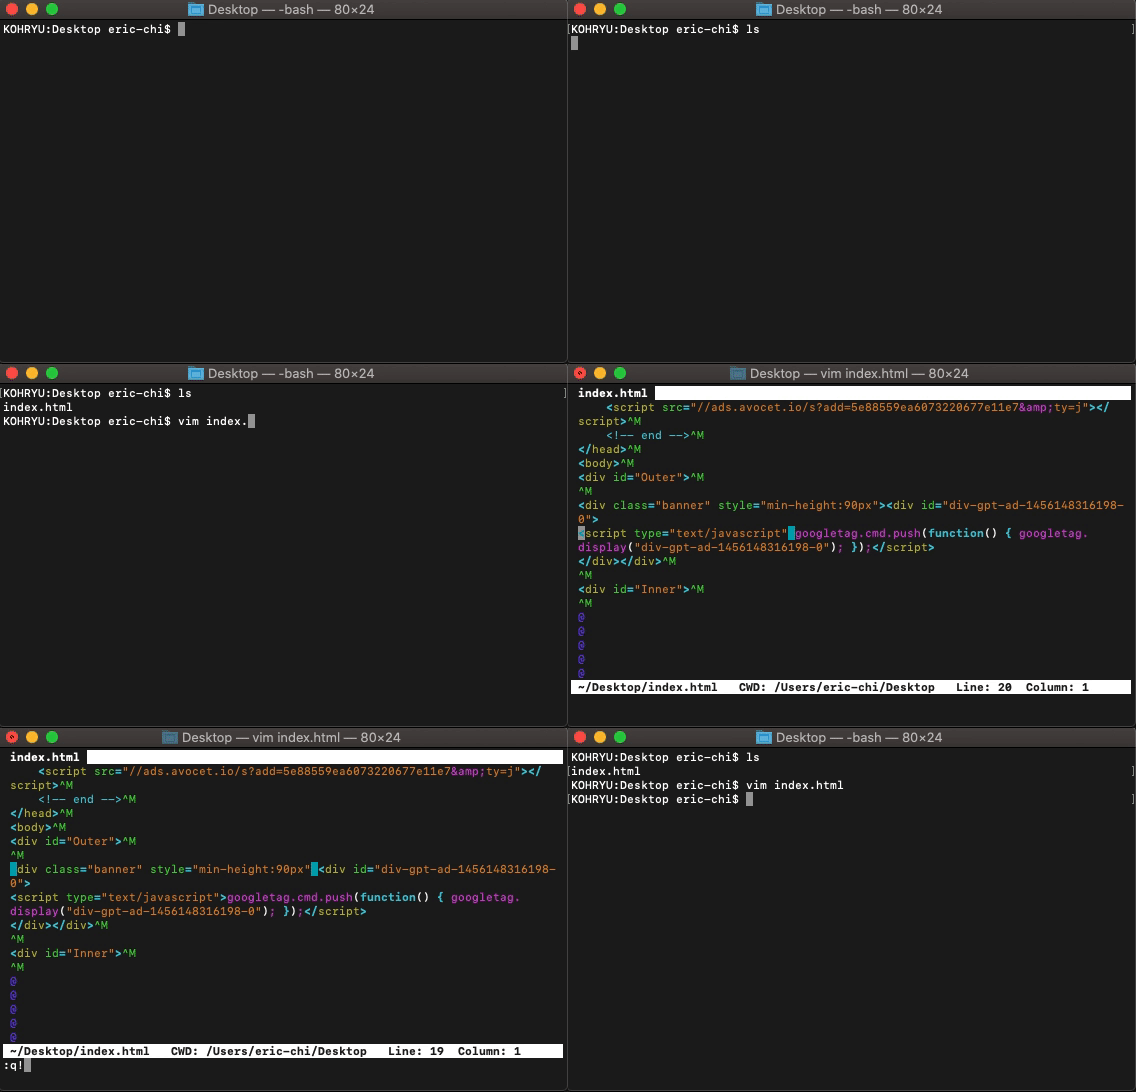
Image for post
Basic usage of vim.

This tool is helpful if you want to quickly edit a file while you are in the terminal and don’t want to open up your IDE or a GUI text editor like VSCode or Sublime Text.

Keep in mind that this tool can be a little tricky to use when first learning it, as many of the shortcuts are not as intuitive as modern-day text editors. However, if you do invest the time to learn vim, it can be extremely powerful for a developer. This is why vim has a huge community. This community is so large that developers will even make plug-ins for popular IDEs and text editors to emulate the vim experience.

2. vtop

top is a very common command that is used within the terminal to display information about processes that your system has running and general information about the memory and CPU usage of your machine. If you have ever used top, it can be a little confusing to look at. So how can we make this information a little easier to process? Introducing vtop, an implementation of top that has graphs!

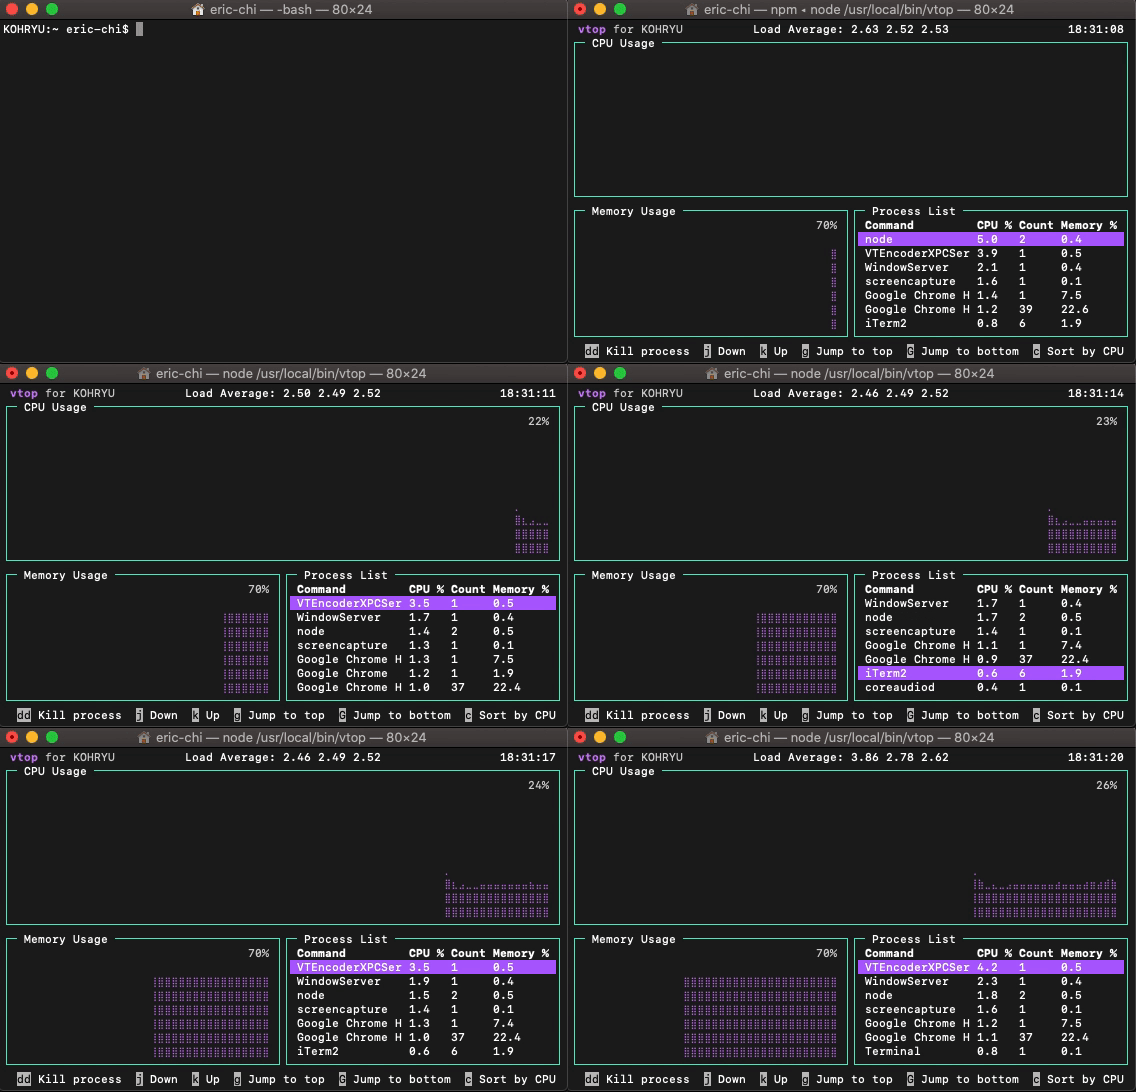
Image for post
vtop in action.

I like having a visual guide for anything, and having one for top information is killer. I have this running all day so that I can keep an eye on my system’s load.

You’re going to need npm for this tool.

3. fzf

This next one is a really cool tool. It’s called fzf. It’s a general-purpose command-line fuzzy finder that allows you to find files based on whatever you type. On its own, it’s an OK tool. It will list all the different files in the current directory you’re in. You can think of it as a Spotlight search, but in your terminal.

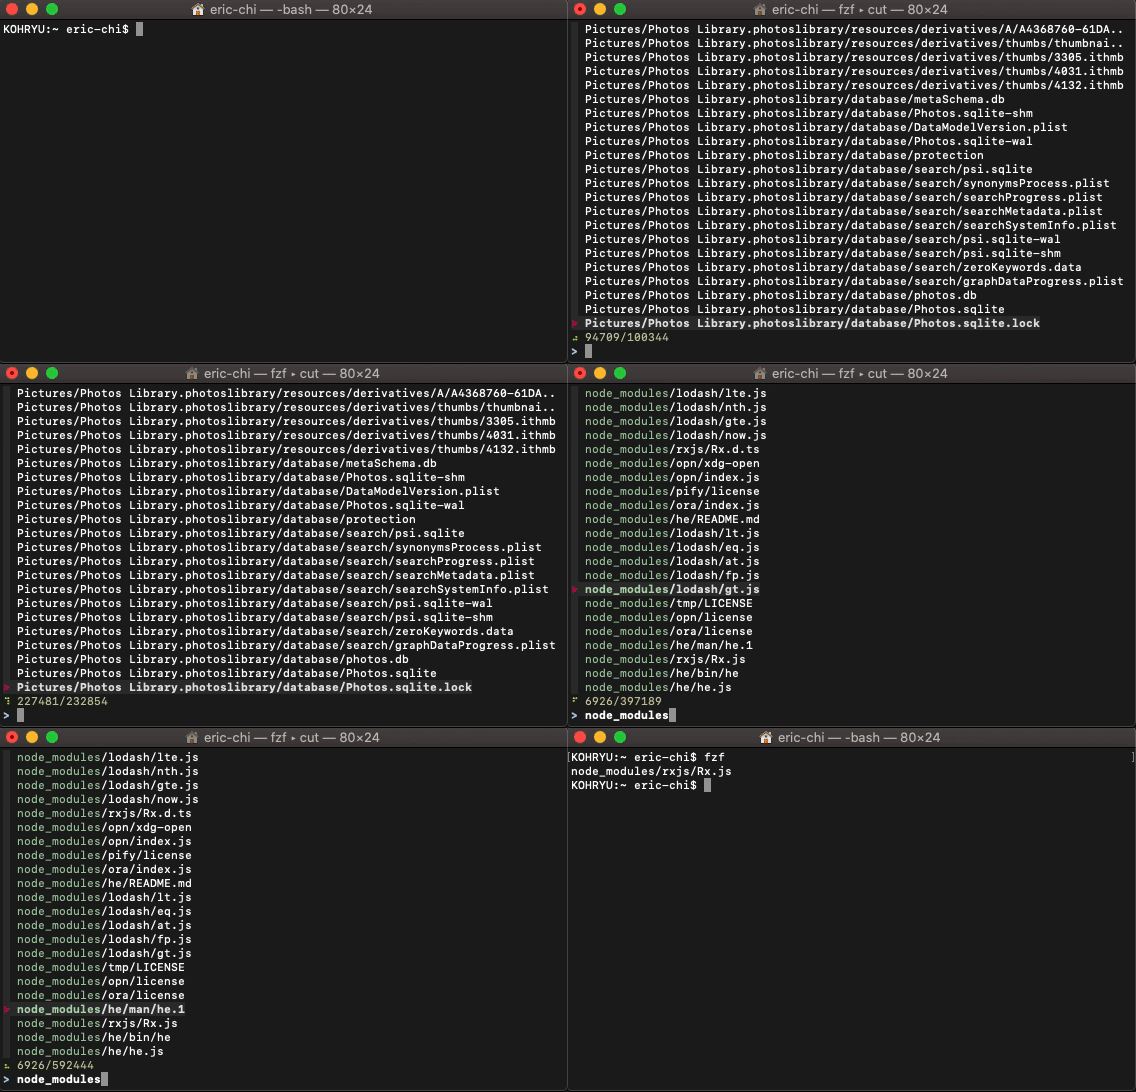
Image for post
Fuzzy-finding in my home.

Now the real power of this tool comes when you combine fzf with other existing commands like kill or cat. In order to do this, you’re going to need to run the install script that is provided with the package or inside the repository:

/usr/local/opt/fzf/installor~/.fzf/install

You will need to restart your terminal or source your .bashrc. It will ask you some questions, and once you’ve answered all of them, you will have unlocked fzf's fullest potential.

Now you can run commands like:

cat **[TAB]
vim **[TAB]
ssh **[TAB]

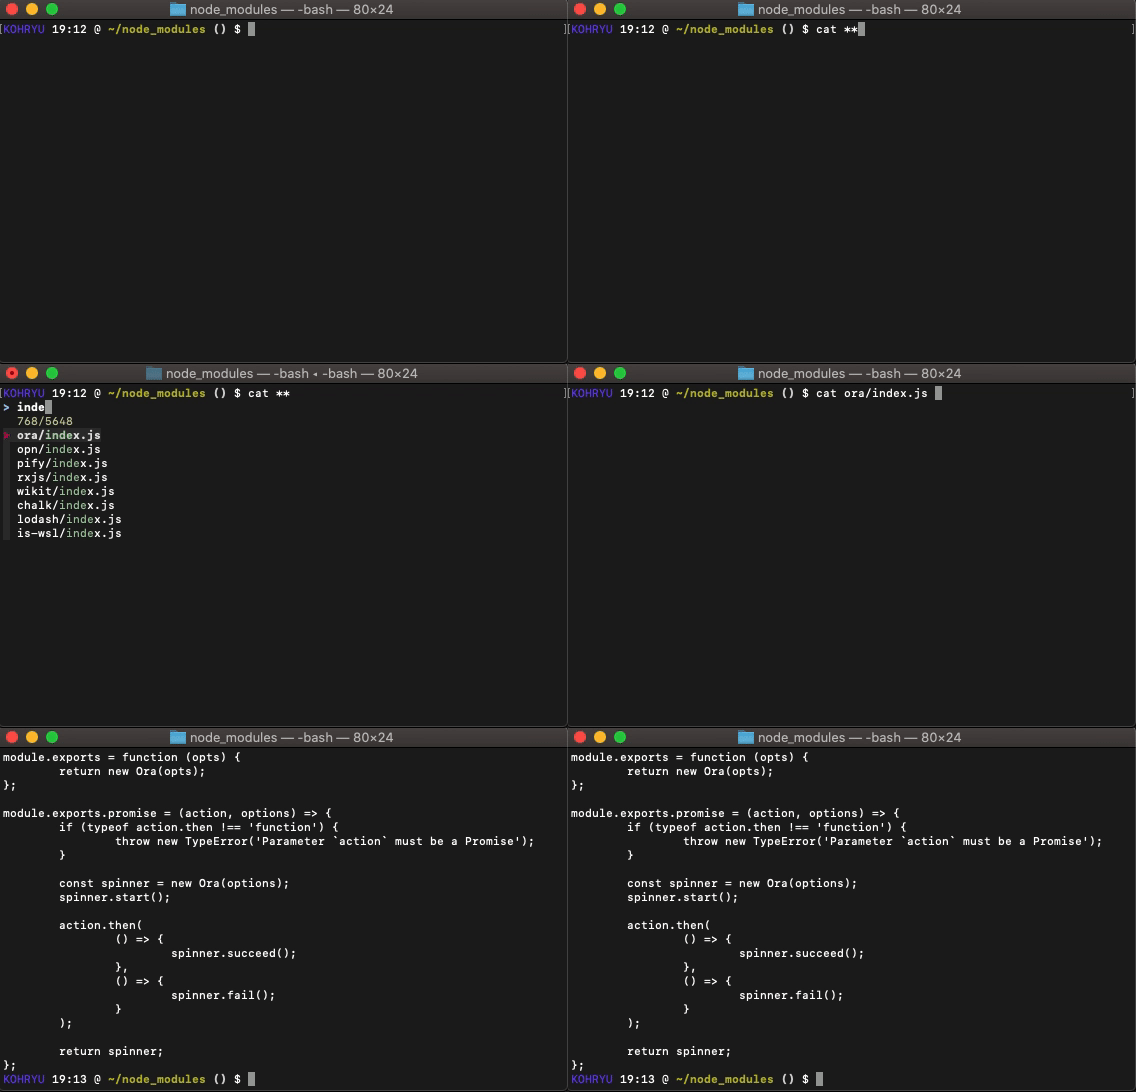
fzf will kick into gear and find all the possible entries that can work with the command:

Image for post
Similar to file finding an IDE.

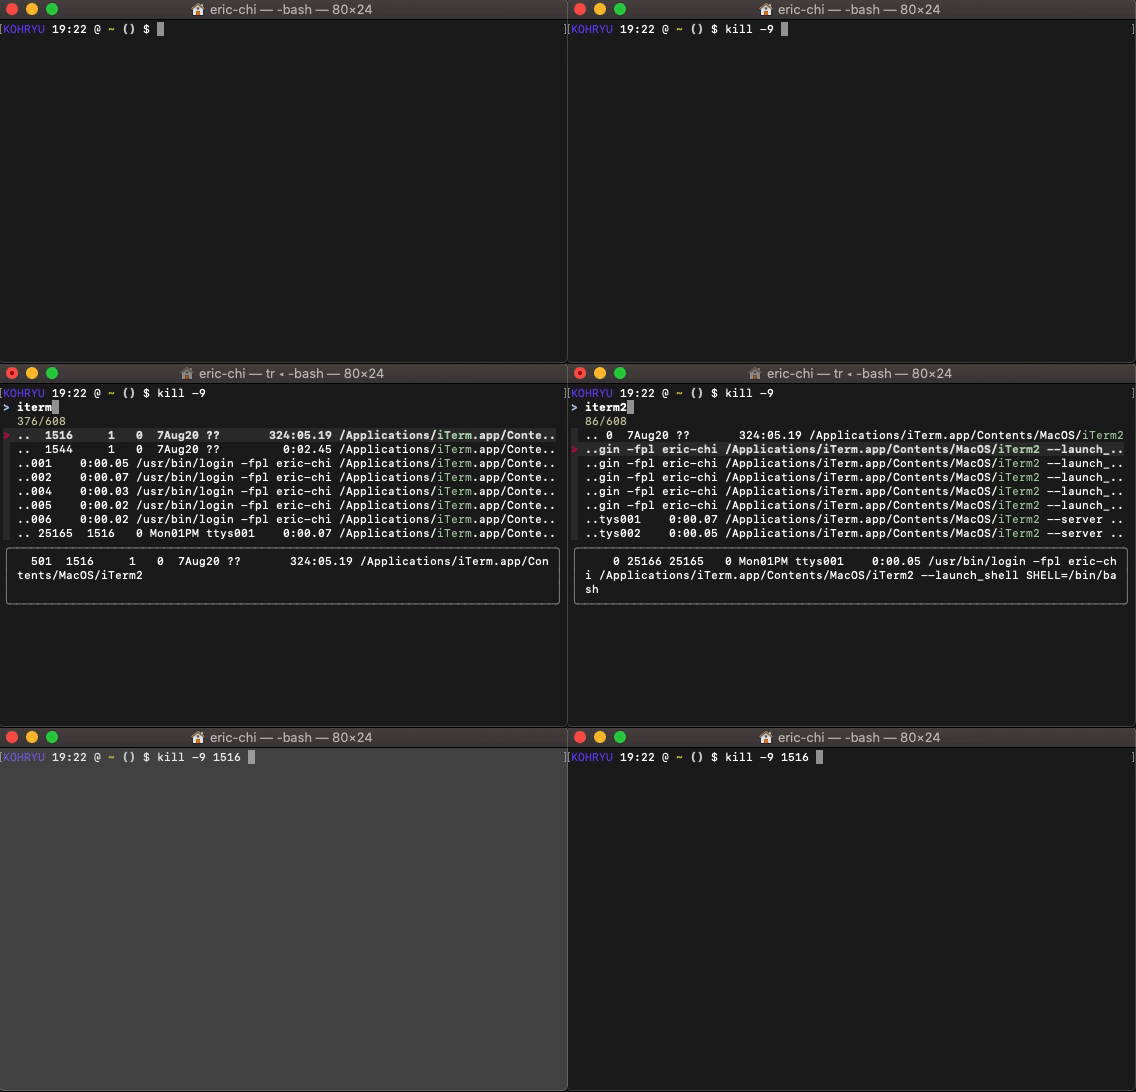
Another cool application of this is using it with the kill command. This is probably the one I use most. The days of typing ps -ef | grep [process-name] and then either manually typing or copying the process ID to kill are long gone. Instead, you can run kill [tab] or kill -9 [tab]. Fuzzy-find the process you want to kill and press enter. It will automatically fill the process ID in for you.

Image for post
Awesome use case.

There are tons of other use cases that I can go over, but these are the main ones I would like to point out.

4. trash-cli

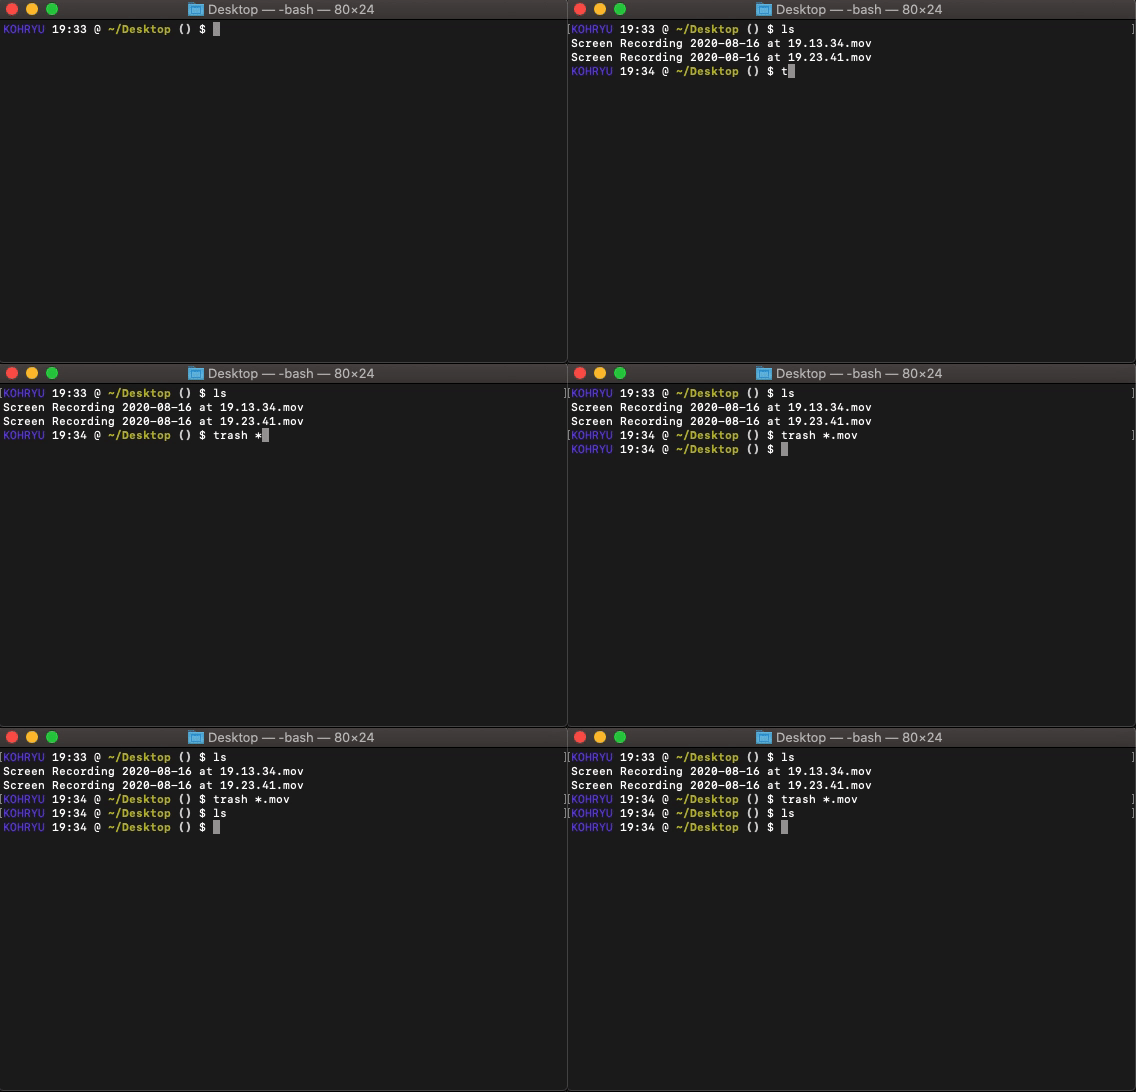
Ever rm -rf something and immediately realize that it wasn’t something you wanted to delete forever? I hope this isn't just me. If you don’t want to deal with that kind of anxiety, then I would recommend using trash-cli.

This tool basically just puts items inside your system’s trash instead of wiping it completely from existence.

Image for post
Moves files into the trash instead of oblivion.

Instead of typing out trash, I have an alias in my .bashrc that replaces the rm command:

alias rm=trash

Now when something is deleted using rm, you don’t have to worry about it being gone forever. You can simply retrieve it from the trash if you like. And yes, this works with different flags that rm provides.

5. speed-test

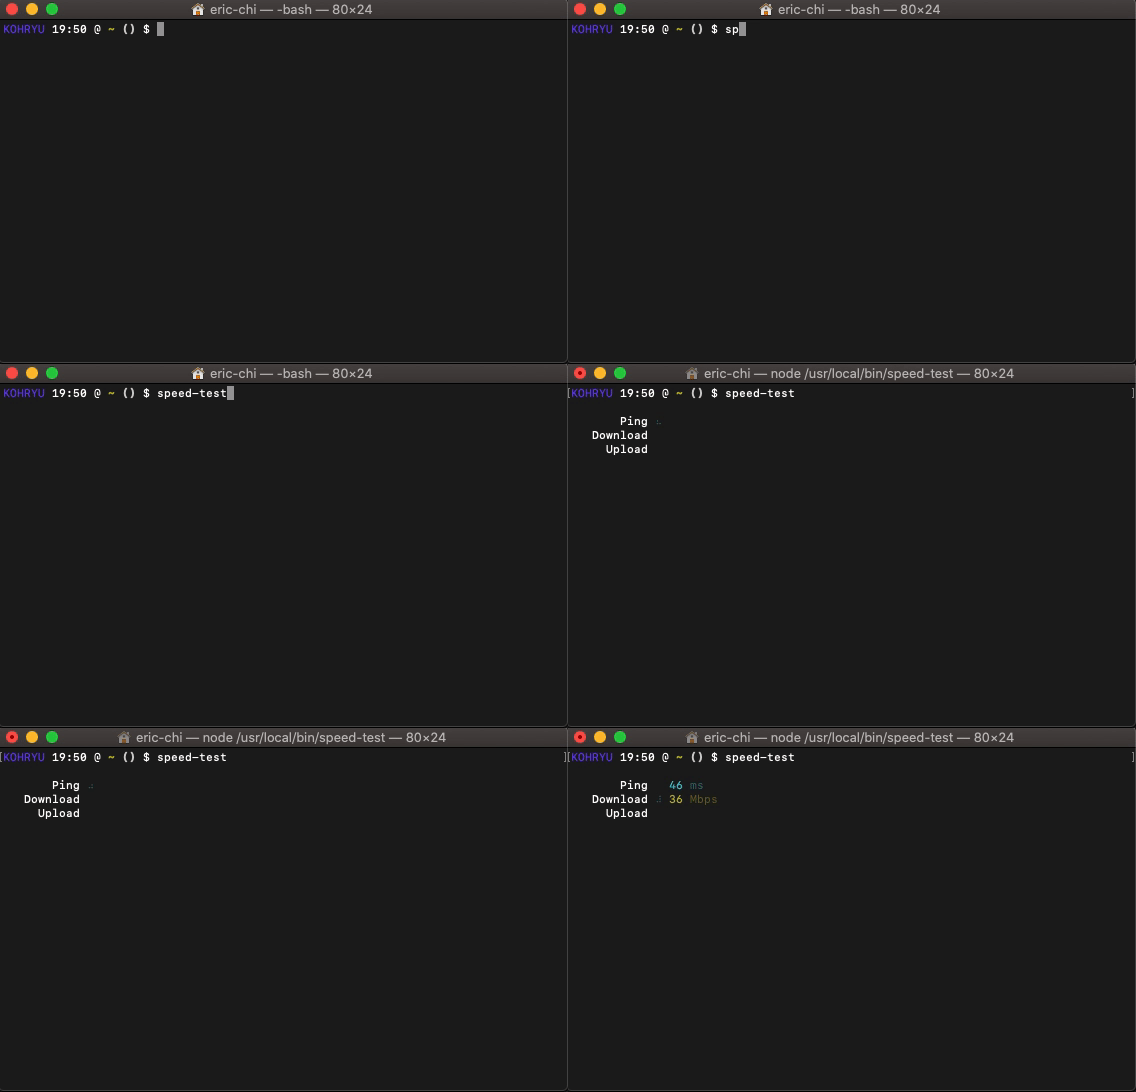
This one is pretty straightforward. If you want to see how fast your internet is without having to open up Chrome, speed-test is for you.

Image for post
I’m not showing you all my horrible speeds. You get the idea.

This is a tool I use quite frequently and always like to have in my back pocket just so that I don’t have to chew up additional resources from Chrome. Also, it’s pretty cool to do it in the terminal.

You’re going to need npm for this tool.

6. wikit

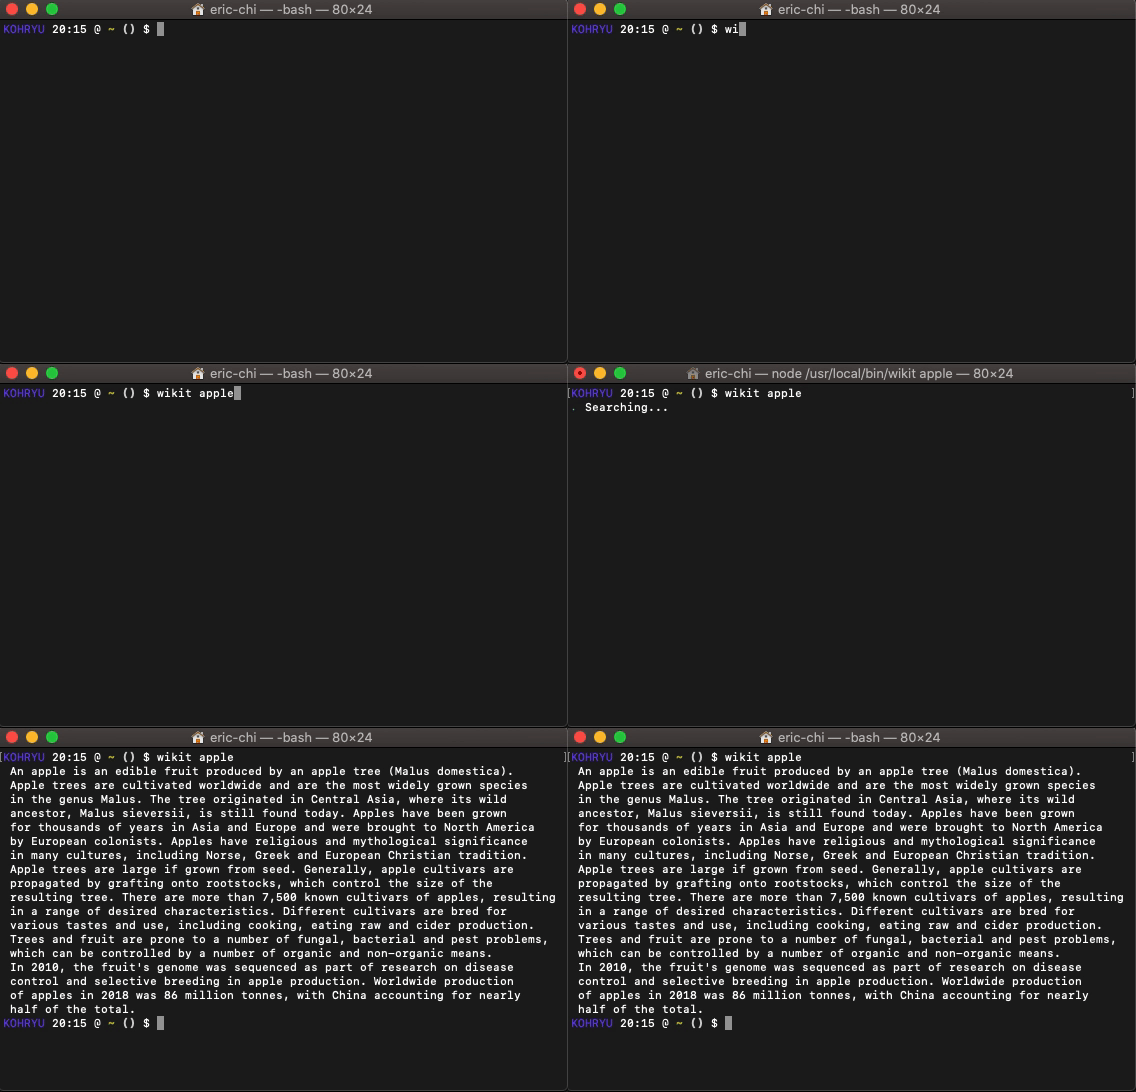
This one is a much smaller repo, and I love it. I have my terminal open all day via iTerm2, so being able to search Wikipedia is awesome. wikit allows you to do that from the terminal. You’d be surprised by how often I use this one on a day-to-day basis.

Image for post
“wikit apple company” if you want to search Apple.

You’re going to need npm for this tool.

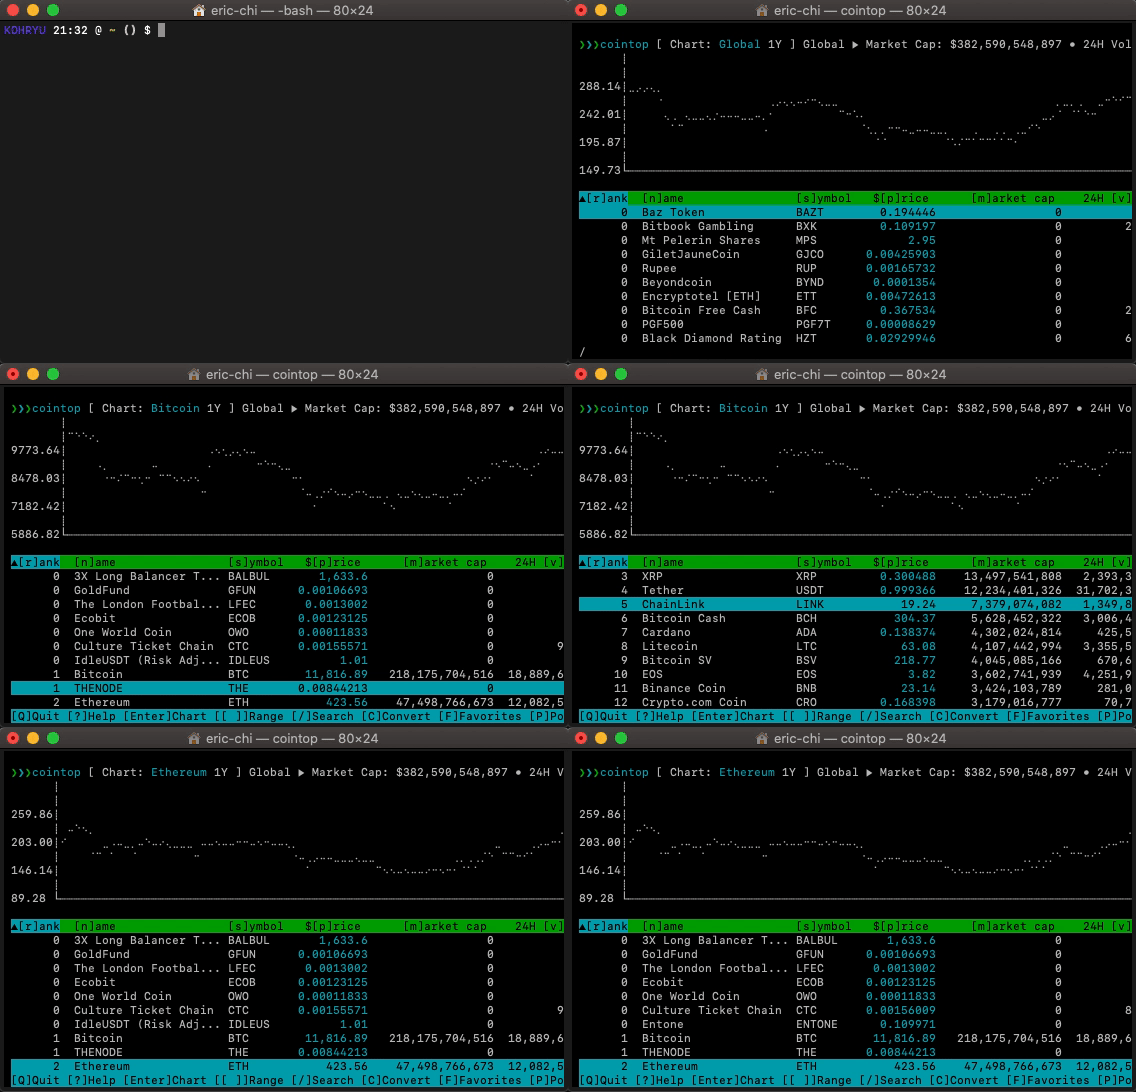
7. cointop

This last one might not be for everyone, but I use it every day. For those of you who are in the crypto world, then you probably already know about this tool.

I dabble in cryptocurrency here and there, and keeping up with so many different types of coins — let alone their prices — can be exhausting. With prices moving so quickly in the crypto world, cointop is a lifesaver.

cointop is a play on the top command. However, instead of displaying system information, cointop displays information about cryptocurrencies.

Image for post
stonks

Conclusion

There are so many more CLI tools that I use on a day-to-day basis, but these are the ones that stand out to me in my toolkit. I can go on forever about CLI tools. They are one of my favorite things to tinker with in the world of software. I always get excited whenever I find a new CLI tool that allows me to accomplish something so minuscule.

I also love the fact that most of these tools are community-driven — a bunch of developers just working on a small tool because they think they’re neat.

I’ll see you all in the next one!

Master Python Lambda Functions With These 4 Don’ts

Use lambdas, but don’t misuse them

Sep 25 · 3 min read
Narrow stairs leading to a beach on a sunny day.
Photo by Khachik Simonian on Unsplash.

Lambda functions are anonymous functions in Python. Using them is a handy technique in a local environment when you need to perform a small job. Some people simply refer to them as lambdas, and they have the following syntax:

lambda arguments: expression

The creation of a lambda function is signaled by the lambda keyword, followed by the list of arguments and a single expression separated by a colon. For instance, lambda x: 2 * x simply multiplies any input number by two, while lambda x, y: x+y simply calculates the sum of two numbers. The syntax is pretty straightforward, right?

With the assumption that you know what a lambda function is, this article is intended to provide some general guidelines on how to use lambda functions properly.

1. Don’t Return Any Value

Looking at the syntax, you may notice that we don’t return anything for the lambda function. It’s all because lambda functions can only contain a single expression. However, the use of the return keyword will constitute a statement that is incompatible with the required syntax, as shown below:

No return in lambda

This mistake probably arises due to the inability to differentiate expressions from statements. Statements like those involving return, try, with, and if perform particular actions. However, expressions are those that can be evaluated to a single value, such as a number or other Python objects.

With lambda functions, the single expression will evaluate a single value that is used subsequently, such as being sorted by the sorted function.

2. Don’t Forget About Better Alternatives

One of the most common use cases is to set a lambda function to the key argument of some built-in utility functions, such as sorted() and max(), as shown above. Depending on the situation, we can use other alternatives. Consider the following examples:

Use of built-in functions

In data science, many people use the pandas library to process data. We can use the lambda function to create new data from existing data using the map() function, as shown below. Instead of using a lambda function, we can simply use the arithmetic function directly because it’s supported in pandas:

Lambda function in series

3. Don’t Assign It to a Variable

I’ve seen some people mistakenly think that a lambda function is an alternative way to declare a simple function, and you may have seen people do the following:

Name lambda function

The only use of naming a lambda function is probably for teaching purposes to show that a lambda function is indeed a function just like other functions — to be called and having a type of function. Other than that, we shouldn’t assign a lambda function to a variable.

The problem with naming a lambda function is that it makes debugging less straightforward. Unlike other functions that are created using the regular def keyword, lambda functions don’t have names, which is why they’re sometimes referred to as anonymous functions. Consider the following trivial example to see this nuance:

Debugging of lambda functions
  • When your code has problems with a lambda function (i.e. inversive0), the Traceback error information can only tell you that a lambda function has bugs.
  • By contrast, with a regularly defined function, the Traceback will clearly inform you of the problematic function (i.e. inversive1).

Related to this, if you have the temptation to use a lambda function more than once, the best practice is to use a regular function using the def keyword, which will also allow you to have docstrings.

4. Don’t Forget About List Comprehension

Some people like to use lambda functions with higher-order functions, such as map or filter. Consider the following example for this usage:

The map and filter functions

Instead of using the lambda function, we can use list comprehension, which has better readability. As shown below, we use list comprehension to create the same list objects. As you can see, the previous usage of map and filter functions with lambda functions is more cumbersome compared to list comprehension. So you should consider using list comprehension when you’re creating lists involving higher-order functions.

List comprehension

Conclusion

In this article, we reviewed four common mistakes that someone may make with lambda functions. By avoiding these mistakes, you should be able to use lambda functions properly in your code.

The rule of thumb for using lambda functions is to keep it simple and use them just once locally.

Change The Way You Write Python Code With One Extra Character

one small syntax change, one giant step for your coding skills

May 23 · 3 min read
Image for post
Photo by Angelina Kichukova on Unsplash

The Syntax Language

Getting the ball rolling

Where Does the Astrix do?

Image for post
Photo by Ivana Cajina on Unsplash
The Power Of Unpacking

Don’t Break Someone Else’s Code

Image for post
Photo by Daniel Tafjord on Unsplash

Args, Kwargs

working code and breaking code

Sum Up

Data-Preprocessing with Python

Sep 29 · 6 min read

Making data understandable

Considering the fact that high-quality data leads to better predictions, data preprocessing has become a fundamental step in data science and machine learning. We’ll talk about the importance of processing data and discuss different approaches in sequence.

What is Data PreProcessing

It is a technique that transforms raw data into an understandable format. Real-world data(raw data) is always incomplete and that data cannot be sent through models as it would cause certain errors. That is why we need to preprocess data before sending it through a model.

Here are the steps I have followed;

  1. Import libraries
  2. Read the Dataset
  3. Split the dataset into independent and dependent
  4. Handling missing values
  5. Handling categorical values
  6. Standardization/ Feature Scaling

Step 1: Import Libraries

The first step is usually importing the libraries that will be needed in the program. A library is essentially a collection of modules that can be called and used. Here we will be using

Pandas: We use pandas for data manipulation and data analysis.
Numpy: It is a fundamental package for scientific computing with Python.

Step 2: Import the Dataset

Most of the dataset’s come in .csv(comma-separated value) format. It’s important to keep the dataset in the same folder as your program and read it using a method called read_csv which can be found in the library called pandas.

Step 3: Split the data into independent and dependent features

We will create a matrix of features in our dataset by creating an Independent variable(X) and a dependent variable (Y).To read the columns, we will use iloc of pandas which takes two parameters — [row selection, column selection].

: as a parameter, it selects all rows in the data. For columns, we have -1, which means all the columns will be selected except for the last one.

Image for post
Photo by Myriam Jessier on Unsplash

Step 4: Handling Missing Values

Sometimes we find some data is missing in the dataset. Missing values need to be handled carefully because they reduce the quality of any of our performance matrix and prediction. No model can handle these NULL or NaN values on its own so we need to deal with it. Firstly, we need to check whether we have null values in our dataset or not. We can do that using the isnull() method.

Handling the missing values is one of the greatest challenges faced by analysts because making the right decision on how to handle it generates robust data models. Let us look at different ways of imputing the missing values.

Deleting Rows

This is the most commonly used method. We either delete a row which has null values and a particular column if it has more than 60% of missing values. This method is only used when that column does not affect the model's prediction that is that feature has less significance or no significance for predicting the model.

Replacing With Mean/Median/Mode

This method can be applied to the features which consist of numerical data. We can calculate the mean, median, or mode of the feature and replace it with the missing values. This method gives better results compared to the removal of rows and columns.

Handling Categorical Data

Sometimes our data is in text form. We can find categories in text form. It gets complicated for machines to understand texts and process them since the models are based on mathematical equations and calculations. Therefore we need to encode the data into numbers.

To make this happen we import a library called LabelEncoder from scikit-learn which we will use for the task. We will create an object of that class. We will call our object labelencoder_X. fit_transform method in the LabelEncoder class will help us.

Now, the text has been replaced by numbers, what if there are more than two categories we keep assigning integers to different categories which lead to confusion. Suppose we have four categories and we assign the first category with 0 and the last category with 3. However, since 1 is greater than 0 and 3is greater than 1 the equations in the model we think 3 has the highest priority than 0. In order to resolve this problem, we use dummy variables where we will have n number of columns for n categories for that we make use of OneHotEncoder.

We will import another class called OneHotEncoder from scikit learn. we will create an object of that class and consider a parameter called categorical_features which takes a value of the index of the column and use fit_transform() for OneHotEncoding as well.

ColumnTransformer allows the input to be transformed separately and the features generated are concatenated to form a single space. It is useful for a heterogeneous data transformations

Feature Scaling

It is used to standardize the values of Independent variables. It is a method used to limit the range of variables so that they can be easily compared.

Why is it necessary?

Most of the machine learning models are based on Euclidean distances. The square difference with the lower value in comparison to the far greater value will almost be treated as if it does not exist. We do not want that to happen. That is why it is necessary to transform all our variables into the same scale.

Most of the Machine Learning models are based on Euclidean distances. Consider if the square root value of (x2-x1) is greater than (y2-y1), then (y2-y1) will be neglected. We don’t want this to happen. That is why it is necessary to transform all our variables into the same scale. There are two ways you can do this.

Normalization

With the help of Normalization, we scale the feature values in between 0.0 and 1.0

Image for post

Standardization

It scales features to have a mean of zero and a standard deviation one.

Image for post

we need to import StandardScaler from the scikit preprocessing library and create an object of that class.

It’s time to fit and transform our X_train set. When we apply Standard Scaler to our training and testing sets. We need to fit and transform only to the training set, In case of the test set, we need to transform, no need to fit it to the test set. This will transform all the values to a standardized scale.

Thank you for reading my article. I will be happy to hear your opinions. Follow me on Medium to get updated on my latest articles. You can also connect with me on Linkedin and Twitter. Check out my blogs on Machine Learning and Deep Learning.

Advanced Python: 9 Best Practices to Apply When You Define Classes

How to make your code more readable and maintainable

Aug 12 · 11 min read
Image for post
Photo by FERESHTEH AZADI on Unsplash

At its core, Python is an object-oriented programming (OOP) language. Being an OOP language, Python handles data and functionalities by supporting various features centered around objects. For instance, data structures are all objects, including primitive types (e.g., integers and strings) which aren’t considered objects in some other languages. For another instance, functions are all objects, and they are merely attributes of other objects where they are defined (e.g., class or module).

Although you can use built-in data types and write a bunch of functions without creating any custom classes, chances are that your code can become harder and harder to maintain when the project’s scope grows. These separate pieces have no shared themes, and there will be lots of hassles to manage connections between them, although much of the information is related.

In these scenarios, it’s worth defining your own classes, which will allow you to group related information and improve the structural design of your project. More importantly, the long-term maintainability of your codebase will be improved, because you’ll be dealing with less pieced code. However, there is a catch — this is only true when your class declaration is done in the right way such that the benefits of defining custom classes can outweigh the overhead of managing them.

In this article, I’d like to review nine important best practices that you should consider applying to your custom classes.

1. Good Names

When you’re defining your own class, you’re adding a new baby to your codebase. You should give the class a very good name. Although the only limit of your class name is the rules of a legal Python variable (e.g., can’t start with a number), there are preferred ways to give class names.

  • Use nouns that are easy to pronounce. It’s especially important if you work on a team project. During a group presentation, you probably don’t want to be the person to say, “in this case, we create an instance of the Zgnehst class.” In addition, being easy to pronounce also means the name shouldn’t be too long. I can barely think of cases when you need to use more than three words to define a class name. One word is best, two words are good, and three words are the limit.
  • Reflect its stored data and intended functionalities. It’s like in our real life — boys are given boy names. When we see boy names, we expect the kids are boys. It applies to class names too (or any other variables in general). The rule is simple — Don’t surprise people. If you’re dealing with the students’ information, the class should be named Student. KiddosAtCampus isn’t making the most common sense.
  • Follow naming conventions. We should use upper-case camel style for class names, like GoodName. The following is an incomplete list of unconventional class names: goodName, Good_Name, good_name, and GOodnAme. Following naming conventions is to make your intention clear. When people read your code, they can safely assume that an object with names like GoodName is a class.

There are also naming rules and conventions that apply to attributes and functions. In the below sections, I’ll briefly mention them where applicable, but the overall principles are the same. The only rule of thumb is simple: Don’t surprise people.

2. Explicit Instance Attributes

In most cases, we want to define our own instance initialization method (i.e., __init__). In this method, we set the initial state of our newly created instances of the class. However, Python doesn’t restrict where you can define instance attributes with custom classes. In other words, you can define additional instance attributes in later operations after the instance has been created. The following code shows you a possible scenario.

Initialization Method

As shown above, we can create an instance of the Student class by specifying a student’s first and last names. Later, when we call the instance method (i.e., verify_registration_status), the Student instance’s status attribute will be set. However, this isn’t the desired pattern, because if you spread various instance attributes throughout the entire class, you’re not making the class clear what data an instance object holds. Thus, the best practice is to place an instance’s attributes in the __init__ method, such that your code’s reader has a single place to get to know your class’s data structure, as shown below.

Better Initialization Method

For those instance attributes that you can’t set initially, you can set them with placeholder values, such as None. Although it’s of less concern, this change also helps prevent the possible error when you forget to call some instance methods to set the applicable instance attributes, causing AttributeError (‘Student’ object has no attribute ‘status_verified’).

In terms of the naming rules, the attributes should be named using lower cases and follow the snake case style, which means that if you use multiple words, connect them with underscores. Moreover, all the names should have meaningful indication regarding what data it holds (e.g., first_name is better than fn).

3. Use Properties — But Parsimoniously

Some people learn Python coding with an existing background of other OOP languages, such as Java, and they’re used to creating getters and setters for attributes of the instances. This pattern can be mimicked with the use of the property decorator in Python. The following code shows you the basic form of using the property decorator to implement getters and setters.

Property Decorator

Once this property is created, we can use it as regular attributes using the dot notation, although it’s implemented using functions under the hood.

Use Properties

As you may know, the advantages of using property implementations include verification of proper value settings (check a string is used, not an integer) and read-only access (by not implementing the setter method). However, you should use properties parsimoniously. It can be very distracting if your custom class looks like the below — there are too many properties!

Abuse of Properties

In most cases, these properties can be replaced with instance attributes, and thus we can access them and set them directly. Unless you have specific needs for the benefits of using properties as discussed (e.g., value verification), using attributes is preferred over creating properties in Python.

4. Define Meaningful String Representations

In Python, functions that have double underscores before and after the name are referred to as special or magic methods, and some people call them dunder methods. They have special usages for basic operations by the interpreter, including the __init__ method that we’ve covered previously. Two special methods, __repr__ and __str__, are essential for creating proper string representations of your custom class, which will give the code readers more intuitive information about your classes.

Between them, the major difference is that the __repr__ method defines the string, using which you can re-create the object by calling eval(repr(“the repr”)), while the __str__ method defines the string that is more descriptive and allows more customization. In other words, you can think that the string defined in the __repr__ method is to be viewed by developers while that used in the __str__ method is to be viewed by regular users. The following shows you an example.

Implementation of String Representations

Please note that in the __repr__ method’s implementation (Line 7), the f-string uses !r which will show these strings with quotation marks, because they’re necessary to construct the instance with strings properly formatted. Without the !r formatting, the string will be Student(John, Smith), which isn’t the correct way to construct a Student instance. Let’s see how these implementations show the strings for us. Specifically, the __repr__ method is called when you access the object in the interactive interpreter, while the __str__ method is called by default when you print the object.

String Representations

5. Instance, Class, and Static Methods

In a class, we can define three kinds of methods: instance, class, and static methods. You need to consider what methods you should use for the functionalities of concern. Here are some general guidelines.

If the methods are concerned with individual instance objects, for example, you need to access or update particular attributes of an instance, in which cases, you should use instance methods. These methods have a signature like this: def do_something(self):, in which the self argument refers to the instance object that calls the method. To know more about the self argument, you can refer to my previous article on this topic.

If the methods are not concerned with individual instance objects, you should consider using class or static methods. Both methods can be easily defined with applicable decorators: classmethod and staticmethod. The difference between these two is that class methods allow you to access or update attributes related to the class, while static methods are independent of any instance or the class itself. A common example of a class method is providing a convenience instantiation method, while a static method can be simply a utility function. The following code shows you some examples.

Different Kinds of Methods

In a similar fashion, you can also create class attributes. Unlike instance attributes that we discussed earlier, class attributes are shared by all instance objects, and they should reflect some characteristics independent of individual instance objects.

6. Encapsulation Using Private Attributes

When you write custom classes for your project, you need to take into account encapsulation, especially if you’re expecting that others will use your classes too. When the functionalities of the class grow, some functions or attributes are only relevant for data processing within the class. In other words, outside the class, these functions won’t be called and other users of your class won’t even care about the implementation details of these functions. In these scenarios, you should consider encapsulation.

One important way to apply encapsulation is to prefix attributes and functions with an underscore or two underscores, as a convention. The subtle difference is that those with an underscore are considered protected, while those with two underscores are considered private, which involves name-mangling after its creation. Differentiating these two categories is beyond the scope of the present article, and one of my previous articles have covered them.

In essence, by naming attributes and functions this way, you’re telling the IDEs (i.e., integrated development environment, such as PyCharm) that they’re not going to be accessed outside the class, although true private attributes don’t exist in Python. In other words, they’re still accessible if we choose so.

Encapsulation

The above code shows you a trivial example of encapsulation. For a student, we may be interested in knowing their average GPA, and we can get the point using the get_mean_gpa method. The user doesn’t need to know how the mean GPA is calculated, such that we can make related methods protected by placing an underscore prefixing the function names.

The key takeaway for this best practice is that you expose only the minimal number of public APIs that are relevant for the users to use your code. For those that are used only internally, make them protected or private methods.

7. Separate Concerns and Decoupling

With the development of your project, you find out that you’re dealing with more data, your class can become cumbersome if you’re sticking to one single class. Let’s continue with the example of the Student class. Suppose that students have lunch at school, and each of them has a dining account that they can use to pay for meals. Theoretically, we can deal with account-related data and functionalities within the Student class, as shown below.

Mixed Functionalities

The above code shows you some pseudocode on checking account balance and loading money to the account, both of which are implemented in the Student class. Imagine that there are more operations that can be related to the account, such as suspending a lost card, consolidating accounts — to implement all of them will make the Student class larger and larger, which make it gradually more difficult to maintain. Instead, you should isolate these responsibilities and make your Student class irresponsible for these account-related functionalities — a design pattern termed as decoupling.

Separated Concerns

The above code shows you how we can design the data structures with an additional Account class. As you can see, we move all account-related operations into the Account class. To retrieve the account information for the student, the Student class will handle the functionality by retrieving information from the Account class. If we want to implement more functions related to the class, we can simply update the Account class only.

The main takeaway for the design pattern is that you want your individual classes to have separate concerns. By having these responsibilities separated, your classes become smaller, which makes future changes easier, because you’ll be dealing with smaller code components.

8. Consider __slots__ For Optimization

If your class is used mostly as data containers for storing data only, you can consider using __slots__ to optimize the performance of your class. It doesn’t only increase the speed of attribute accessing but also saves memory, which can be a big benefit if you need to create thousands or many more instance objects. The reason is that for a regular class, instance attributes are stored through an internally managed dictionary. By contrast, with the use of the __slots__, instance attributes will be stored using array-related data structures implemented using C under the hood, and their performance is optimized with much higher efficiency.

Use of __slots__ in Class Definition

The above code shows you a trivial example of how we implement the __slots__ in a class. Specifically, you list all the attributes as a sequence, which will create a one-to-one match in data storage for faster access and less memory consumption. As just mentioned, regular classes use a dictionary for attribute accessing but not for those with __slots__ implemented. The following code shows you such a fact.

No __dict__ in Classes With __slots__

A detailed discussion of using __slots__ can be found in a nice answer on Stack Overflow, and you can find more information from the official documentation. Regarding the gained benefits of faster access and saved memory, a recent Medium article has a very good demonstration, and I’m not going to expand on this. However, one thing to note is that using __slots__ will have a side effect — it prevents you from dynamically creating additional attributes. Some people propose it as a mechanism for controlling what attributes your class has, but it’s not how it was designed.

9. Documentation

Last, but not least, we have to talk about documentation of your class. Most importantly, we need to understand that writing documents isn’t replacing any code. Writing tons of documents doesn’t improve your code’s performance, and it doesn’t necessarily make your code more readable. If you have to rely on docstrings to clarify your code, it’s very likely that your code has problems. I truly believe that your code should speak all by itself. The following code just shows you a mistake that some programmers can make — using unnecessary comments to compensate for bad code (i.e., meaningless variable names in this case). By contrast, some good code with good names doesn’t even need comments.

Bad Comment Examples

I’m not saying that I’m against writing comments and docstrings, but it really depends on your use cases. If your code is used by more than one person or more than one occasion (e.g., you’re the only one accessing the code but for multiple times), you should consider writing some good comments. They can help yourself or your teammates read your code, but no one should assume that your code does exactly what’s said in the comments. In other words, writing good code is always the top priority that you need to keep in mind.

If particular portions of your code are to be used by end users, you want to write docstrings, because those people aren’t familiar with the relevant codebase. All they want to know is how to use the pertinent APIs, and the docstrings will form the basis for the help menu. Thus, it’s your responsibility as the programmer to make sure that you provide clear instructions on how to use your programs.

Conclusions

In this article, we reviewed important factors that you need to consider when you define your own classes. If you’re new to Python or programming in general, you may not fully understand every aspect that we’ve discussed, which is OK. The more you code, the more you’ll find the importance of having these principles in mind before you define your classes. Practice these guidelines continuously when you work with classes because a good design will save much of your development time later.

Tutorial: Stop Running Jupyter Notebooks from your Command Line

Run your Jupyter Notebook as a stand alone web app

Image for post
Photo taken by Justin Jairam from @jusspreme (with permission)

Jupyter Notebook provides a great platform to produce human-readable documents containing code, equations, analysis, and their descriptions. Some even consider it a powerful development when combining it with NBDev. For such an integral tool, the out of the box start up is not the best. Each use requires starting the Jupyter web application from the command line and entering your token or password. The entire web application relies on that terminal window being open. Some might “daemonize” the process and then use nohup to detach it from their terminal, but that’s not the most elegant and maintainable solution.

Lucky for us, Jupyter has already come up with a solution to this problem by coming out with an extension of Jupyter Notebooks that runs as a sustainable web application and has built-in user authentication. To add a cherry on top, it can be managed and sustained through Docker allowing for isolated development environments.

By the end of this post we will leverage the power of JupyterHub to access a Jupyter Notebook instance which can be accessed without a terminal, from multiple devices within your network, and a more user friendly authentication method.

Prerequisites

A basic knowledge of Docker and the command line would be beneficial in setting this up.

I recommend doing this on the most powerful device you have and one that is turned on for most of the day, preferably all day. One of the benefits of this setup is that you will be able to use Jupyter Notebook from any device on your network, but have all the computation happen on the device we configure.

What is Jupyter Hub

JupyterHub brings the power of notebooks to groups of users. The idea behind JupyterHub was to scale out the use of Jupyter Notebooks to enterprises, classrooms, and large groups of users. Jupyter Notebook, however, is supposed to run as a local instance, on a single node, by a single developer. Unfortunately, there was no middle ground to have the usability and scalability of JupyterHub and the simplicity of running a local Jupyter Notebook. That is, until now.

JupyterHub has pre-built Docker images that we can utilize to spawn a single notebook on a whim, with little to no overhead in technical complexity. We are going to use the combination of Docker and JupyterHub to access Jupyter Notebooks from anytime, anywhere, at the same URL.

Architecture

The architecture of our JupyterHub server will consist of 2 services: JupyterHub and JupyterLab. JupyterHub will be the entry point and will spawn JupyterLab instances for any user. Each of these services will exist as a Docker container on the host.

Image for post
JupyterLab Architecture Diagram (Image by Author)

Building the Docker Images

To build our at-home JupyterHub server we will use the pre-built Docker images of JupyterHub & JupyterLab.

Dockerfiles

The JupyterHub Docker image is simple.

FROM jupyterhub/jupyterhub:1.2# Copy the JupyterHub configuration in the container
COPY jupyterhub_config.py .
# Download script to automatically stop idle single-user servers
COPY cull_idle_servers.py .
# Install dependencies (for advanced authentication and spawning)
RUN pip install dockerspawner

We use the pre-built JupyterHub Docker Image and add our own configuration file to stop idle servers, cull_idle_servers.py. Lastly, we install additional packages to spawn JupyterLab instances via Docker.

Docker Compose

To bring everything together, let’s create a docker-compose.yml file to define our deployments and configuration.

version: '3'services:
# Configuration for Hub+Proxy
jupyterhub:
build: . # Build the container from this folder.
container_name: jupyterhub_hub # The service will use this container name.
volumes: # Give access to Docker socket.
- /var/run/docker.sock:/var/run/docker.sock
- jupyterhub_data:/srv/jupyterlab
environment: # Env variables passed to the Hub process.
DOCKER_JUPYTER_IMAGE: jupyter/tensorflow-notebook
DOCKER_NETWORK_NAME: ${COMPOSE_PROJECT_NAME}_default
HUB_IP: jupyterhub_hub
ports:
- 8000:8000
restart: unless-stopped
# Configuration for the single-user servers
jupyterlab:
image: jupyter/tensorflow-notebook
command: echo
volumes:
jupyterhub_data:

The key environment variables to note are DOCKER_JUPYTER_IMAGE and DOCKER_NETWORK_NAME. JupyterHub will create Jupyter Notebooks with the images defined in the environment variable.For more information on selecting Jupyter images you can visit the following Jupyter documentation.

DOCKER_NETWORK_NAME is the name of the Docker network used by the services. This network gets an automatic name from Docker Compose, but the Hub needs to know this name to connect the Jupyter Notebook servers to it. To control the network name we use a little hack: we pass an environment variable COMPOSE_PROJECT_NAME to Docker Compose, and the network name is obtained by appending _default to it.

Create a file called .env in the same directory as the docker-compose.yml file and add the following contents:

COMPOSE_PROJECT_NAME=jupyter_hub

Stopping Idle Servers

Since this is our home setup, we want to be able to stop idle instances to preserve memory on our machine. JupyterHub has services that can run along side it and one of them being jupyterhub-idle-culler. This service stops any instances that are idle for a prolonged duration.

To add this servive, create a new file called cull_idle_servers.py and copy the contents of jupyterhub-idle-culler project into it.

Ensure `cull_idle_servers.py` is in the same folder as the Dockerfile.

To find out more about JupyterHub services, check out their official documentation on them.

Jupyterhub Config

To finish off, we need to define configuration options such, volume mounts, Docker images, services, authentication, etc. for our JupyterHub instance.

Below is a simple jupyterhub_config.py configuration file I use.

import os
import sys
c.JupyterHub.spawner_class = 'dockerspawner.DockerSpawner'
c.DockerSpawner.image = os.environ['DOCKER_JUPYTER_IMAGE']
c.DockerSpawner.network_name = os.environ['DOCKER_NETWORK_NAME']
c.JupyterHub.hub_connect_ip = os.environ['HUB_IP']
c.JupyterHub.hub_ip = "0.0.0.0" # Makes it accessible from anywhere on your network
c.JupyterHub.admin_access = Truec.JupyterHub.services = [
{
'name': 'cull_idle',
'admin': True,
'command': [sys.executable, 'cull_idle_servers.py', '--timeout=42000']
},
]
c.Spawner.default_url = '/lab'notebook_dir = os.environ.get('DOCKER_NOTEBOOK_DIR') or '/home/jovyan/work'
c.DockerSpawner.notebook_dir = notebook_dir
c.DockerSpawner.volumes = {
'/home/sidhu': '/home/jovyan/work'
}

Take note of the following configuration options:

  • 'command': [sys.executable, 'cull_idle_servers.py', '--timeout=42000'] : Timeout is the number of seconds until an idle Jupyter instance is shut down.
  • c.Spawner.default_url = '/lab': Uses Jupyterlab instead of Jupyter Notebook. Comment out this line to use Jupyter Notebook.
  • '/home/sidhu': '/home/jovyan/work': I mounted my home directory to the JupyterLab home directory to have access to any projects and notebooks I have on my Desktop. This also allows us to achieve persistence in the case we create new notebooks, they are saved to our local machine and will not get deleted if our Jupyter Notebook Docker container is deleted.

Remove this line if you do not wish to mount your home directory and do not forget to change sidhu to your user name.

Start the Server

To start the server, simply run docker-compose up -d, navigate to localhost:8000 in your browser and you should be able to see the JupyterHub landing page.

Image for post
JupyterHub Landing Page Screenshot (Image by Author)

To access it on other devices on your network such asva laptop, an iPad, etc, identify the IP of the host machine by running ifconfig on Unix machines & ipconfig on Windows.

Image for post
Ipconfig (Image by Author)

From your other device, navigate to the IP you found on port 8000: http://IP:8000 and you should see the JupyterHub landing page!

Authenticating

That leaves us with the last task of authenticating to the server. Since we did not set up a LDAP server or OAuth, JupyterHub will use PAM (Pluggable Authentication Module) authentication to authenticate users. This means JupyterHub uses the user name and passwords of the host machine to authenticate.

To make use of this, we will have to create a user on the JupyterHub Docker container. There are other ways of doing this such as having a script placed on the container and executed at container start up but we will do it manually as an exercise. If you tear down or rebuild the container you will have to recreate users.

I do not recommend hard coding user credentials into any script or Dockerfile.

1) Find the JupyterLab container ID: docker ps -a

Image for post
JupyterLab Container ID (Image by Author)

2) “SSH” into the container: docker exec -it $YOUR_CONTAINER_ID bash

3) Create a user and follow the terminal prompts to create a password: useradd $YOUR_USERNAME

4) Sign in with the credentials and you’re all set!

You now have a ready to go Jupyter Notebook server that can be accessed from any device, in the palm of your hands! Happy Coding!

Feedback

I welcome any and all feedback about any of my posts and tutorials. You can message me on twitter or e-mail me at sidhuashton@gmail.com.

7 Python Tricks You Should Know

Impress your friends with these useful tips and tricks

Image for post
Photo by Michael Dziedzic on Unsplash

There’s a treasure trove of useful Python tips and tricks online. Here are some fun, cool tricks you can use to beef up your Python game and impress your friends at the same time — kill two birds with one stone.

Without further ado, let’s jump right into it.

1. Download YouTube Videos With YouTube-Dl

You can easily download YouTube videos (and videos from many other websites) using the youtube-dl module in Python.

First, let’s install the module using pip:

pip install youtube-dl

Once installed, you can download videos directly from terminal or command prompt by using the following one-line command:

youtube-dl <Your video link here>

Alternatively, since youtube-dl has bindings for Python, you can create a Python script to do the same thing programmatically.

You can create a list with all the links and download the videos using the quick-and-dirty script below.

Sample code to create a list with all the links and download the videos using the youtube-dl module
Image by Author

With this module, you can not only easily download videos, but entire playlists, metadata, thumbnails, subtitles, annotations, descriptions, audio, and much more.

The easiest way to achieve this is by adding a bunch of these parameters to a dictionary and passing it to the YoutubeDL object constructor.

In the code below I created a dictionary, ydl_options, with some parameters, and passed it on to the constructor:

Sample code to use youtube-dl with a number of parameters passed as options
Image by Author
1. 'format':'bestvideo+bestaudio' #Dowloads the video in the best available video and audio format.2. 'writethumbnail':'writethumbnail' #Downloads the thumbnail image of the video.3. 'writesubtitles':'writesubtitles' #Downloads the subtitles, if any.4. 'writedescription':'writedescription' #Writes the video description to a .description file.

Note: You can do everything directly within the terminal or a command prompt, but using a Python script is better due to the flexibility/reusability it offers.

You can find more details about the module here: Github:youtube-dl.

2. Debug Your Code With Pdb

Python has its own in-built debugger called pdb. A debugger is an extremely useful tool that helps programmers to inspect variables and program execution, line by line. A debugger means programmers don’t have to pull their hair out trying to find pesky issues in their code.

The good thing about pdb is that it is included with the standard Python library. As a result, this beauty can be used on any machine where Python is installed. This comes in handy in environments with restrictions on installing any add-on on top of the vanilla Python installation.

There are several ways to invoke the pdb debugger:

In-line breakpoint
pdb.set_trace()
In Python 3.7 and later
breakpoint()
pdb.py can also be invoked as a script to debug other scripts
python3 -m pdb myscript.py

Here’s a sample code on Python 3.8 that invokes pdb using the breakpoint() function:

Image for post
Image from Author

Here are some of the most useful commands to aid you in your debugging adventure:

  • n: To continue execution until the next line in the current function is reached or it returns.
  • l: list code
  • j <line>: jump to a line
  • b <line>: set breakpoint()
  • c: continue until breakpoint
  • q: quit

Note: Once you are in pdb, n, l, b, c, and q become reserved keywords. The last one will quit pdb if you have a variable named q in your code.

You can find more details about this here: pdb — The Python Debugger

3. Make Your Python Code Into an Executable File Using PyInstaller

Not a lot of people know this, but you can convert your Python scripts into standalone executables. The biggest benefit to this is that your Python scripts/applications can then work on machines where Python (and any necessary third-party packages) are not installed.

PyInstaller works on pretty much all the major platforms, including Windows, GNU/Linux, Mac OS X, FreeBSD, Solaris and AIX.

To install it, use the following command in pip:

pip install pyinstaller

Then, go to the directory where your program is located and run:

pyinstaller myscript.py

This will generate the executable and place it in a subdirectory called dist.

PyInstaller provides many options for customization:

pyinstaller --onefile --icon [icon file] [script file]# Using the --onefile option bundles everything in a single executable file instead of having a bunch of other files. 
# Using the --icon option adds a custom icon (.ico file) for the executable file

Pyinstaller is compatible with most of the third-party packages — Django, NumPy, Matplotlib, SQLAlchemy, Pandas, Selenium, and many more.

To learn about all the features and the myriad of options Pyinstaller provides, visit its page on Github: Pyinstaller.

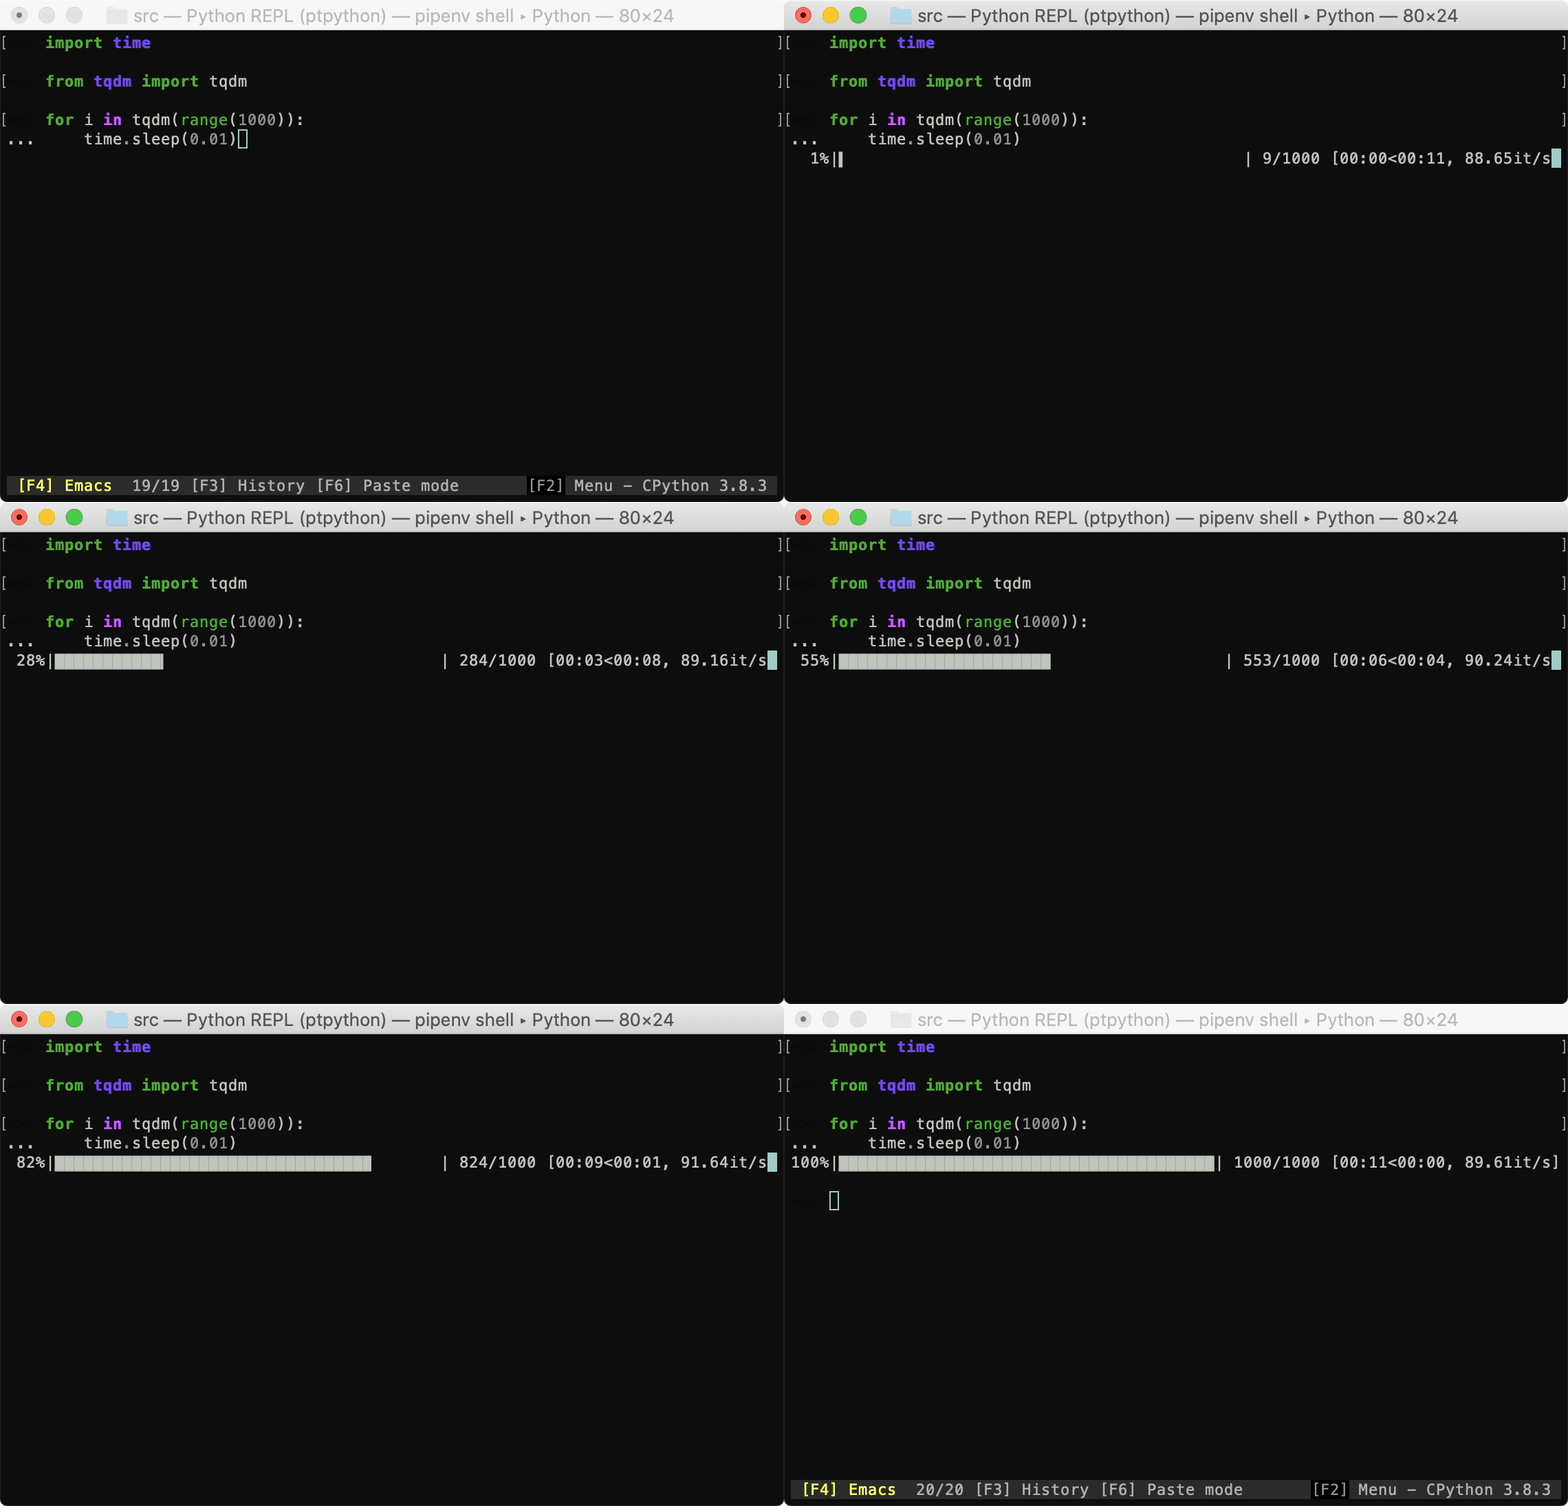
4. Make a Progress Bar With Tqdm

The TQDM library will let you create fast, extensible progress bars for Python and CLI.

You’d need to first install the module using pip:

pip install tqdm

With a few lines of code, you can add smart progress bars to your Python scripts.

tqdm working directly inside Terminal
GIF by Author

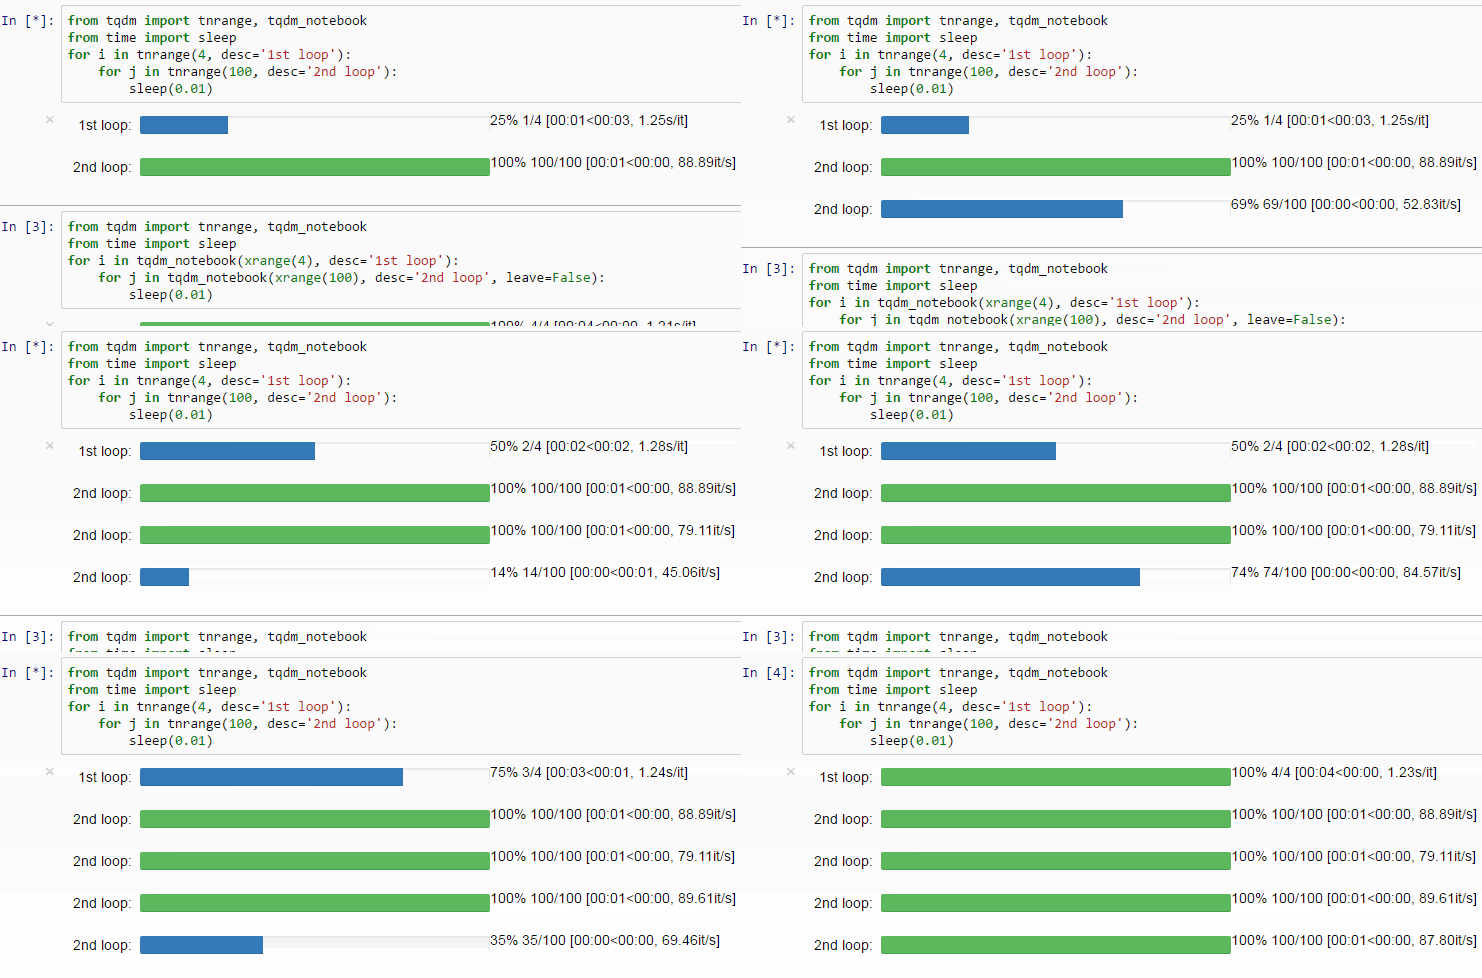
TQDM works on all major platforms like Linux, Windows, Mac, FreeBSD, NetBSD, Solaris/SunOS. Not only that, but it also integrates seamlessly with any console, GUI, and IPython/Jupyter notebooks.

tqdm working in Jupiter notebooks
GIF from TQDM

To get more details on all the tricks tqdm has up its sleeve, visit its official page here: tqdm.

5. Add Color to Your Console Output With Colorama

Colorama is a nifty little cross-platform module that adds color to the console output. Let’s install it using pip:

pip install colorama

Colorama provides the following formatting constants:

Fore: BLACK, RED, GREEN, YELLOW, BLUE, MAGENTA, CYAN, WHITE, RESET.
Back: BLACK, RED, GREEN, YELLOW, BLUE, MAGENTA, CYAN, WHITE, RESET.
Style: DIM, NORMAL, BRIGHT, RESET_ALL

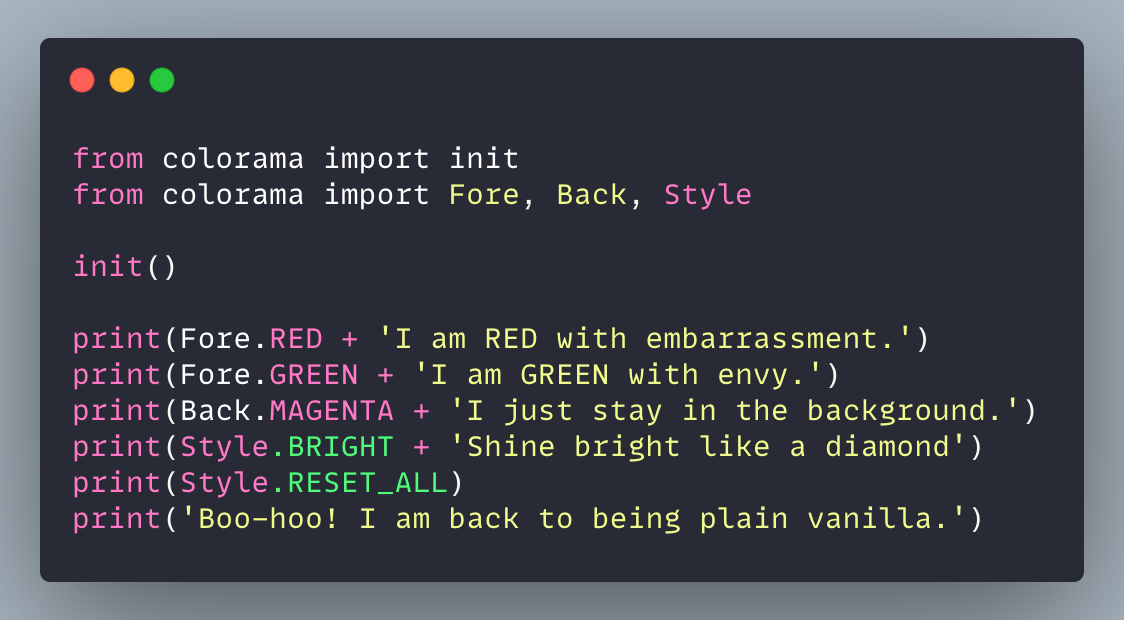
Here’s a sample code to use Colorama:

Sample code to color the console output using Colorama
Image by Author

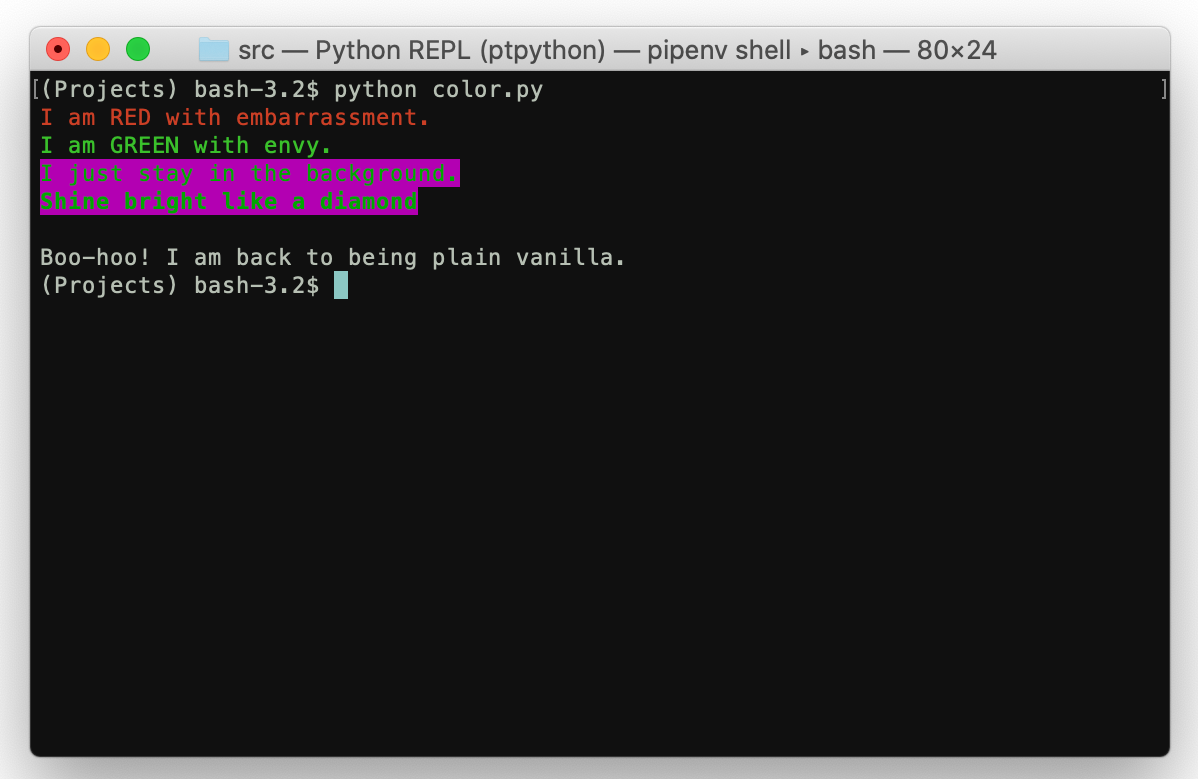
The code above yields the following output:

Image for post
Image by Author

Style.RESET_ALL explicitly resets the foreground, background, and brightness — although, Colorama also performs this reset automatically on program exit.

Colorama has other features that you can find here: Colorama Website.

6. Pretty Print 2D Lists Using Tabulate

Often, dealing with tabular output in Python is a pain. That’s when tabulate comes to the rescue. It can transform your output from “The output looks like hieroglyphs to me?” to “Wow, that looks pretty!”. Well, maybe that last part is a slight exaggeration, but it will improve the readability of your output.

First, install it using pip:

pip install tabulate

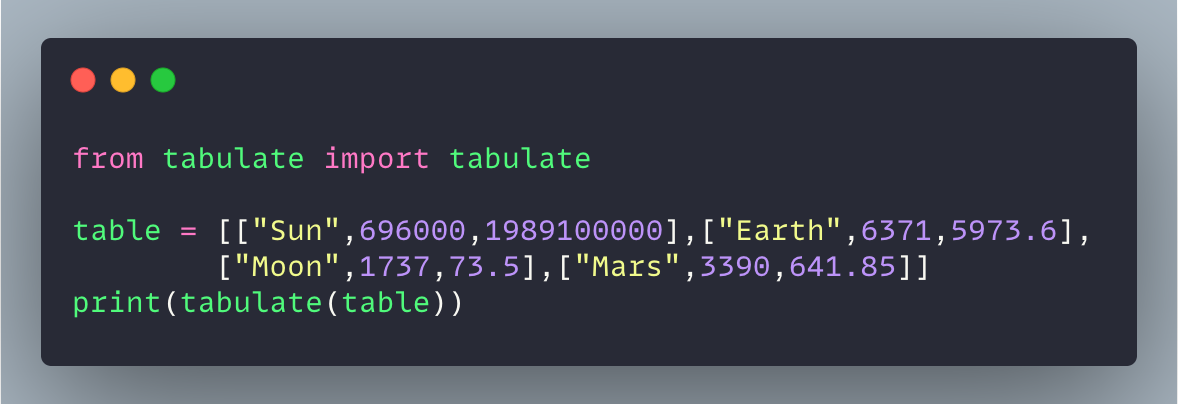
Here’s a simple snippet to print a 2D list as a table using tabulate:

Image for post
Image by Author

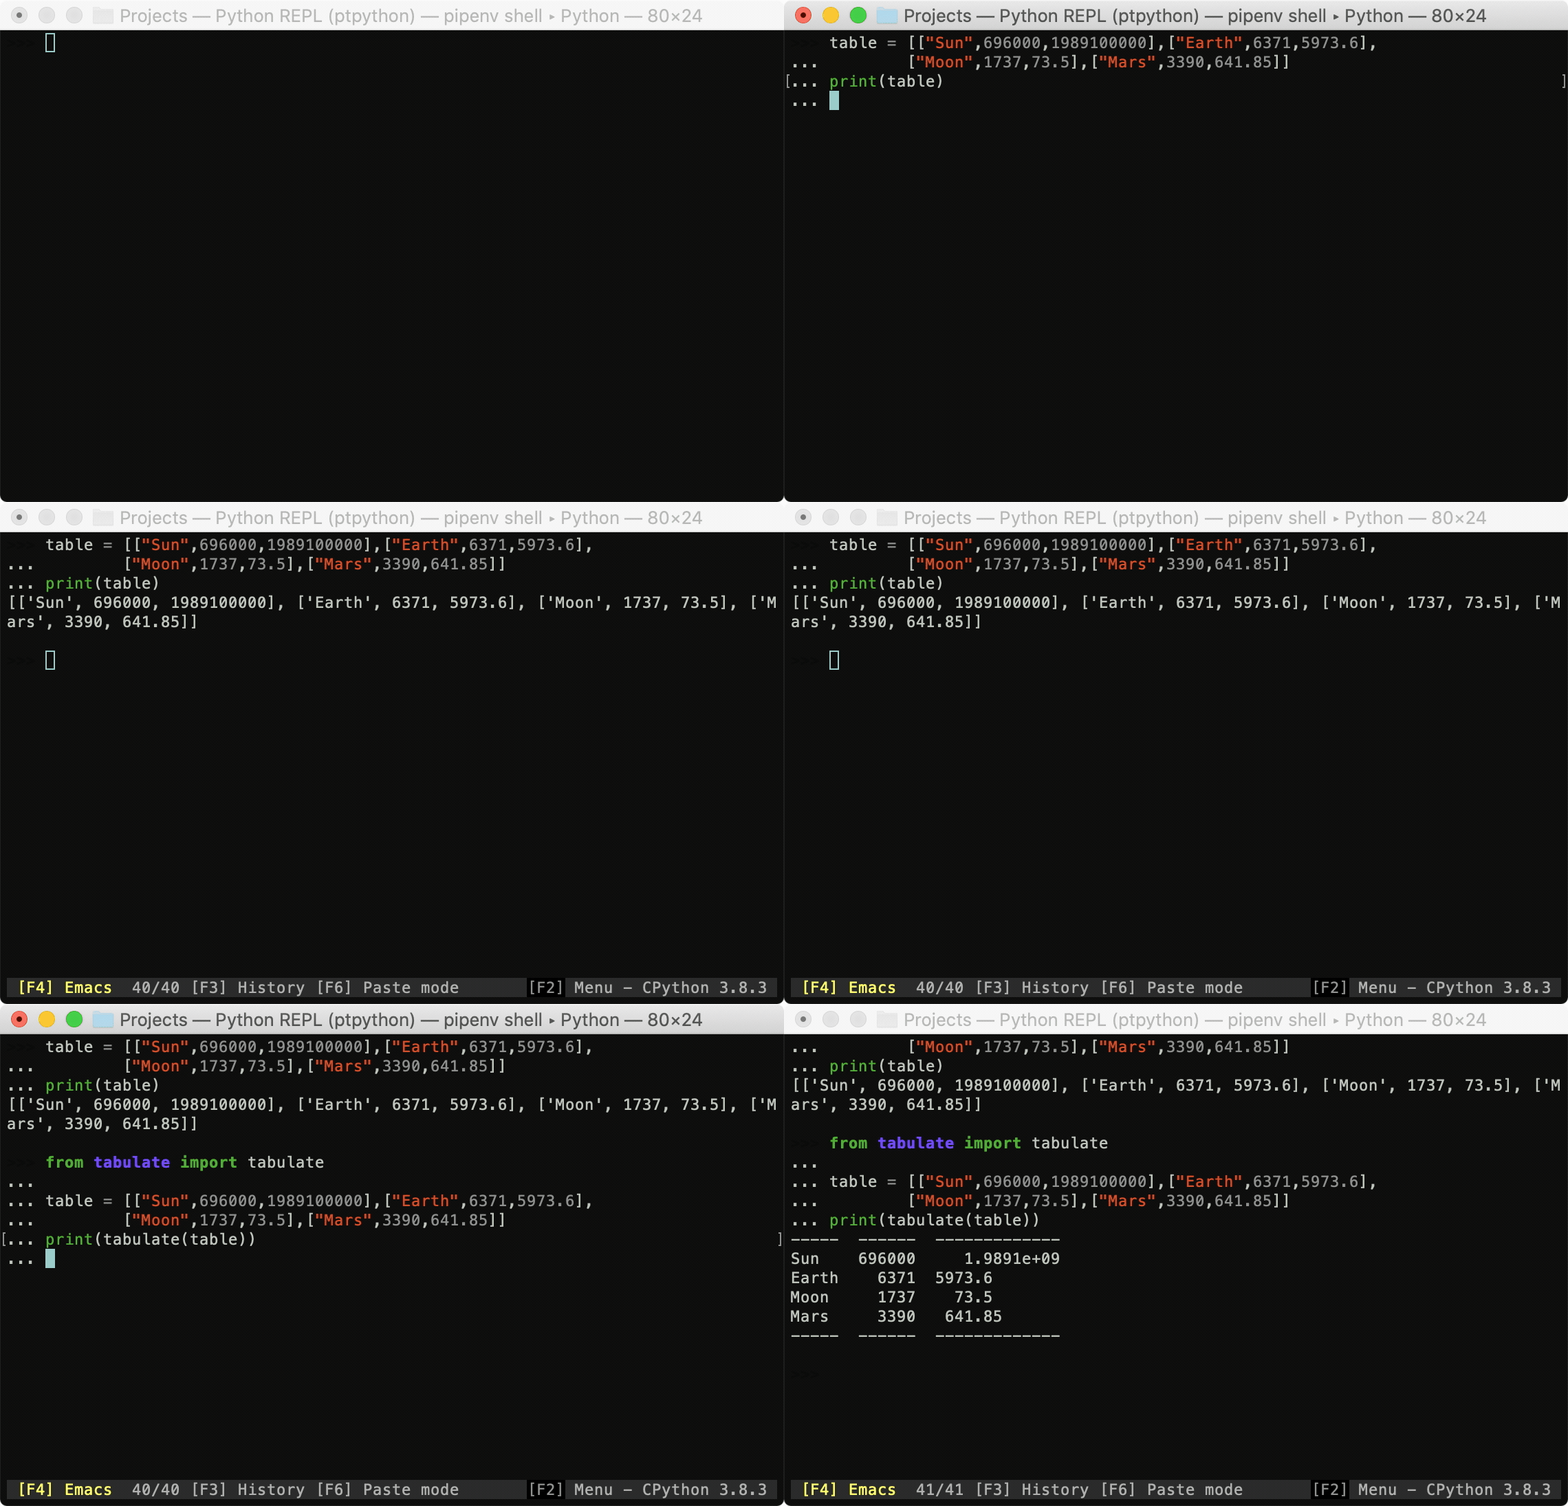
The GIF below shows how the output of the code above looks with and without tabulate. No prizes for guessing which of the two outputs is more readable!

Image for post
GIF by Author

Tabulate supports the following data types:

1. list of lists or another iterable of iterables
2.
list or another iterable of dicts (keys as columns)
3. dict of iterables (keys as columns)
4. two-dimensional NumPy array
5. NumPy record arrays (names as columns)
6. pandas.DataFrame
Source: https://pypi.org/project/tabulate/

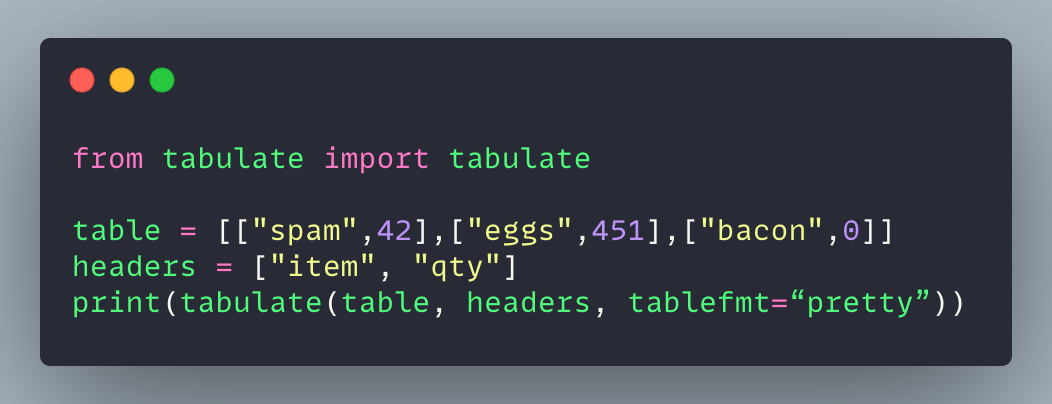
Here’s an example that works on a dictionary:

Image for post
Image by Author

This pretty-prints the dictionary:

+-------+-----+
| item | qty |
+-------+-----+
| spam | 42 |
| eggs | 451 |
| bacon | 0 |
+-------+-----+

You can find more details about the library here: tabulate.

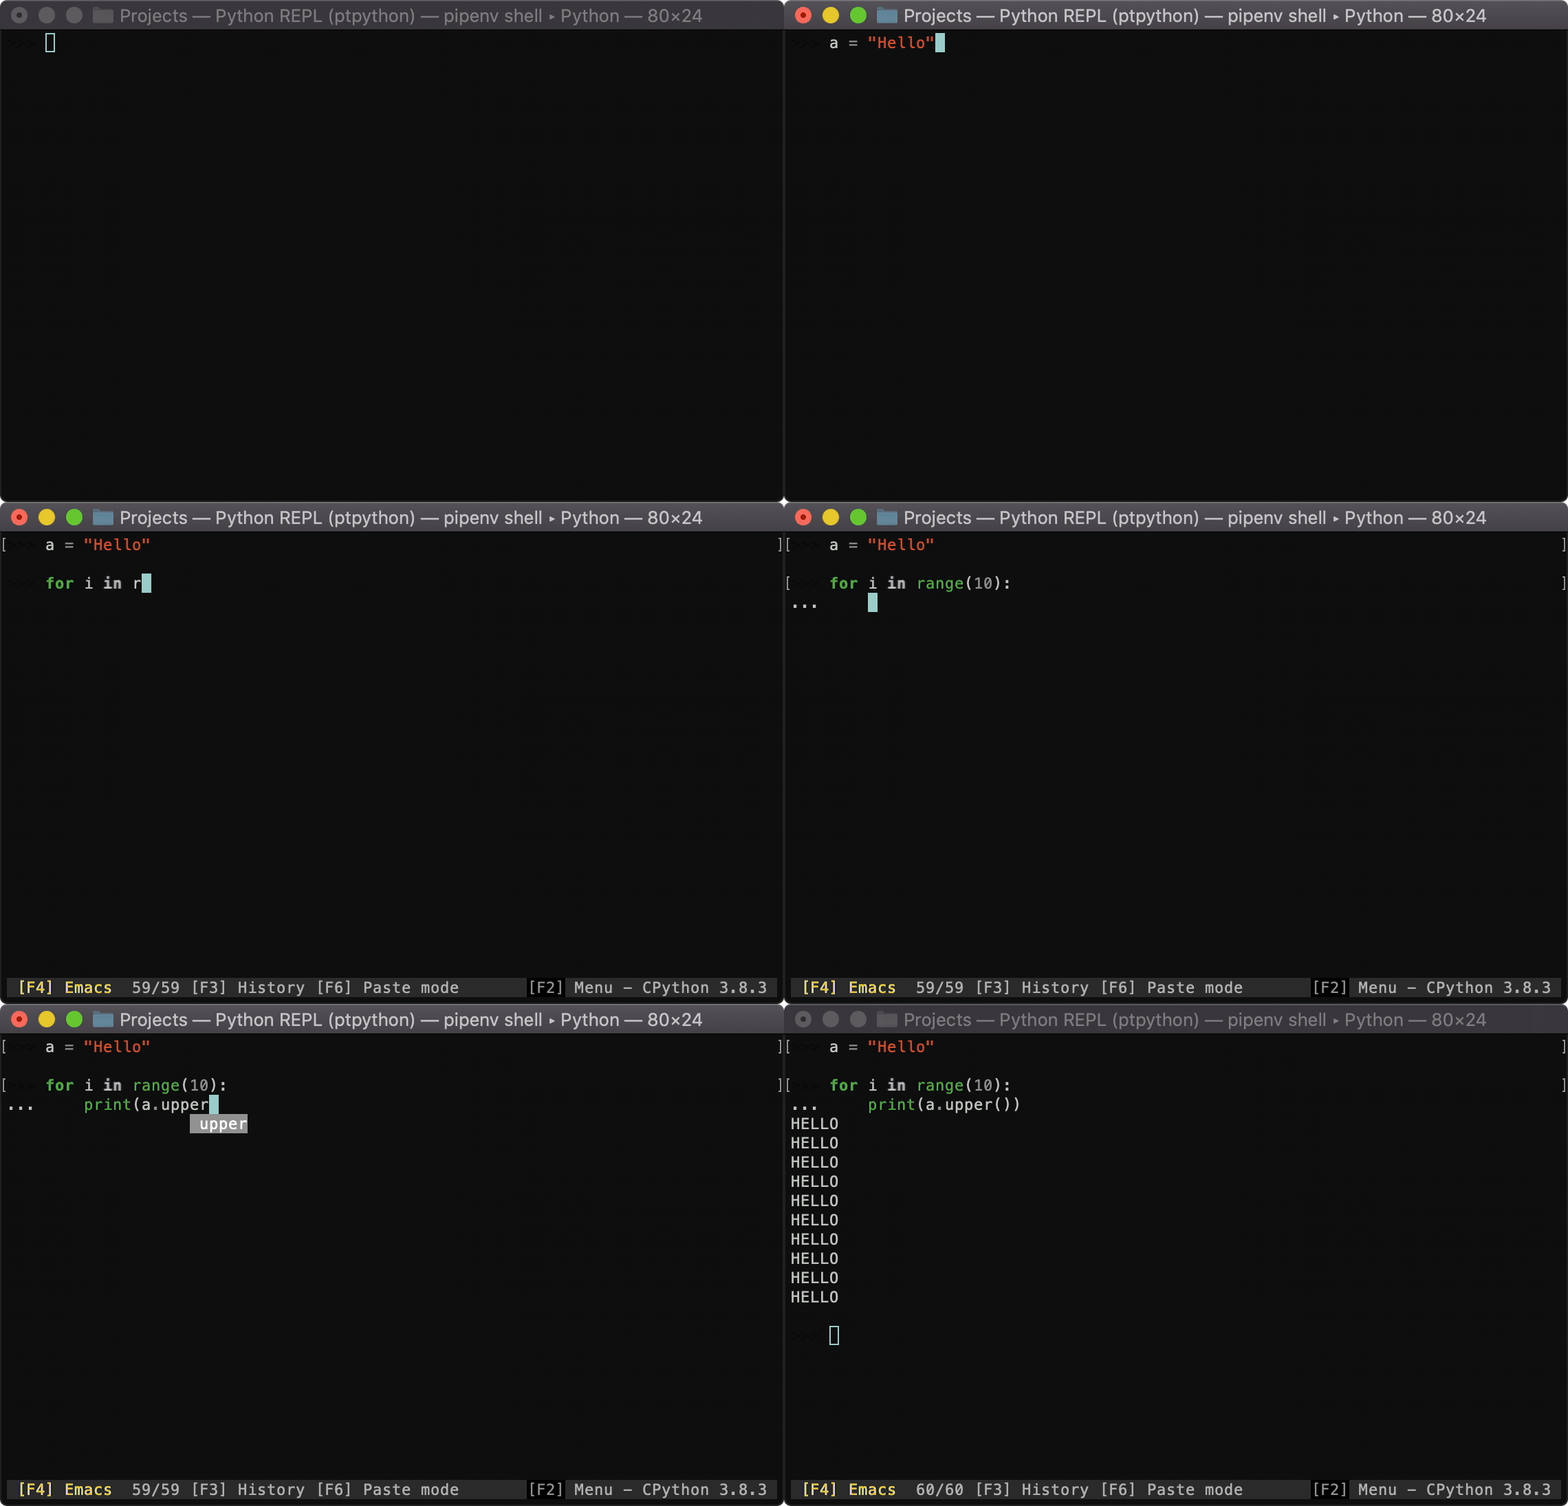
7. Spruce Up Your Standard Python Shell With Ptpython

In case you’re wondering why my Python shell is sexier than yours, it’s because I’ve been using a custom Python shell. This shell, ptpython, has a lot of enhancements over the standard Python shell. Basically, if the standard Python shell and ptpython were twins, the latter would be the prettier (and more successful) of the two siblings.

You can install ptpython through pip:

pip install ptpython

Once installed, you can invoke it by typing ptpython in your standard shell.

It has several features over the standard shell:

1. Code indentation
2. Syntax highlighting
3. Autocompletion
4. Multiline editing
5. Support for color schemes
... and many other things

In the GIF below, you can see features 1–3 in action:

Image for post
GIF by Author

To learn more about its features, visit its website here: ptpython.

I hope you enjoyed the article and learned something new in the process.

Do you have any cool Python tricks? Chime in with yours in the comments.

Advanced Python: Consider These 10 Elements When You Define Python Functions

Best practices for function declarations in Python — particularly public APIs

Aug 26 · 12 min read
Image for post
Photo by Ricardo Frantz on Unsplash

No matter what implementation mechanisms programming languages use, all of them have a reserved seat for functions. Functions are essential parts of any code project because they’re responsible for preparing and processing data and configuring user interface elements. Without exception, Python, while positioned as an object-oriented programming language, depends on functions to perform data-related operations. So, writing good functions is critical to building a resilient code base.

It’s straightforward to define a few simple functions in a small project. With the growth of the project scope, the functions can get far more complicated and the need for more functions grows exponentially. Getting all the functions to work together without any confusion can be a headache, even to experienced programmers. Applying best practices to function declarations becomes more important as the scope of your project grows. In this article, I’d like to talk about best practices for declaring functions — knowledge I have accrued over years of coding.

1. General Guidelines

You may be familiar with these general guidelines, but I’d like to discuss them first because they’re high-level, good practices that many programmers don’t appreciate. When developers don’t follow these guidelines, they pay the price — the code is very hard to maintain.

We have to give meaningful names to our functions. As you know, functions are also objects in Python, so when we define a function, we basically create a variable of the function type. So, the variable name (i.e. the name of the function) has to reflect the operation it performs.

Although readability has become more emphasized in modern coding, it’s mostly talked about in regards to comments — it’s much less often discussed in relation to code itself. So, if you have to write extensive comments to explain your functions, it’s very likely that your functions don’t have good names. Don’t worry about having a long function name — almost all modern IDEs have excellent auto-completion hints, which will save you from typing the entire long names.

Function Names

Good naming rules should also apply to the arguments of the function and all local variables within the function. Something else to note is that if your functions are intended to be used within your class or module, you may want to prefix the name with an underscore (e.g., def _internal_fun():) to indicate that these functions are for private usages and they’re not public APIs.

Small and Single Purpose

Your functions should be kept small, so they’re easier to manage. Imagine that you’re building a house (not a mansion). However, the bricks you’re using are one meter cubed. Are they easy to use? Probably not — they’re too large. The same principle applies to functions. The functions are the bricks of your project. If the functions are all enormous in size, your construction won’t progress as smoothly as it could. When they’re small, they’re easier to fit into various places and moved around if the need arises.

It’s also key for your functions to serve single purposes, which can help you keep your functions small. Another benefit of single-purpose functions is that you’ll find it much easier to name such functions. You can simply name your function based on its intended single purpose. The following is how we can refactor our functions to make each of them serve only one purpose each. Another thing to note is that by doing that, you can minimize the comments that you need to write — because all the function names tell the story.

Single Purposes

You don’t have unlimited energy and time to write functions for every operation you need, so it’s essential to be familiar with common functions in standard libraries. Before you define your own functions, think about whether the particular business need is common — if so, it’s likely that these particular and related needs have already been addressed.

For instance, if you work with data in the CSV format, you can look into the functionalities in the CSV module. Alternatively, the pandas library can handle CSV files gracefully. For another instance, if you want to count elements in a list, you should consider the Counter class in the collections module, which is designed specifically for these operations.

2. Default Arguments

When we first define a function, it usually serves one particular purpose. However, when you add more features to your project, you may realize that some closely related functions can be merged. The only difference is that the invocation of the merged function sometimes involves passing another argument or setting slightly different arguments. In this case, you can consider setting a default value to the argument.

The other common scenario is that when you declare a function, you already expect that your function serves multiple purposes, with function calls using differential parameters while some other parameters requiring few variations. You should consider setting a default value to the less varied argument.

The benefit of setting default arguments is straightforward — you don’t need to deal with setting unnecessary arguments in most cases. However, the availability of keeping these parameters in your function signature allows you to use your functions more flexibly when you need to. For instance, for the built-in sorted() function, there are several ways to call the function, but in most cases, we just use the basic form: sorted(the_iterable), which will sort the iterable in the ascending lexicographic order. However, when you want to change the ascending order or the default lexicographic order, we can override the default setting by specifying the reverse and key arguments.

We should apply the same practice to our own function declaration. In terms of what value we should set, the rule of thumb is you should choose the default value that is to be used for most function calls. Because this is an optional argument, you (or the users of your APIs) don’t want to set it in most situations. Consider the following example:

Default Arguments

There is a catch for setting the default argument. If your argument is a mutable object, it’s important that you don’t set it using the default constructor — because functions are objects in Python and they’re created when they’re defined. The side effect is that the default argument is evaluated at the time of function declaration, so a default mutable object is created and becomes part of the function. Whenever you call the function using the default object, you’re essentially accessing the same mutable object associated with the function, although your intention may be having the function to create a brand new object for you. The following code snippet shows you the unwanted side effect of setting a default mutable argument:

Default Mutable Object

As shown above, although we intended to create two distinct shopping lists, the second function call still accessed the same underlying object, which resulted in the Soccer item added to the same list object. To solve the problem, we should use the following implementation. Specifically, you should use None as the default value for a mutable argument:

None As the Default Value for Mutable Argument

3. Consider Returning Multiple Values

When your function performs complicated operations, the chances are that these operations can generate two or more objects, all of which are needed for your subsequent data processing. Theoretically, it’s possible that you can create a class to wrap these objects such that your function can return the class instance as its output. However, it’s possible in Python that a function can return multiple values. More precisely speaking, these multiple values are returned as a tuple object. The following code shows you a trivial example:

Multiple Return Values

As shown above, the returned values are simply separated by a comma, which essentially creates a tuple object, as checked by the type() function.

One thing to note is that although Python functions can return multiple values, you should not abuse this feature. One value (when a function doesn’t explicitly return anything, it actually returns None implicitly) is best — because everything is straightforward and most users usually expect a function to return only one value. In some cases, returning two values is fine, returning three values is probably still OK, but please don’t ever return four values. It can create a lot of confusion for the users over which are which. If it happens, this is a good indication that you should refactor your functions — your functions probably serve multiple purposes and you should create smaller ones with more dedicated responsibilities.

4. Use Try…Except

When you define functions as public APIs, you can’t always assume that the users set the desired parameters to the functions. Even if we use the functions ourselves, it’s possible that some parameters are created out of our control and they’re incompatible with our functions. In these cases, what should we do in our function declaration?

The first consideration is to use the try…except statement, which is the typical exception handling technique. You embed the code that can possibly go wrong (i.e., raise certain exceptions) in the try clause and the possible exceptions are handled in the except clause.

Let’s consider the following scenario. Suppose that the particular business need is that your function takes a file path and if the file exists and is read successfully, your function does some data processing operations with the file and returns the result, otherwise returns -1. There are multiple ways to implement this need. The code below shows you a possible solution:

Try…Except Statement

In other words, if you expect that users of your functions can set some arguments that result in exceptions in your code, you can define functions that handle these possible exceptions. However, this should be communicated with the users clearly, unless it’s part of the feature as shown in the example (return -1 when the file can’t be read).

5. Consider Argument Validation

The previous function using the try…except statement is sometimes referred to as the EAFP (Easier to Ask Forgiveness than Permission) coding style. There is another coding style called LBYL (Look Before You Leap), which stresses the sanity check before running particular code blocks.

Following the previous example, in terms of applying LBYL to function declaration, the other consideration is to validate your function’s arguments. One common use case for argument validation is to check whether the argument is of the right data type. As we all know, Python is a dynamically-typed language, which doesn’t enforce type checking. For instance, your function’s arguments should be integers or floating-point numbers. However, calling the function by setting strings — the invocation itself — won’t prompt any error messages until the function is executed.

The following code shows how to validate the arguments before running the code:

Argument Validation

It should be noted that both EAFP and LBYL can be applied to more than just dealing with function arguments. They can be applied anywhere in your functions. Although EAFP is a preferred coding style in the Python world, depending on your use case, you should also consider using LBYL which can provide more user-friendly function-specific error messages than the generic built-in error messages you get with the EAFP style.

6. Consider Lambda Functions As Alternatives

Some functions can take another function (or are callable, in general terms) to perform particular operations. For instance, the sorted() function has the key argument that allows us to define more custom sorting behaviors. The following code snippet shows you a use case:

Custom Sorting Using Function

Notably, the sorting_grade function was used just once and it’s a simple function — in which case, we can consider using a lambda function.

If you’re not familiar with the lambda function, here’s a brief description. A lambda function is an anonymous function declared using the lambda keyword. It takes zero to more arguments and has one expression for applicable operations with the form: lambda arguments: expression. The following code shows you how we can use a lambda function in the sorted() function, which looks a little cleaner than the solution above:

Custom Sorting Using Lambda

Another common use-case that’s relevant to many data scientists is the use of lambda functions when they work with the pandas library. The following code is a trivial example how a lambda function assists data manipulation using the map() function, which operates each item in a pandas Series object:

Data Manipulation With map() and Lambda

7. Consider Decorators

Decorators are functions that modify the behavior of other functions without affecting their core functionalities. In other words, they provide modifications to the decorated functions at the cosmetic level. If you don’t know too much about decorators, please feel free to refer to my earlier articles (1, 2, and 3). Here’s a trivial example of how decorators work in Python.

Basic Decorator

As shown, the decorator function simply runs the decorated function twice. To use the decorator, we simply place the decorator function name above the decorated function with an @ prefix. As you can tell, the decorated function did get called twice.

For instance, one useful decorator is the property decorator that you can use in your custom class. The following code shows you how it works. In essence, the @property decorator converts an instance method to make it behave like a regular attribute, which allows the access of using the dot notation.

Decorators: Property

Another trivial use case of decorators is the time logging decorator, which can be particularly handy when the efficiency of your functions is of concern. The following code shows you such a usage:

Logging Time

8. Use *args and **kwargs — But Parsimoniously

In the previous section, you saw the use of *args and **kwargs in defining our decorator function, the use of which allows the decorator function to decorate any functions. In essence, we use *args to capture all (or an undetermined number of, to be more general) position arguments while **kwargs to capture all (or an undetermined number of, to be more general) keyword arguments. Specifically, position arguments are based on the positions of the arguments that are passed in the function call, while keyword arguments are based on setting parameters to specifically named function arguments.

If you’re unfamiliar with these terminologies, here’s a quick peek to the signature of the built-in sorted() function: sorted(iterable, *, key=None, reverse=False). The iterable argument is a position argument, while the key and reverse arguments are keyword arguments.

The major benefit of using *args and **kwargs is to make your function declaration looks clean, or less noisy for the same matter. The following example shows you a legitimate use of *arg in function declaration, which allows your function to accept any number of position arguments.

Use of *args

The following code shows you a legitimate use of **kwargs in function declaration. Similarly, the function with **kwargs allows the users to set any number of keyword arguments, to make your function more flexible.

Use of **kwargs

However, in most cases, you don’t need to use *args or **kwargs. Although it can make your declaration a bit cleaner, it hides the function’s signature. In other words, the users of your functions have to figure out exactly what parameters your functions take. So my advice is to avoid using them if you don’t have to. For instance, can I use a dictionary argument to replace the **kwargs? Similarly, can I use a list or tuple object to replace *args? In most cases, these alternatives should work without any problems.

9. Type Annotation for Arguments

As mentioned previously, Python is a dynamically-typed programming language as well as an interpreted language, the implication of which is that Python doesn’t check code validity, including type compatibility, during coding time. Until your code actually executes, will type incompatibility with your function (e.g., send a string to a function when an integer is expected) emerge.

For these reasons, Python doesn’t enforce the declaration of the type of input and output arguments. In other words, when you create your functions, you don’t need to specify what types of parameters they should have. However, it has become possible to do that in recent Python releases. The major benefit of having type annotation is that some IDEs (e.g., PyCharm or Visual Studio Code) could use the annotations to check the type compatibility for you, so that when you or other users use your functions you can get proper hints.

Another related benefit is that if the IDEs know the type of parameter, it can give proper auto-completion suggestions to help you code faster. Certainly, when you write docstrings for your functions, these type annotations will also be informative to the end developers of your code.

Image for post
Helpful Information With Type Annotation (PyCharm)

10. Responsible Documentation

I equate good documentation with responsible documentation. If your functions are for private uses, you don’t have to write very thorough documentation — you can make the assumption that your code tells the story clearly. If anywhere requires some clarification, you can write a very brief comment that can serve as a reminder for yourself or other readers when your code is revisited. Here, the discussion of responsible documentation is more concerned with the docstrings of your function as public APIs. The following aspects should be included:

  • A brief summary of the intended operation of your function. This should be very concise. In most cases, the summary shouldn’t be more than one sentence.
  • Input arguments: Type and explanation. You need to specify what type of your input arguments should be and what they can do by setting particular options.
  • Return Value: Type and explanation. Just as with input arguments, you need to specify the output of your function. If it doesn’t return anything, you can optionally specify None as the return value.

Conclusions

If you’re experienced with coding, you’ll find out that most of your time is spent on writing and refactoring functions. After all, your data usually doesn’t change too much itself— it’s the functions that process and manipulate your data. If you think of data as the trunk of your body, functions are the arms and legs that move you around. So, we have to write good functions to make our programs agile.

I hope that this article has conveyed some useful information that you can use in your coding.

Thanks for reading.

Data Science, Machine Learning

ROCKET: Fast and Accurate Time Series Classification

State-of-the-art algorithm for time series classification with python

Image by OpenClipart-Vectors at pixabay
  • Explain how ROCKET works
  • Provide a python code example

What are the alternatives?

Other methods for time series classification usually rely on specific representations of series, such as shape, frequency, or variance. The convolutional kernels of ROCKET replace this engineered feature extraction with a single mechanism that can capture many of the same features.

Survey of time series classification

Time series transformation is a foundational idea of time series classification. Many time-series specific algorithms are compositions of transformed time series and conventional classification algorithms, such as those in scikit-learn.

Competing SOTA methods

The following methods strive to improve upon the speed and accuracy of the algorithms described in the Survey above.

  • TS-CHIEF extends Proximity Forest by using dictionary-based and interval-based splitting criteria.
  • InceptionTime is an ensemble of 5 deep CNN’s based on the Inception architecture.
  • Mr-SEQL applies a linear classifier to features extracted by symbolic representations of time series (SAX, SFA).
  • cBOSS, or contractable BOSS, is a dictionary-based classifier based on the SFA transform.
  • catch22 is a set of 22 pre-selected time series transformations that can be passed to a classifier.

How does ROCKET work?

ROCKET first transforms a time series using convolutional kernels and second passes the transformed data to a linear classifier.

Convolutional Kernels

The convolutional kernels, the same as those found in convolutional neural networks, are initialized with random length, weights, bias, dilation, and padding. See the paper for how the random parameters are sampled — they are part of ROCKET and the sampling does not need to be tuned. The stride is always one. ROCKET does not apply non-linear transforms, such as ReLU, on the resulting features.

The Convolutional Kernel Transform

Each kernel is convolved with each time series to produce a feature map. The kernel’s feature map is aggregated to produce two features per kernel: the maximum value and proportion of positive values.

Image for post
zi is the output of the convolution operation

Linear Classification

For smaller datasets, the authors recommend a ridge regression classifier due to fast cross-validation of the regularization parameter and no other hyperparameters.

How to use ROCKET with Python?

The ROCKET transform is implemented in the sktime python package.

import numpy as np
from sklearn.linear_model import RidgeClassifierCV
from sktime.datasets import load_arrow_head # univariate dataset
from sktime.transformers.series_as_features.rocket import Rocket
X_train, y_train = load_arrow_head(split="test", return_X_y=True)
X_test, y_test = load_arrow_head(split="train", return_X_y=True)
print(X_train.shape, X_test.shape)
>> (175, 1) (36, 1)
Image for post
rocket = Rocket(num_kernels=10,000, random_state=111) 
rocket.fit(X_train)
X_train_transform = rocket.transform(X_train)
X_train_transform.shape
>> (175, 20000)
classifier = RidgeClassifierCV(alphas=np.logspace(-3, 3, 10), normalize=True)
classifier.fit(X_train_transform, y_train)
X_test_transform = rocket.transform(X_test)
classifier.score(X_test_transform, y_test)
>> 0.9167

Citation

Dempster, A., Petitjean, F. & Webb, G.I. ROCKET: exceptionally fast and accurate time series classification using random convolutional kernels. Data Min Knowl Disc 34, 1454–1495 (2020). https://doi.org/10.1007/s10618-020-00701-z

+ Recent posts