Jupyter Notebook은 코드, 방정식, 분석 및 설명이 포함 된 사람이 읽을 수있는 문서를 생성 할 수있는 훌륭한 플랫폼을 제공합니다. 일부는 NBDev와 결합 할 때 강력한 개발이라고 생각합니다. 이러한 통합 도구의 경우 즉시 시작하는 것이 최선이 아닙니다. 사용할 때마다 명령 줄에서 Jupyter 웹 애플리케이션을 시작하고 토큰 또는 비밀번호를 입력해야합니다. 전체 웹 애플리케이션은 열려있는 해당 터미널 창에 의존합니다. 일부는 프로세스를 "악화"한 다음안돼터미널에서 분리 할 수 있지만 가장 우아하고 유지 관리가 쉬운 솔루션은 아닙니다.
루씨우리에게 Jupyter는 지속 가능한 웹 애플리케이션으로 실행되고 사용자 인증이 내장 된 Jupyter Notebook의 확장을 출시함으로써 이미이 문제에 대한 해결책을 제시했습니다. 맨 위에 체리를 추가하려면 Docker를 통해 관리하고 유지하여 격리 된 개발 환경을 허용 할 수 있습니다.
이 게시물이 끝날 때까지 JupyterHub의 기능을 활용하여 터미널없이 네트워크 내의 여러 장치에서 액세스 할 수있는 Jupyter Notebook 인스턴스 및보다 사용자 친화적 인 인증 방법에 액세스 할 것입니다.
전제 조건
Docker 및 명령 줄에 대한 기본 지식이 있으면이를 설정하는 데 도움이됩니다.
가지고있는 가장 강력한 장치와 하루 종일 켜져있는 장치에서이 작업을 수행하는 것이 좋습니다. 이 설정의 장점 중 하나는 네트워크의 모든 장치에서 Jupyter Notebook을 사용할 수 있지만 구성한 장치에서 모든 계산이 수행된다는 것입니다.
Jupyter 허브 란?
JupyterHub는 사용자 그룹에 노트북의 강력한 기능을 제공합니다. JupyterHub의 아이디어는 Jupyter 노트북의 사용을 기업, 강의실 및 대규모 사용자 그룹으로 확장하는 것이 었습니다. 그러나 Jupyter Notebook은 단일 개발자가 단일 노드에서 로컬 인스턴스로 실행해야합니다. 안타깝게도 JupyterHub의 유용성 및 확장 성과 로컬 Jupyter 노트북 실행의 단순성을 가질 수있는 중간 지점이 없었습니다. 즉, 지금까지입니다.
JupyterHub에는 기술적 복잡성의 오버 헤드가 거의 또는 전혀없이 단일 노트북을 생성하는 데 활용할 수있는 사전 빌드 된 Docker 이미지가 있습니다. Docker와 JupyterHub의 조합을 사용하여 언제 어디서나 동일한 URL에서 Jupyter Notebook에 액세스 할 것입니다.
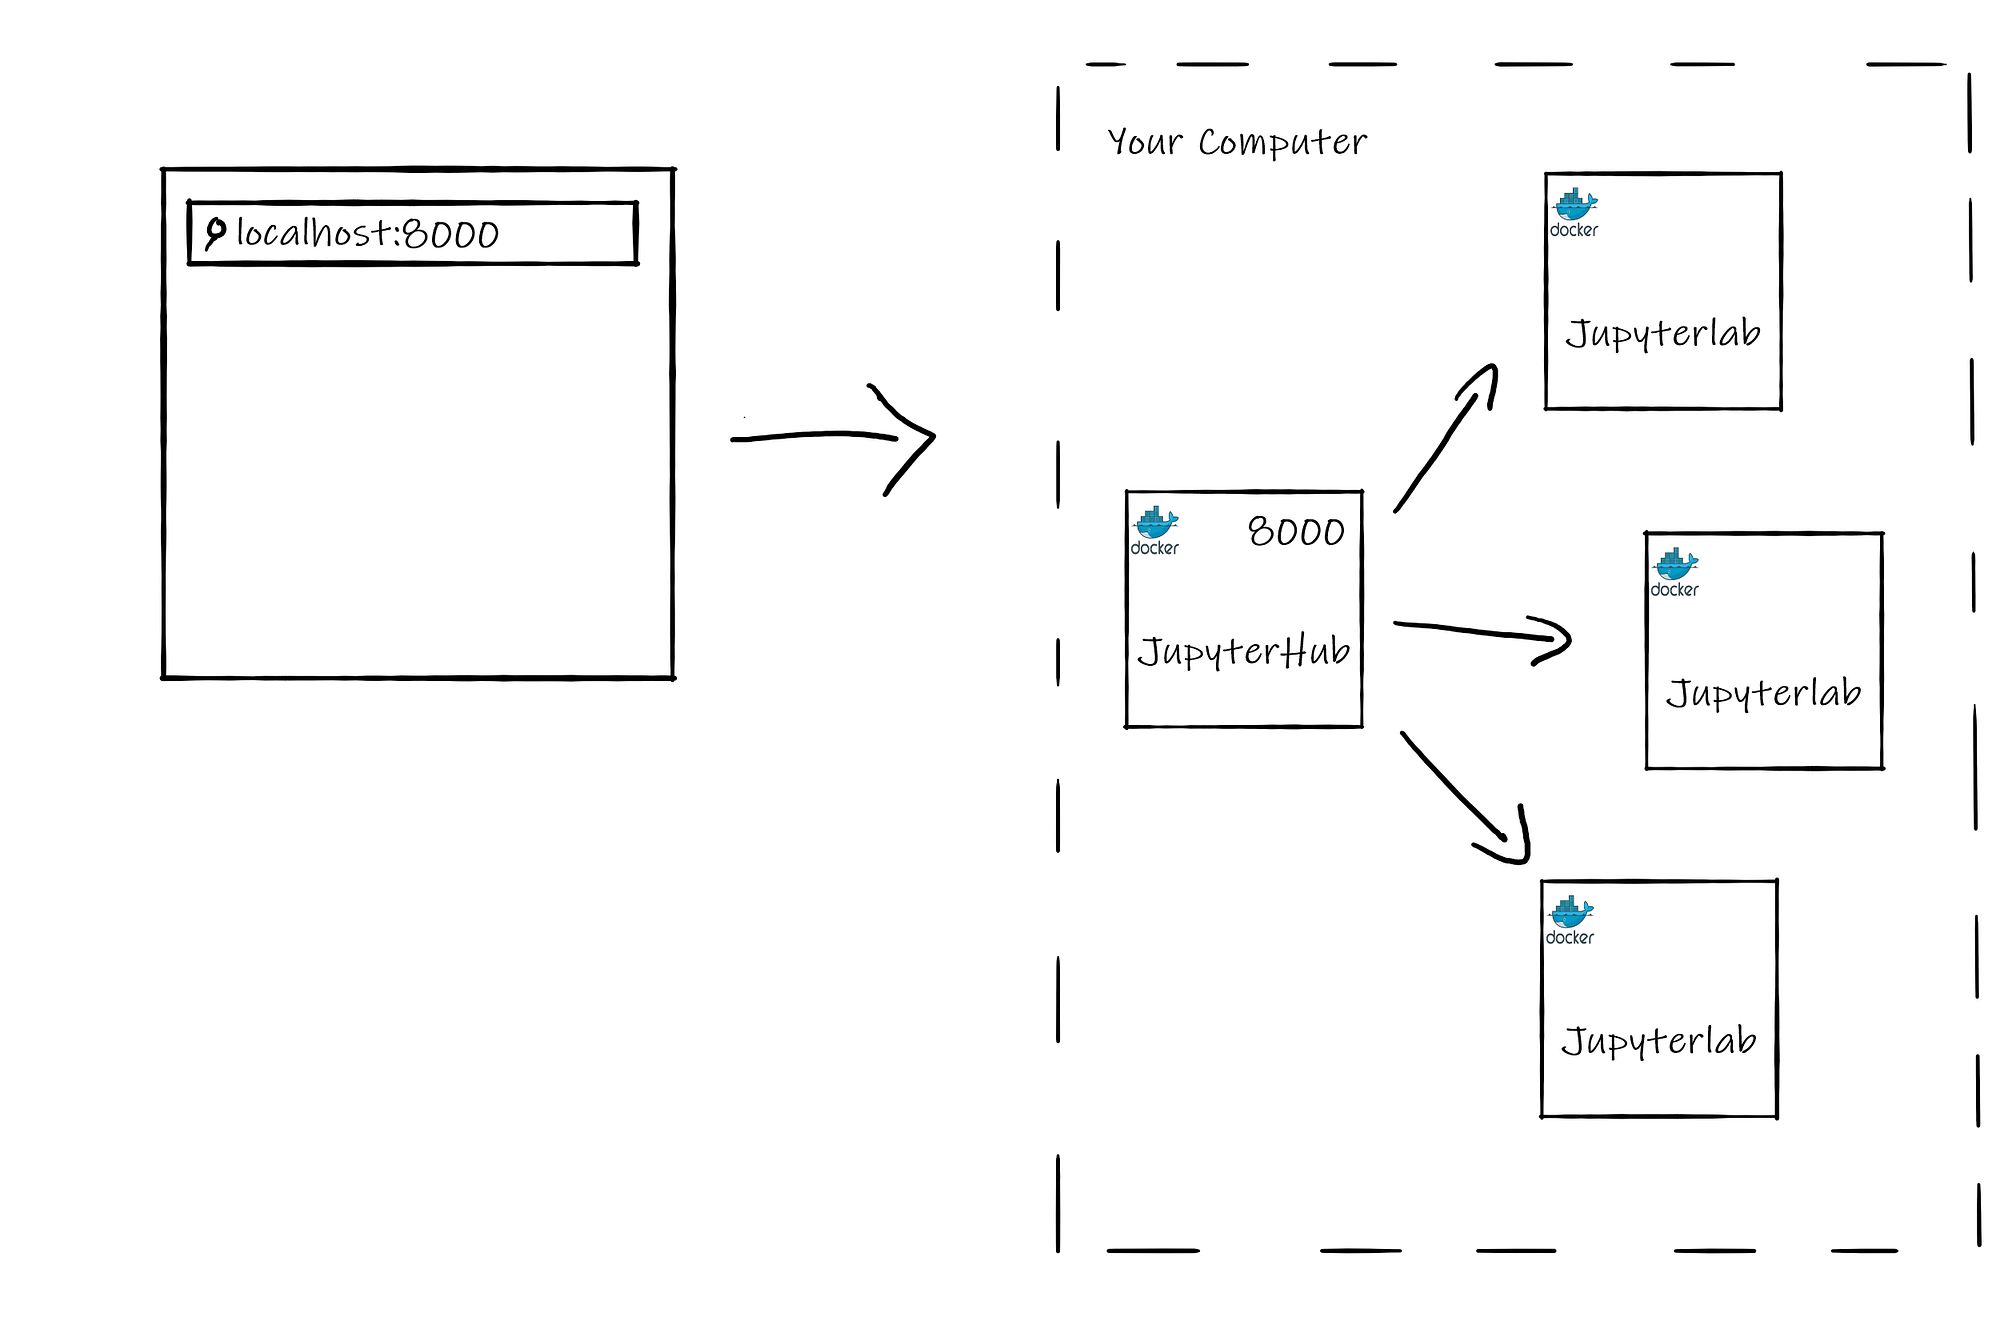
건축물
JupyterHub 서버의 아키텍처는 JupyterHub 및 JupyterLab의 2 가지 서비스로 구성됩니다. JupyterHub는 진입 점이되고 모든 사용자에 대한 JupyterLab 인스턴스를 생성합니다. 이러한 각 서비스는 호스트에서 Docker 컨테이너로 존재합니다.
JupyterLab 아키텍처 다이어그램 (작성자 별 이미지)
Docker 이미지 빌드
To build our at-home JupyterHub server we will use the pre-built Docker images of JupyterHub & JupyterLab.
Dockerfiles
JupyterHub Docker 이미지는 간단합니다.
FROM jupyterhub/jupyterhub:1.2# Copy the JupyterHub configuration in the container
COPY jupyterhub_config.py .# Download script to automatically stop idle single-user servers
COPY cull_idle_servers.py .# Install dependencies (for advanced authentication and spawning)
RUN pip install dockerspawner
사전 구축 된 JupyterHub Docker Image를 사용하고 자체 구성 파일을 추가하여 유휴 서버를 중지합니다.cull_idle_servers.py. 마지막으로 Docker를 통해 JupyterLab 인스턴스를 생성하기 위해 추가 패키지를 설치합니다.
Docker 작성
모든 것을 하나로 모으기 위해docker-compose.yml배포 및 구성을 정의하는 파일입니다.
version: '3'services:
  # Configuration for Hub+Proxy
  jupyterhub:
    build: .                # Build the container from this folder.
    container_name: jupyterhub_hub   # The service will use this container name.
    volumes:                         # Give access to Docker socket.
      - /var/run/docker.sock:/var/run/docker.sock
      - jupyterhub_data:/srv/jupyterlab
    environment:                     # Env variables passed to the Hub process.
      DOCKER_JUPYTER_IMAGE: jupyter/tensorflow-notebook
      DOCKER_NETWORK_NAME: ${COMPOSE_PROJECT_NAME}_default
      HUB_IP: jupyterhub_hub
    ports:
      - 8000:8000
    restart: unless-stopped  # Configuration for the single-user servers
  jupyterlab:
    image: jupyter/tensorflow-notebook
    command: echovolumes:
  jupyterhub_data:
주목할 주요 환경 변수는 다음과 같습니다.DOCKER_JUPYTER_IMAGE과DOCKER_NETWORK_NAME. JupyterHub는 환경 변수에 정의 된 이미지로 Jupyter Notebook을 만듭니다. Jupyter 이미지 선택에 대한 자세한 내용은 다음 Jupyter를 참조하세요.선적 서류 비치.
DOCKER_NETWORK_NAME서비스에서 사용하는 Docker 네트워크의 이름입니다. 이 네트워크는 Docker Compose에서 자동 이름을 가져 오지만 허브는 Jupyter 노트북 서버를 여기에 연결하기 위해이 이름을 알아야합니다. 네트워크 이름을 제어하기 위해 약간의 해킹을 사용합니다. 환경 변수 COMPOSE_PROJECT_NAME을 Docker Compose에 전달하고 _default를 추가하여 네트워크 이름을 얻습니다.
라는 파일을 만듭니다..env같은 디렉토리에docker-compose.yml파일을 열고 다음 내용을 추가하십시오.
COMPOSE_PROJECT_NAME=jupyter_hub
유휴 서버 중지
이것이 홈 설정이므로 유휴 인스턴스를 중지하여 시스템의 메모리를 보존 할 수 있기를 원합니다. JupyterHub에는 함께 실행할 수있는 서비스가 있으며 그중 하나는jupyterhub-idle-culler. 이 서비스는 장기간 유휴 상태 인 모든 인스턴스를 중지합니다.
마무리하려면 JupyterHub 인스턴스에 대한 볼륨 마운트, Docker 이미지, 서비스, 인증 등과 같은 구성 옵션을 정의해야합니다.
아래는 간단합니다jupyterhub_config.py내가 사용하는 구성 파일.
import os
import sysc.JupyterHub.spawner_class = 'dockerspawner.DockerSpawner'
c.DockerSpawner.image = os.environ['DOCKER_JUPYTER_IMAGE']
c.DockerSpawner.network_name = os.environ['DOCKER_NETWORK_NAME']
c.JupyterHub.hub_connect_ip = os.environ['HUB_IP']
c.JupyterHub.hub_ip = "0.0.0.0" # Makes it accessible from anywhere on your networkc.JupyterHub.admin_access = Truec.JupyterHub.services = [
    {
        'name': 'cull_idle',
        'admin': True,
        'command': [sys.executable, 'cull_idle_servers.py', '--timeout=42000']
    },
]c.Spawner.default_url = '/lab'notebook_dir = os.environ.get('DOCKER_NOTEBOOK_DIR') or '/home/jovyan/work'
c.DockerSpawner.notebook_dir = notebook_dir
c.DockerSpawner.volumes = {
    '/home/sidhu': '/home/jovyan/work'
}
다음 구성 옵션에 유의하십시오.
'명령': [sys.executable, 'cull_idle_servers.py', '--timeout = 42000']: 제한 시간은 유휴 Jupyter 인스턴스가 종료 될 때까지의 시간 (초)입니다.
c.Spawner.default_url = '/ lab': Jupyter Notebook 대신 Jupyterlab을 사용합니다. Jupyter Notebook을 사용하려면이 줄을 주석 처리하십시오.
'/ home / sidhu': '/ home / jovyan / work': 데스크탑에있는 모든 프로젝트와 노트북에 액세스 할 수 있도록 홈 디렉토리를 JupyterLab 홈 디렉토리에 마운트했습니다. 이를 통해 새 노트북을 생성하고 로컬 머신에 저장하고 Jupyter 노트북 Docker 컨테이너를 삭제해도 삭제되지 않는 경우에도 지속성을 확보 할 수 있습니다.
홈 디렉토리를 마운트하지 않으려면이 줄을 제거하고 변경하는 것을 잊지 마십시오.시두사용자 이름에.
서버 시작
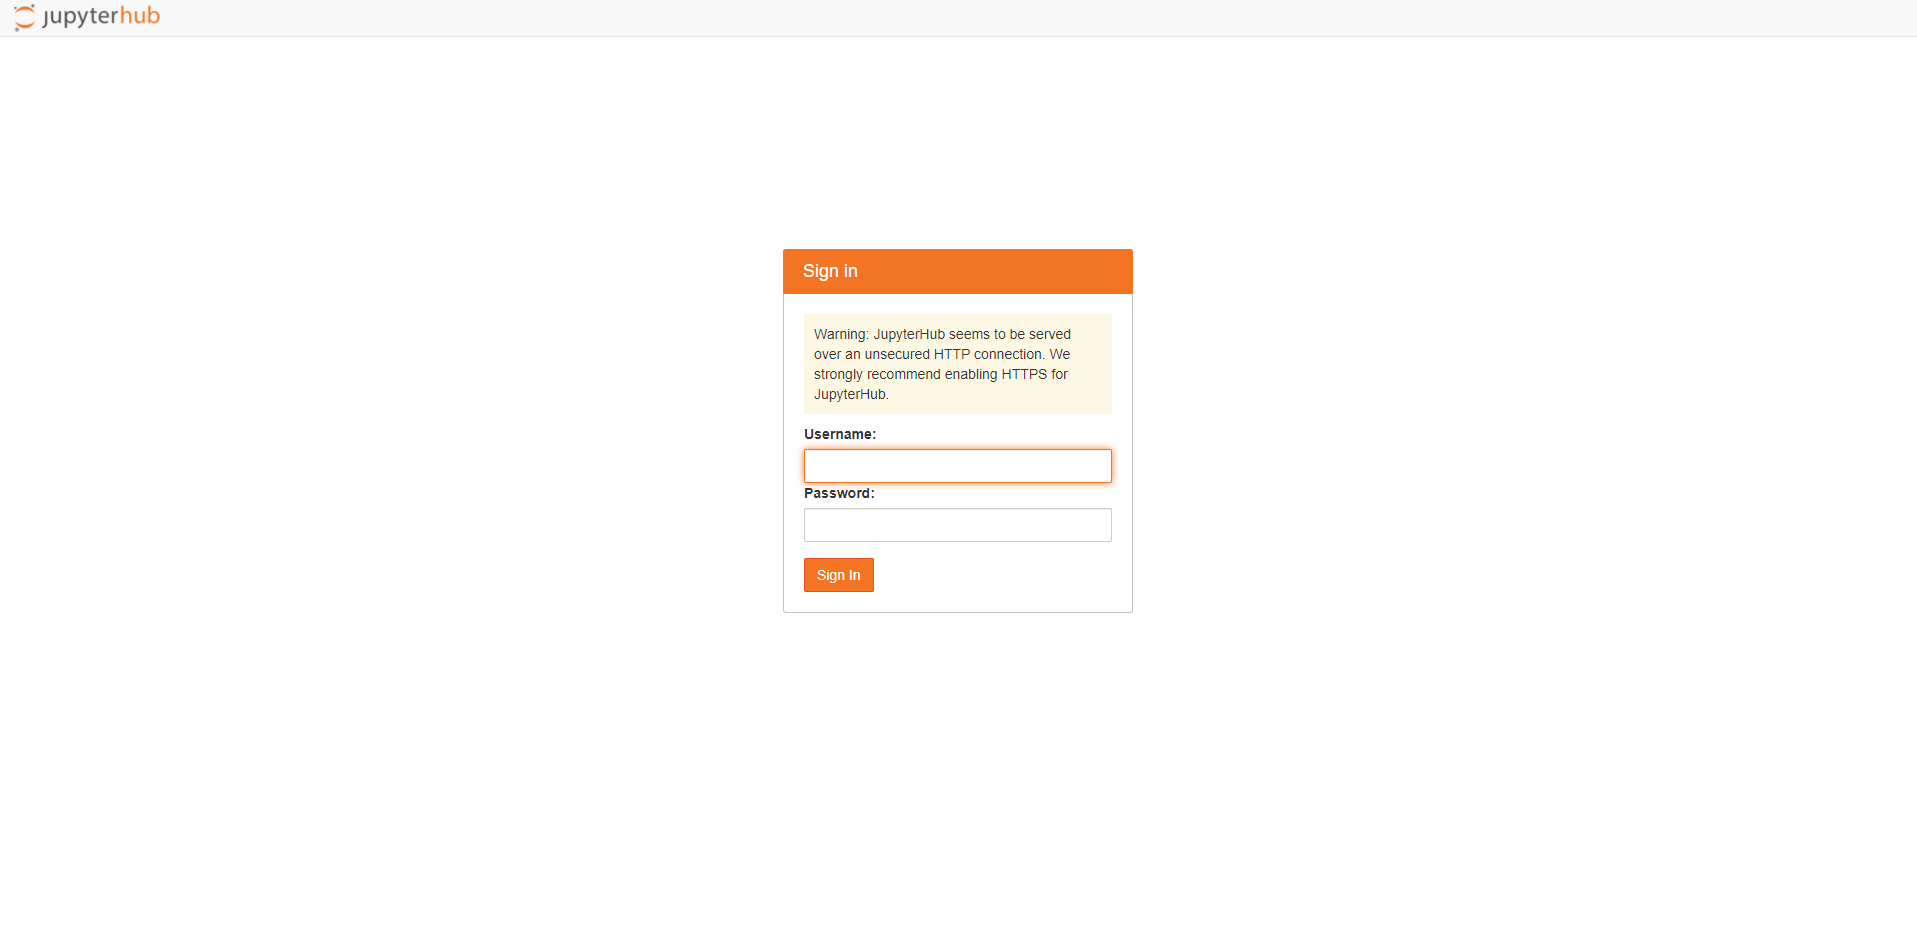
서버를 시작하려면 다음을 실행하십시오.도커 구성 -d, 로 이동localhost : 8000브라우저에서 JupyterHub 방문 페이지를 볼 수 있습니다.
JupyterHub 랜딩 페이지 스크린 샷 (작성자 별 이미지)
va 노트북, iPad 등과 같은 네트워크의 다른 장치에서 액세스하려면 다음을 실행하여 호스트 컴퓨터의 IP를 식별하십시오.ifconfig on Unix machines & ipconfigWindows에서.
Ipconfig (작성자 별 이미지)
다른 장치에서 포트 8000에서 찾은 IP로 이동합니다.http : // IP : 8000JupyterHub 방문 페이지가 표시됩니다!
인증 중
그러면 서버에 인증하는 마지막 작업이 남습니다. LDAP 서버 또는 OAuth를 설정하지 않았으므로 JupyterHub는 PAM (Pluggable Authentication Module) 인증을 사용하여 사용자를 인증합니다. 즉, JupyterHub는 호스트 시스템의 사용자 이름과 비밀번호를 사용하여 인증합니다.
이를 활용하려면 JupyterHub Docker 컨테이너에 사용자를 만들어야합니다. 컨테이너에 스크립트를 배치하고 컨테이너를 시작할 때 실행하는 것과 같은 다른 방법이 있지만 연습으로 수동으로 수행합니다. 컨테이너를 해체하거나 다시 빌드하는 경우 사용자를 다시 만들어야합니다.
사용자 자격 증명을 스크립트 또는 Dockerfile에 하드 코딩하지 않는 것이 좋습니다.
Photo taken by Justin Jairam from @jusspreme (with permission)
Jupyter Notebook provides a great platform to produce human-readable documents containing code, equations, analysis, and their descriptions. Some even consider it a powerful development when combining it with NBDev. For such an integral tool, the out of the box start up is not the best. Each use requires starting the Jupyter web application from the command line and entering your token or password. The entire web application relies on that terminal window being open. Some might “daemonize” the process and then use nohup to detach it from their terminal, but that’s not the most elegant and maintainable solution.
Lucky for us, Jupyter has already come up with a solution to this problem by coming out with an extension of Jupyter Notebooks that runs as a sustainable web application and has built-in user authentication. To add a cherry on top, it can be managed and sustained through Docker allowing for isolated development environments.
By the end of this post we will leverage the power of JupyterHub to access a Jupyter Notebook instance which can be accessed without a terminal, from multiple devices within your network, and a more user friendly authentication method.
Prerequisites
A basic knowledge of Docker and the command line would be beneficial in setting this up.
I recommend doing this on the most powerful device you have and one that is turned on for most of the day, preferably all day. One of the benefits of this setup is that you will be able to use Jupyter Notebook from any device on your network, but have all the computation happen on the device we configure.
What is Jupyter Hub
JupyterHub brings the power of notebooks to groups of users. The idea behind JupyterHub was to scale out the use of Jupyter Notebooks to enterprises, classrooms, and large groups of users. Jupyter Notebook, however, is supposed to run as a local instance, on a single node, by a single developer. Unfortunately, there was no middle ground to have the usability and scalability of JupyterHub and the simplicity of running a local Jupyter Notebook. That is, until now.
JupyterHub has pre-built Docker images that we can utilize to spawn a single notebook on a whim, with little to no overhead in technical complexity. We are going to use the combination of Docker and JupyterHub to access Jupyter Notebooks from anytime, anywhere, at the same URL.
Architecture
The architecture of our JupyterHub server will consist of 2 services: JupyterHub and JupyterLab. JupyterHub will be the entry point and will spawn JupyterLab instances for any user. Each of these services will exist as a Docker container on the host.
JupyterLab Architecture Diagram (Image by Author)
Building the Docker Images
To build our at-home JupyterHub server we will use the pre-built Docker images of JupyterHub & JupyterLab.
Dockerfiles
The JupyterHub Docker image is simple.
FROM jupyterhub/jupyterhub:1.2# Copy the JupyterHub configuration in the container
COPY jupyterhub_config.py .# Download script to automatically stop idle single-user servers
COPY cull_idle_servers.py .# Install dependencies (for advanced authentication and spawning)
RUN pip install dockerspawner
We use the pre-built JupyterHub Docker Image and add our own configuration file to stop idle servers, cull_idle_servers.py. Lastly, we install additional packages to spawn JupyterLab instances via Docker.
Docker Compose
To bring everything together, let’s create a docker-compose.yml file to define our deployments and configuration.
version: '3'services:
  # Configuration for Hub+Proxy
  jupyterhub:
    build: .                # Build the container from this folder.
    container_name: jupyterhub_hub   # The service will use this container name.
    volumes:                         # Give access to Docker socket.
      - /var/run/docker.sock:/var/run/docker.sock
      - jupyterhub_data:/srv/jupyterlab
    environment:                     # Env variables passed to the Hub process.
      DOCKER_JUPYTER_IMAGE: jupyter/tensorflow-notebook
      DOCKER_NETWORK_NAME: ${COMPOSE_PROJECT_NAME}_default
      HUB_IP: jupyterhub_hub
    ports:
      - 8000:8000
    restart: unless-stopped  # Configuration for the single-user servers
  jupyterlab:
    image: jupyter/tensorflow-notebook
    command: echovolumes:
  jupyterhub_data:
The key environment variables to note are DOCKER_JUPYTER_IMAGE and DOCKER_NETWORK_NAME. JupyterHub will create Jupyter Notebooks with the images defined in the environment variable.For more information on selecting Jupyter images you can visit the following Jupyter documentation.
DOCKER_NETWORK_NAME is the name of the Docker network used by the services. This network gets an automatic name from Docker Compose, but the Hub needs to know this name to connect the Jupyter Notebook servers to it. To control the network name we use a little hack: we pass an environment variable COMPOSE_PROJECT_NAME to Docker Compose, and the network name is obtained by appending _default to it.
Create a file called .env in the same directory as the docker-compose.yml file and add the following contents:
COMPOSE_PROJECT_NAME=jupyter_hub
Stopping Idle Servers
Since this is our home setup, we want to be able to stop idle instances to preserve memory on our machine. JupyterHub has services that can run along side it and one of them being jupyterhub-idle-culler. This service stops any instances that are idle for a prolonged duration.
To add this servive, create a new file called cull_idle_servers.py and copy the contents of jupyterhub-idle-culler project into it.
Ensure `cull_idle_servers.py` is in the same folder as the Dockerfile.
To find out more about JupyterHub services, check out their official documentation on them.
Jupyterhub Config
To finish off, we need to define configuration options such, volume mounts, Docker images, services, authentication, etc. for our JupyterHub instance.
Below is a simple jupyterhub_config.py configuration file I use.
import os
import sysc.JupyterHub.spawner_class = 'dockerspawner.DockerSpawner'
c.DockerSpawner.image = os.environ['DOCKER_JUPYTER_IMAGE']
c.DockerSpawner.network_name = os.environ['DOCKER_NETWORK_NAME']
c.JupyterHub.hub_connect_ip = os.environ['HUB_IP']
c.JupyterHub.hub_ip = "0.0.0.0" # Makes it accessible from anywhere on your networkc.JupyterHub.admin_access = Truec.JupyterHub.services = [
    {
        'name': 'cull_idle',
        'admin': True,
        'command': [sys.executable, 'cull_idle_servers.py', '--timeout=42000']
    },
]c.Spawner.default_url = '/lab'notebook_dir = os.environ.get('DOCKER_NOTEBOOK_DIR') or '/home/jovyan/work'
c.DockerSpawner.notebook_dir = notebook_dir
c.DockerSpawner.volumes = {
    '/home/sidhu': '/home/jovyan/work'
}
Take note of the following configuration options:
'command': [sys.executable, 'cull_idle_servers.py', '--timeout=42000'] : Timeout is the number of seconds until an idle Jupyter instance is shut down.
c.Spawner.default_url = '/lab': Uses Jupyterlab instead of Jupyter Notebook. Comment out this line to use Jupyter Notebook.
'/home/sidhu': '/home/jovyan/work': I mounted my home directory to the JupyterLab home directory to have access to any projects and notebooks I have on my Desktop. This also allows us to achieve persistence in the case we create new notebooks, they are saved to our local machine and will not get deleted if our Jupyter Notebook Docker container is deleted.
Remove this line if you do not wish to mount your home directory and do not forget to change sidhu to your user name.
Start the Server
To start the server, simply run docker-compose up -d, navigate to localhost:8000 in your browser and you should be able to see the JupyterHub landing page.
JupyterHub Landing Page Screenshot (Image by Author)
To access it on other devices on your network such asva laptop, an iPad, etc, identify the IP of the host machine by running ifconfig on Unix machines & ipconfig on Windows.
Ipconfig (Image by Author)
From your other device, navigate to the IP you found on port 8000: http://IP:8000 and you should see the JupyterHub landing page!
Authenticating
That leaves us with the last task of authenticating to the server. Since we did not set up a LDAP server or OAuth, JupyterHub will use PAM (Pluggable Authentication Module) authentication to authenticate users. This means JupyterHub uses the user name and passwords of the host machine to authenticate.
To make use of this, we will have to create a user on the JupyterHub Docker container. There are other ways of doing this such as having a script placed on the container and executed at container start up but we will do it manually as an exercise. If you tear down or rebuild the container you will have to recreate users.
I do not recommend hard coding user credentials into any script or Dockerfile.
1) Find the JupyterLab container ID: docker ps -a
JupyterLab Container ID (Image by Author)
2) “SSH” into the container: docker exec -it $YOUR_CONTAINER_ID bash
3) Create a user and follow the terminal prompts to create a password: useradd $YOUR_USERNAME
4) Sign in with the credentials and you’re all set!
You now have a ready to go Jupyter Notebook server that can be accessed from any device, in the palm of your hands! Happy Coding!
Feedback
I welcome any and all feedback about any of my posts and tutorials. You can message me on twitter or e-mail me at sidhuashton@gmail.com.
설치가 완료되면 다음 한 줄 명령을 사용하여 터미널 또는 명령 프롬프트에서 직접 비디오를 다운로드 할 수 있습니다.
youtube-dl <Your video link here>
또는 이후유튜브 -dlPython에 대한 바인딩이 있으면 프로그래밍 방식으로 동일한 작업을 수행하는 Python 스크립트를 만들 수 있습니다.
모든 링크가 포함 된 목록을 만들고 아래의 빠르고 더러운 스크립트를 사용하여 비디오를 다운로드 할 수 있습니다.
작성자 별 이미지
이 모듈을 사용하면 비디오뿐만 아니라 전체 재생 목록, 메타 데이터, 섬네일, 자막, 주석, 설명, 오디오 등을 쉽게 다운로드 할 수 있습니다.
이를 달성하는 가장 쉬운 방법은 이러한 매개 변수를 사전에 추가하고이를 사전에 전달하는 것입니다.YoutubeDL객체 생성자.
아래 코드에서 사전을 만들었습니다.ydl_options, 일부 매개 변수와 함께 생성자에 전달했습니다.
작성자 별 이미지
1. 'format':'bestvideo+bestaudio' #Dowloads the video in the best available video and audio format.2. 'writethumbnail':'writethumbnail' #Downloads the thumbnail image of the video.3. 'writesubtitles':'writesubtitles' #Downloads the subtitles, if any.4. 'writedescription':'writedescription' #Writes the video description to a .description file.
노트 :터미널이나 명령 프롬프트에서 직접 모든 작업을 수행 할 수 있지만 Python 스크립트를 사용하는 것이 유연성 / 재사용 가능성으로 인해 더 좋습니다.
Python에는 pdb라는 자체 내장 디버거가 있습니다. 디버거는 프로그래머가 변수와 프로그램 실행을 한 줄씩 검사하는 데 도움이되는 매우 유용한 도구입니다. 디버거는 프로그래머가 코드에서 성가신 문제를 찾으려고 노력할 필요가 없음을 의미합니다.
pdb의 좋은 점은 표준 Python 라이브러리에 포함되어 있다는 것입니다. 결과적으로이 아름다움은 Python이 설치된 모든 컴퓨터에서 사용할 수 있습니다. 이것은 바닐라 Python 설치 위에 추가 기능을 설치하는 데 제한이있는 환경에서 유용합니다.
pdb 디버거를 호출하는 방법에는 여러 가지가 있습니다.
In-line breakpoint
pdb.set_trace()In Python 3.7 and later
breakpoint()pdb.py can also be invoked as a script to debug other scripts
python3 -m pdb myscript.py
다음은 다음을 사용하여 pdb를 호출하는 Python 3.8의 샘플 코드입니다.중단 점 ()함수:
작성자의 이미지
다음은 디버깅 모험에 도움이되는 몇 가지 유용한 명령입니다.
엔: 현재 함수의 다음 줄에 도달하거나 반환 될 때까지 실행을 계속합니다.
엘: 목록 코드
j <line>: 줄로 이동
b <line>: breakpoint () 설정
씨: 중단 점까지 계속
큐: 종료
노트 :일단 pdb에 있으면엔,엘,비,씨, 및큐예약 된 키워드가됩니다. 마지막 변수는 이름이 변수 인 경우 pdb를 종료합니다.큐귀하의 코드에서.
많은 사람들이 이것을 아는 것은 아니지만 Python을 변환 할 수 있습니다.스크립트를 독립 실행 형 실행 파일로 변환합니다. 이것에 대한 가장 큰 이점은 Python 스크립트 / 애플리케이션이 Python (및 필요한 타사 패키지)이 설치되지 않은 컴퓨터에서 작동 할 수 있다는 것입니다.
PyInstaller는 Windows, GNU / Linux, Mac OS X, FreeBSD, Solaris 및 AIX를 포함한 거의 모든 주요 플랫폼에서 작동합니다.
설치하려면 pip에서 다음 명령을 사용하십시오.
pip install pyinstaller
그런 다음 프로그램이있는 디렉토리로 이동하여 다음을 실행하십시오.
pyinstaller myscript.py
그러면 실행 파일이 생성되어 다음과 같은 하위 디렉토리에 저장됩니다.dist.
PyInstaller는 사용자 정의를위한 다양한 옵션을 제공합니다.
pyinstaller --onefile --icon [icon file] [script file]# Using the --onefile option bundles everything in a single executable file instead of having a bunch of other files.
# Using the --icon option adds a custom icon (.ico file) for the executable file
Pyinstaller는 Django, NumPy, Matplotlib, SQLAlchemy, Pandas, Selenium 등 대부분의 타사 패키지와 호환됩니다.
Pyinstaller가 제공하는 모든 기능과 다양한 옵션에 대해 알아 보려면 Github의 해당 페이지를 방문하십시오.Pyinstaller.
4. Tqdm으로 진행률 표시 줄 만들기
TQDM 라이브러리를 사용하면 Python 및 CLI에 대한 빠르고 확장 가능한 진행률 표시 줄을 만들 수 있습니다.
먼저 pip를 사용하여 모듈을 설치해야합니다.
pip install tqdm
몇 줄의 코드로 Python 스크립트에 스마트 진행률 표시 줄을 추가 할 수 있습니다.
작성자 별 GIF
TQDM은 Linux, Windows, Mac, FreeBSD, NetBSD, Solaris / SunOS와 같은 모든 주요 플랫폼에서 작동합니다. 뿐만 아니라 모든 콘솔, GUI 및 IPython / Jupyter 노트북과 원활하게 통합됩니다.
종종 Python에서 표 형식의 출력을 처리하는 것은 고통입니다. 그 때의표로 만들다구조하러 온다. "출력이 나에게 상형 문자처럼 보입니까?"에서 출력을 변환 할 수 있습니다. "와, 예쁘 네요!" 음, 마지막 부분은 약간 과장된 것일 수도 있지만출력의 가독성을 향상시킵니다.
먼저 pip를 사용하여 설치합니다.
pip install tabulate
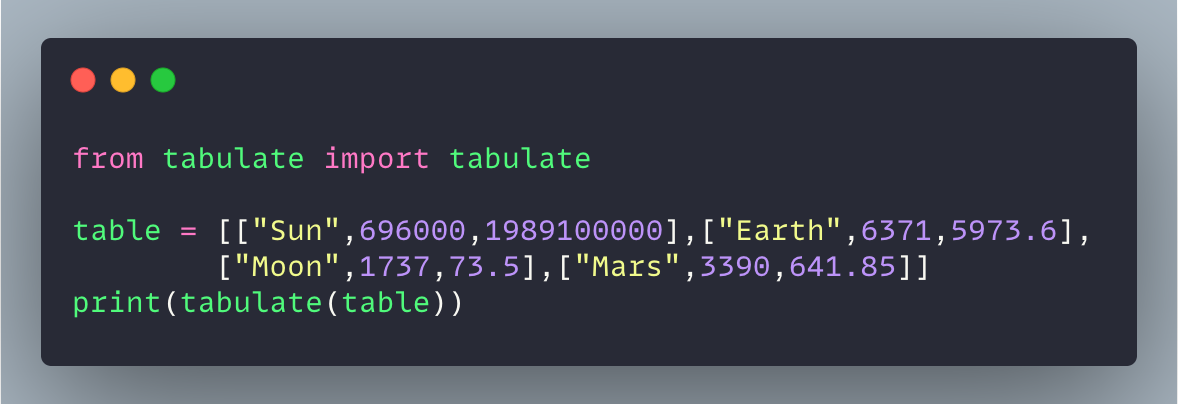
다음은 tabulate를 사용하여 2D 목록을 표로 인쇄하는 간단한 스 니펫입니다.
작성자 별 이미지
아래 GIF는 위 코드의 출력이 표로 표시되거나 표시되지 않는 모습을 보여줍니다. 두 출력 중 어느 것이 더 읽기 쉬운 지 추측하는 것에 대한 보상은 없습니다!
작성자 별 GIF
Tabulate는 다음 데이터 유형을 지원합니다.
1. list of lists or another iterable of iterables
2. list or another iterable of dicts (keys as columns)
3. dict of iterables (keys as columns)
4. two-dimensional NumPy array
5. NumPy record arrays (names as columns)
6. pandas.DataFrameSource: https://pypi.org/project/tabulate/
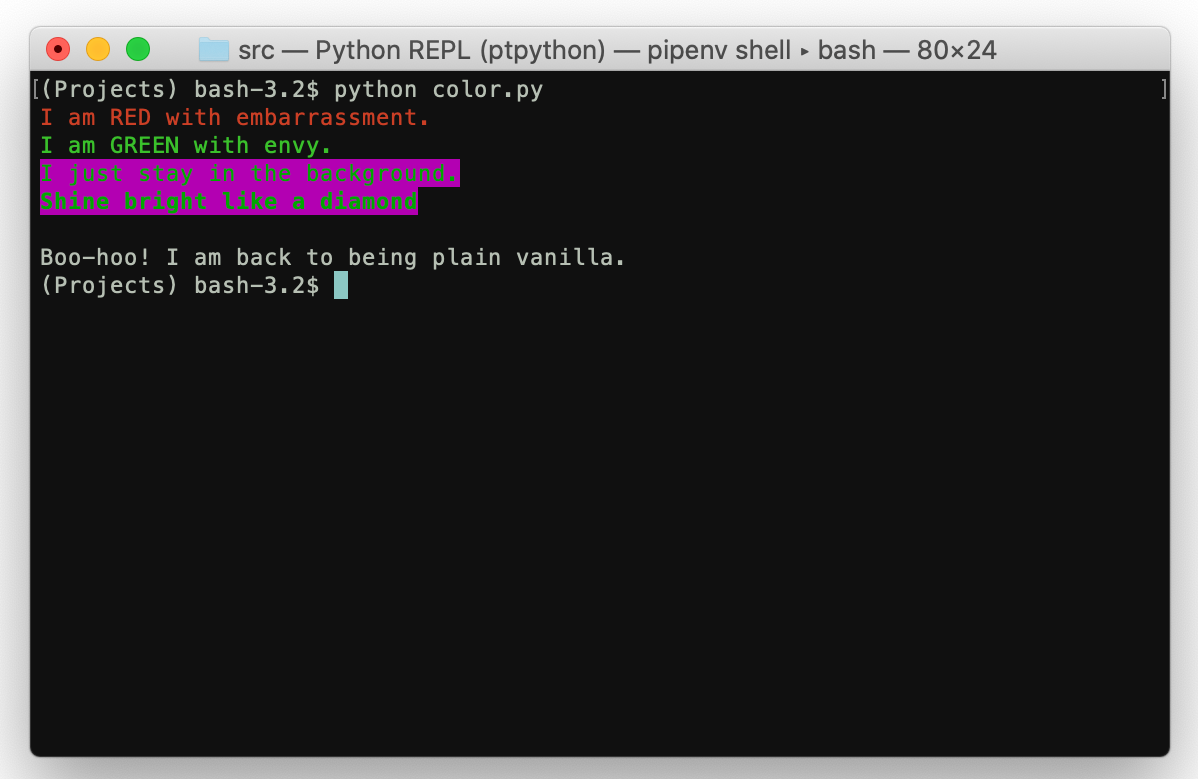
내 Python 셸이 내 Python 셸보다 섹시한 이유가 궁금한 경우 사용자 지정 Python 셸을 사용하고 있기 때문입니다. 이 껍질,ptpython, 표준 Python 셸에 비해 많은 개선 사항이 있습니다. 기본적으로 표준 Python 셸과 ptpython이 쌍둥이 인 경우 후자는 두 형제 중 더 예쁘고 더 성공적 일 것입니다.
pip를 통해 ptpython을 설치할 수 있습니다.
pip install ptpython
설치되면 다음을 입력하여 호출 할 수 있습니다.ptpython표준 셸에서.
표준 셸에 비해 몇 가지 기능이 있습니다.
1. Code indentation
2. Syntax highlighting
3. Autocompletion
4. Multiline editing
5. Support for color schemes
... and many other things
There’s a treasure trove of useful Python tips and tricks online. Here are some fun, cool tricks you can use to beef up your Python game and impress your friends at the same time — kill two birds with one stone.
Once installed, you can download videos directly from terminal or command prompt by using the following one-line command:
youtube-dl <Your video link here>
Alternatively, since youtube-dl has bindings for Python, you can create a Python script to do the same thing programmatically.
You can create a list with all the links and download the videos using the quick-and-dirty script below.
Image by Author
With this module, you can not only easily download videos, but entire playlists, metadata, thumbnails, subtitles, annotations, descriptions, audio, and much more.
The easiest way to achieve this is by adding a bunch of these parameters to a dictionary and passing it to the YoutubeDL object constructor.
In the code below I created a dictionary, ydl_options, with some parameters, and passed it on to the constructor:
Image by Author
1. 'format':'bestvideo+bestaudio' #Dowloads the video in the best available video and audio format.2. 'writethumbnail':'writethumbnail' #Downloads the thumbnail image of the video.3. 'writesubtitles':'writesubtitles' #Downloads the subtitles, if any.4. 'writedescription':'writedescription' #Writes the video description to a .description file.
Note: You can do everything directly within the terminal or a command prompt, but using a Python script is better due to the flexibility/reusability it offers.
Python has its own in-built debugger called pdb. A debugger is an extremely useful tool that helps programmers to inspect variables and program execution, line by line. A debugger means programmers don’t have to pull their hair out trying to find pesky issues in their code.
The good thing about pdb is that it is included with the standard Python library. As a result, this beauty can be used on any machine where Python is installed. This comes in handy in environments with restrictions on installing any add-on on top of the vanilla Python installation.
There are several ways to invoke the pdb debugger:
In-line breakpoint
pdb.set_trace()In Python 3.7 and later
breakpoint()pdb.py can also be invoked as a script to debug other scripts
python3 -m pdb myscript.py
Here’s a sample code on Python 3.8 that invokes pdb using the breakpoint() function:
Image from Author
Here are some of the most useful commands to aid you in your debugging adventure:
n: To continue execution until the next line in the current function is reached or it returns.
l: list code
j <line>: jump to a line
b <line>: set breakpoint()
c: continue until breakpoint
q: quit
Note: Once you are in pdb, n, l, b, c, and q become reserved keywords. The last one will quit pdb if you have a variable named q in your code.
3. Make Your Python Code Into an Executable File Using PyInstaller
Not a lot of people know this, but you can convert your Pythonscripts into standalone executables. The biggest benefit to this is that your Python scripts/applications can then work on machines where Python (and any necessary third-party packages) are not installed.
PyInstaller works on pretty much all the major platforms, including Windows, GNU/Linux, Mac OS X, FreeBSD, Solaris and AIX.
To install it, use the following command in pip:
pip install pyinstaller
Then, go to the directory where your program is located and run:
pyinstaller myscript.py
This will generate the executable and place it in a subdirectory called dist.
PyInstaller provides many options for customization:
pyinstaller --onefile --icon [icon file] [script file]# Using the --onefile option bundles everything in a single executable file instead of having a bunch of other files.
# Using the --icon option adds a custom icon (.ico file) for the executable file
Pyinstaller is compatible with most of the third-party packages — Django, NumPy, Matplotlib, SQLAlchemy, Pandas, Selenium, and many more.
To learn about all the features and the myriad of options Pyinstaller provides, visit its page on Github: Pyinstaller.
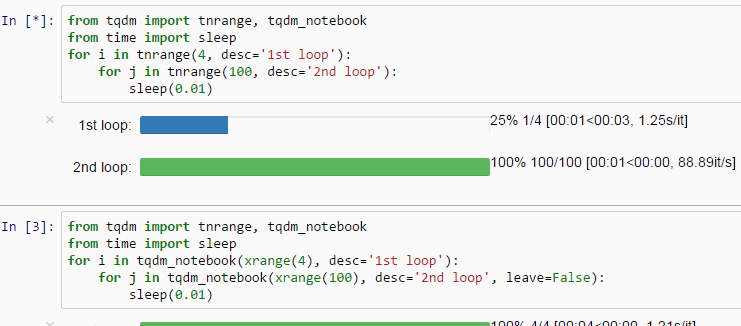
4. Make a Progress Bar With Tqdm
The TQDM library will let you create fast, extensible progress bars for Python and CLI.
You’d need to first install the module using pip:
pip install tqdm
With a few lines of code, you can add smart progress bars to your Python scripts.
GIF by Author
TQDM works on all major platforms like Linux, Windows, Mac, FreeBSD, NetBSD, Solaris/SunOS. Not only that, but it also integrates seamlessly with any console, GUI, and IPython/Jupyter notebooks.
Style.RESET_ALL explicitly resets the foreground, background, and brightness — although, Colorama also performs this reset automatically on program exit.
Colorama has other features that you can find here: Colorama Website.
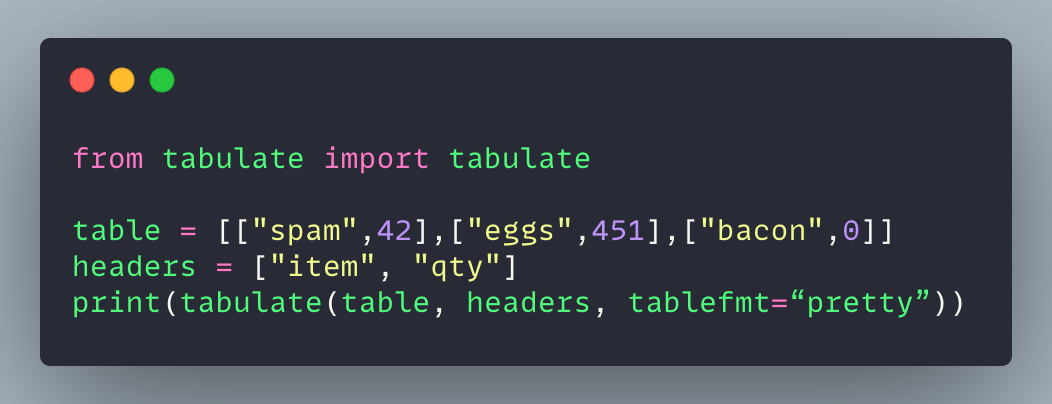
6. Pretty Print 2D Lists Using Tabulate
Often, dealing with tabular output in Python is a pain. That’s when tabulate comes to the rescue. It can transform your output from “The output looks like hieroglyphs to me?” to “Wow, that looks pretty!”. Well, maybe that last part is a slight exaggeration, but it willimprove the readability of your output.
First, install it using pip:
pip install tabulate
Here’s a simple snippet to print a 2D list as a table using tabulate:
Image by Author
The GIF below shows how the output of the code above looks with and without tabulate. No prizes for guessing which of the two outputs is more readable!
GIF by Author
Tabulate supports the following data types:
1. list of lists or another iterable of iterables
2. list or another iterable of dicts (keys as columns)
3. dict of iterables (keys as columns)
4. two-dimensional NumPy array
5. NumPy record arrays (names as columns)
6. pandas.DataFrameSource: https://pypi.org/project/tabulate/
You can find more details about the library here: tabulate.
7. Spruce Up Your Standard Python Shell With Ptpython
In case you’re wondering why my Python shell is sexier than yours, it’s because I’ve been using a custom Python shell. This shell, ptpython, has a lot of enhancements over the standard Python shell. Basically, if the standard Python shell and ptpython were twins, the latter would be the prettier (and more successful) of the two siblings.
You can install ptpython through pip:
pip install ptpython
Once installed, you can invoke it by typing ptpython in your standard shell.
It has several features over the standard shell:
1. Code indentation
2. Syntax highlighting
3. Autocompletion
4. Multiline editing
5. Support for color schemes
... and many other things
In the GIF below, you can see features 1–3 in action:
GIF by Author
To learn more about its features, visit its website here: ptpython.
I hope you enjoyed the article and learned something new in the process.
Do you have any cool Python tricks? Chime in with yours in the comments.
프로그래밍 언어가 사용하는 구현 메커니즘에 관계없이 모두 기능을위한 예약 된 자리를 가지고 있습니다. 함수는 데이터 준비 및 처리와 사용자 인터페이스 요소 구성을 담당하므로 모든 코드 프로젝트의 필수 부분입니다. 예외없이 Python은 객체 지향 프로그래밍 언어로 자리를 잡았지만 데이터 관련 작업을 수행하는 함수에 의존합니다. 따라서 좋은 함수를 작성하는 것은 탄력적 인 코드 기반을 구축하는 데 중요합니다.
작은 프로젝트에서 몇 가지 간단한 기능을 정의하는 것은 간단합니다. 프로젝트 범위가 확대됨에 따라 기능이 훨씬 더 복잡해질 수 있으며 더 많은 기능에 대한 필요성이 기하 급수적으로 증가합니다. 모든 기능을 혼동없이 함께 작동시키는 것은 숙련 된 프로그래머에게도 골칫거리가 될 수 있습니다. 프로젝트 범위가 커짐에 따라 함수 선언에 모범 사례를 적용하는 것이 더욱 중요해집니다. 이 기사에서는 함수 선언에 대한 모범 사례, 즉 수년간 코딩을 통해 쌓아온 지식에 대해 이야기하고 싶습니다.
1. 일반 지침
이러한 일반 지침에 익숙 할 수 있지만 많은 프로그래머가 인정하지 않는 높은 수준의 우수 사례이므로 먼저 논의하고 싶습니다. 개발자가 이러한 지침을 따르지 않으면 대가를 지불해야합니다. 코드를 유지 관리하기가 매우 어렵습니다.
노골적이고 의미있는 이름
기능에 의미있는 이름을 부여해야합니다. 아시다시피 함수는 파이썬의 객체이기도하므로 함수를 정의 할 때 기본적으로 함수 유형의 변수를 만듭니다. 따라서 변수 이름 (즉, 함수 이름)은 수행하는 작업을 반영해야합니다.
현대 코딩에서는 가독성이 더욱 강조되었지만 대부분 주석과 관련하여 논의되고 있으며 코드 자체와 관련하여 논의되는 빈도는 훨씬 적습니다. 따라서 함수를 설명하기 위해 광범위한 주석을 작성해야하는 경우 함수에 좋은 이름이 없을 가능성이 큽니다. 긴 함수 이름에 대해 걱정하지 마십시오. 거의 모든 최신 IDE에는 뛰어난 자동 완성 힌트가 있으므로 전체 긴 이름을 입력하지 않아도됩니다.
기능 명
좋은 명명 규칙은 함수의 인수와 함수 내의 모든 지역 변수에도 적용되어야합니다. 주목해야 할 또 다른 점은 함수가 클래스 또는 모듈 내에서 사용되도록 의도 된 경우 이름 앞에 밑줄을 붙여야 할 수 있다는 것입니다 (예 :def _internal_fun () :)는 이러한 함수가 비공개 용도이며 공개 API가 아님을 나타냅니다.
작고 단일 목적
기능은 작게 유지해야 관리하기 쉽습니다. 집을 짓고 있다고 상상해보십시오 (저택이 아님). 그러나 사용중인 벽돌은 1 미터 큐브입니다. 사용하기 쉽습니까? 아마 아닐 것입니다. 너무 큽니다. 기능에도 동일한 원칙이 적용됩니다. 기능은 프로젝트의 벽돌입니다. 기능의 크기가 모두 방대하다면 건설이 원활하게 진행되지 않습니다. 크기가 작 으면 다양한 장소에 더 쉽게 맞출 수 있으며 필요에 따라 이동합니다.
또한 기능이 단일 목적을 수행하는 것이 중요하므로 기능을 작게 유지하는 데 도움이됩니다. 단일 목적 함수의 또 다른 이점은 이러한 함수의 이름을 훨씬 쉽게 지정할 수 있다는 것입니다. 의도 된 단일 목적에 따라 함수의 이름을 간단하게 지정할 수 있습니다. 다음은 함수를 리팩토링하여 각 함수가 각각 하나의 목적에만 사용되도록하는 방법입니다. 주목해야 할 또 다른 사항은 모든 함수 이름이 이야기를 전달하기 때문에 작성해야하는 주석을 최소화 할 수 있다는 것입니다.
단일 목적
바퀴를 재발 명하지 마십시오
필요한 모든 작업에 대해 함수를 작성하는 데 무제한의 에너지와 시간이 필요하지 않으므로 표준 라이브러리의 공통 함수에 익숙해지는 것이 중요합니다. 자신의 기능을 정의하기 전에 특정 비즈니스 요구가 일반적인 것인지 생각해보십시오. 그렇다면 이러한 특정 및 관련 요구가 이미 해결되었을 가능성이 높습니다.
예를 들어 CSV 형식의 데이터로 작업하는 경우 다음에서 기능을 살펴볼 수 있습니다.CSV 모듈. 또는팬더 라이브러리CSV 파일을 정상적으로 처리 할 수 있습니다. 또 다른 예로, 목록의 요소를 계산하려면 다음을 고려해야합니다.카운터이러한 작업을 위해 특별히 설계된 collections 모듈의 클래스입니다.
2. 기본 인수
관련 시나리오
함수를 처음 정의 할 때 일반적으로 특정 목적에 사용됩니다. 그러나 프로젝트에 더 많은 기능을 추가하면 밀접하게 관련된 일부 기능이 병합 될 수 있음을 알 수 있습니다. 유일한 차이점은 병합 된 함수의 호출에는 때때로 다른 인수를 전달하거나 약간 다른 인수를 설정해야한다는 것입니다. 이 경우 인수에 기본값을 설정하는 것을 고려할 수 있습니다.
또 다른 일반적인 시나리오는 함수를 선언 할 때 함수가 차등 매개 변수를 사용하는 함수 호출과 함께 여러 목적을 제공 할 것으로 예상하는 반면 일부 다른 매개 변수는 약간의 변형이 필요하다는 것입니다. 기본값을 덜 가변적 인 인수로 설정하는 것을 고려해야합니다.
기본 인수 설정
기본 인수 설정의 이점은 간단합니다. 대부분의 경우 불필요한 인수 설정을 처리 할 필요가 없습니다. 그러나 이러한 매개 변수를 함수 시그니처에 유지할 수 있으므로 필요할 때 함수를 더 유연하게 사용할 수 있습니다. 예를 들어, 내장정렬 됨 ()함수를 호출하는 방법에는 여러 가지가 있지만 대부분의 경우 기본 형식 만 사용합니다.정렬 됨 (the_iterable), 오름차순 사전 순으로 iterable을 정렬합니다. 그러나 오름차순이나 기본 사전 순서를 변경하려는 경우 다음을 지정하여 기본 설정을 재정의 할 수 있습니다.역전과키인수.
우리 자신의 함수 선언에 동일한 방법을 적용해야합니다. 어떤 값을 설정해야하는지에 관해서는 대부분의 함수 호출에 사용할 기본값을 선택해야합니다. 이것은 선택적 인수이기 때문에 귀하 (또는 귀하의 API 사용자)는 대부분의 상황에서이를 설정하고 싶지 않습니다. 다음 예를 고려하십시오.
기본 인수
변경 가능한 기본 인수의 함정을 피하십시오
기본 인수를 설정하는 방법이 있습니다. 인수가 변경 가능한 객체 인 경우 기본 생성자를 사용하여 설정하지 않는 것이 중요합니다. 함수는 Python의 객체이며 정의 될 때 생성되기 때문입니다. 부작용은 함수 선언시 기본 인수가 평가되므로 기본 가변 객체가 생성되고 함수의 일부가된다는 것입니다. 기본 개체를 사용하여 함수를 호출 할 때마다 기본적으로 함수와 연결된 동일한 변경 가능한 개체에 액세스하게됩니다.하지만 의도적으로 새로운 개체를 만드는 함수가있을 수 있습니다. 다음 코드 스 니펫은 기본 변경 가능 인수 설정의 원치 않는 부작용을 보여줍니다.
기본 변경 가능 개체
위에서 볼 수 있듯이 두 개의 개별 쇼핑 목록을 만들려고했지만 두 번째 함수 호출은 여전히 동일한 기본 개체에 액세스하여축구동일한 목록 개체에 추가 된 항목. 문제를 해결하려면 다음 구현을 사용해야합니다. 구체적으로는없음변경 가능한 인수의 기본값으로 :
변경 가능한 인수의 기본값으로 없음
3. 여러 값 반환 고려
튜플의 여러 값
함수가 복잡한 작업을 수행 할 때 이러한 작업이 두 개 이상의 개체를 생성 할 수 있으며,이 모든 개체는 후속 데이터 처리에 필요합니다. 이론적으로는 함수가 클래스 인스턴스를 출력으로 반환 할 수 있도록 이러한 객체를 래핑하는 클래스를 만들 수 있습니다. 그러나 Python에서는 함수가 여러 값을 반환 할 수 있습니다. 보다 정확하게 말하면 이러한 여러 값은 튜플 객체로 반환됩니다. 다음 코드는 간단한 예를 보여줍니다.
여러 반환 값
위에 표시된 것처럼 반환 된 값은 쉼표로 구분됩니다. 기본적으로 튜플 객체를 생성합니다.유형()함수.
그러나 3 개 이하
한 가지 주목할 점은 Python 함수가 여러 값을 반환 할 수 있지만이 기능을 남용해서는 안된다는 것입니다. 하나의 값 (함수가 명시 적으로 아무것도 반환하지 않으면 실제로없음모든 것이 간단하고 대부분의 사용자는 일반적으로 함수가 하나의 값만 반환하기를 기대하기 때문입니다. 경우에 따라 두 개의 값을 반환하는 것이 좋으며 세 개의 값을 반환하는 것도 괜찮지 만 네 개의 값을 반환하지 마십시오. 어떤 사용자에게 많은 혼란을 줄 수 있습니다. 이런 일이 발생하면 함수를 리팩토링해야 함을 나타내는 좋은 표시입니다. 함수는 여러 용도로 사용되며 더 많은 전용 책임이있는 작은 함수를 만들어야합니다.
4. Try… Except 사용
함수를 공개 API로 정의 할 때 사용자가 원하는 매개 변수를 함수에 설정했다고 항상 가정 할 수는 없습니다. 우리가 직접 함수를 사용하더라도 일부 매개 변수가 우리의 통제를 벗어나 생성되어 우리의 함수와 호환되지 않을 수 있습니다. 이 경우 함수 선언에서 무엇을해야합니까?
첫 번째 고려 사항은시도…일반적인 예외 처리 기술입니다. 잘못 될 수있는 코드 (예 : 특정 예외 발생)를시험절과 가능한 예외는외절.
다음 시나리오를 살펴 보겠습니다. 특정 비즈니스 요구 사항은 함수가 파일 경로를 사용하고 파일이 존재하고 성공적으로 읽힌 경우 함수가 파일에 대해 일부 데이터 처리 작업을 수행하고 결과를 반환하고 그렇지 않으면 반환하는 것입니다.-1. 이러한 요구를 구현하는 방법에는 여러 가지가 있습니다. 아래 코드는 가능한 솔루션을 보여줍니다.
시도… 문 제외
즉, 함수 사용자가 코드에서 예외를 발생시키는 일부 인수를 설정할 수 있다고 예상하는 경우 이러한 가능한 예외를 처리하는 함수를 정의 할 수 있습니다. 그러나 예에 표시된 기능의 일부가 아닌 한 사용자에게 명확하게 전달해야합니다 (return-1파일을 읽을 수없는 경우).
5. 인수 유효성 검사 고려
사용하는 이전 기능시도…선언문은 EAFP (허가보다 용서를 쉽게 구하기) 코딩 스타일이라고도합니다. LBYL (Look Before You Leap)이라는 또 다른 코딩 스타일이 있는데, 특정 코드 블록을 실행하기 전에 온 전성 검사를 강조합니다.
앞의 예에 따라 LBYL을 함수 선언에 적용 할 때 다른 고려 사항은 함수의 인수를 확인하는 것입니다. 인수 유효성 검사의 일반적인 사용 사례 중 하나는 인수가 올바른 데이터 유형인지 확인하는 것입니다. 우리 모두 알다시피 Python은 동적 유형 언어로 유형 검사를 시행하지 않습니다. 예를 들어 함수의 인수는 정수 또는 부동 소수점 숫자 여야합니다. 그러나 문자열 (호출 자체)을 설정하여 함수를 호출하면 함수가 실행될 때까지 오류 메시지가 표시되지 않습니다.
다음 코드는 코드를 실행하기 전에 인수의 유효성을 검사하는 방법을 보여줍니다.
인수 검증
토론 : EAFP 대 LBYL
EAFP 및 LBYL은 함수 인수를 처리하는 것 이상으로 적용될 수 있습니다. 기능의 어느 곳에 나 적용 할 수 있습니다. EAFP는 Python 세계에서 선호되는 코딩 스타일이지만 사용 사례에 따라 EAFP 스타일로 얻는 일반적인 기본 제공 오류 메시지보다 더 사용자 친화적 인 함수 별 오류 메시지를 제공 할 수있는 LBYL 사용을 고려해야합니다. .
6. Lambda 함수를 대안으로 고려
다른 기능의 매개 변수로서의 기능
일부 함수는 특정 작업을 수행하기 위해 다른 함수 (또는 일반적인 용어로 호출 가능)를 사용할 수 있습니다. 예를 들어정렬 됨 ()기능에는키더 많은 사용자 지정 정렬 동작을 정의 할 수있는 인수입니다. 다음 코드 스 니펫은 사용 사례를 보여줍니다.
함수를 사용한 맞춤 정렬
대안으로서의 Lambda 기능
특히sorting_grade함수는 한 번만 사용되었으며 간단한 함수입니다.이 경우 람다 함수 사용을 고려할 수 있습니다.
람다 함수에 익숙하지 않은 경우 다음은 간단한 설명입니다. 람다 함수는 lambda 키워드를 사용하여 선언 된 익명 함수입니다. 0 개 이상의 인수가 필요하며 다음 형식의 적용 가능한 작업에 대해 하나의 표현식이 있습니다.람다 인수 : 표현식. 다음 코드는 람다 함수를 사용하는 방법을 보여줍니다.정렬 됨 ()위의 솔루션보다 약간 깔끔해 보이는 함수 :
Lambda를 사용한 사용자 지정 정렬
많은 데이터 과학자와 관련된 또 다른 일반적인 사용 사례는 Pandas 라이브러리로 작업 할 때 람다 함수를 사용하는 것입니다. 다음 코드는 간단한 예입니다.람다함수는 다음을 사용하여 데이터 조작을 지원합니다.지도()팬더의 각 항목을 작동하는 함수시리즈목적:
데이터 조작지도()과람다
7. 데코레이터 고려
데코레이터
데코레이터는 핵심 기능에 영향을주지 않고 다른 기능의 동작을 수정하는 기능입니다. 즉, 장식적인 수준에서 장식 된 기능을 수정합니다. 데코레이터에 대해 잘 모르시 겠다면 이전 기사를 참조하십시오 (1,2, 및삼). 다음은 데코레이터가 Python에서 작동하는 방식에 대한 간단한 예입니다.
기본 데코레이터
표시된대로 데코레이터 함수는 단순히 데코 레이팅 된 함수를 두 번 실행합니다. 데코레이터를 사용하려면 데코레이터 함수 이름을 데코 레이팅 된 함수 위에@접두사. 알 수 있듯이 데코 레이팅 된 함수는 두 번 호출되었습니다.
함수 선언에 데코레이터 사용
예를 들어 유용한 데코레이터 중 하나는 사용자 정의 클래스에서 사용할 수있는 속성 데코레이터입니다. 다음 코드는 작동 방식을 보여줍니다. 본질적으로@특성데코레이터는 인스턴스 메서드를 변환하여 점 표기법을 사용하는 액세스를 허용하는 일반 속성처럼 작동하도록합니다.
데코레이터 : 속성
데코레이터의 또 다른 사소한 사용 사례는 시간 로깅 데코레이터로, 함수의 효율성이 중요한 경우 특히 유용 할 수 있습니다. 다음 코드는 이러한 사용법을 보여줍니다.
로깅 시간
8. * args와 ** kwargs를 사용하라 — 그러나 간결하게
이전 섹션에서* args과** kwargs데코레이터 함수를 정의 할 때 데코레이터 함수를 사용하여 모든 함수를 데코레이션 할 수 있습니다. 본질적으로 우리는* args모든 (또는 더 일반적으로 결정되지 않은 수의) 위치 인수를 캡처하는 동안** kwargs모든 (또는 더 일반적으로 결정되지 않은 수의) 키워드 인수를 캡처합니다. 특히 위치 인수는 함수 호출에서 전달 된 인수의 위치를 기반으로하는 반면, 키워드 인수는 매개 변수를 특별히 명명 된 함수 인수로 설정하는 것을 기반으로합니다.
이러한 용어에 익숙하지 않은 경우 여기에서 기본 제공의 서명을 간단히 살펴볼 수 있습니다.정렬 됨 ()함수:정렬 됨 (반복 가능,*,key = 없음,reverse = 거짓). 그만큼반복 가능인수는 위치 인수이고키과역전인수는 키워드 인수입니다.
사용의 주요 이점* args과** kwargs동일한 문제에 대해 함수 선언을 깨끗하게하거나 덜 시끄럽게 만드는 것입니다. 다음 예는 다음의 합법적 인 사용을 보여줍니다.* arg함수 선언에서 함수가 임의의 수의 위치 인수를 허용하도록합니다.
* args 사용
다음 코드는 합법적 인 사용을 보여줍니다.** kwargs함수 선언에서. 마찬가지로** kwargs사용자가 원하는 수의 키워드 인수를 설정하여 함수를보다 유연하게 만들 수 있습니다.
** kwargs 사용
그러나 대부분의 경우 사용할 필요가 없습니다.* args또는** kwargs. 선언을 좀 더 깔끔하게 만들 수 있지만 함수의 서명을 숨 깁니다. 즉, 함수 사용자는 함수가 취하는 매개 변수를 정확히 파악해야합니다. 그러니 제 충고는 필요하지 않으면 사용하지 않는 것입니다. 예를 들어 사전 인수를 사용하여** kwargs? 마찬가지로 목록 또는 튜플 객체를 사용하여* args? 대부분의 경우 이러한 대안은 문제없이 작동합니다.
9. 인수에 대한 유형 주석
앞서 언급했듯이 Python은 동적 형식의 프로그래밍 언어이자 해석 언어이며, 이는 Python이 코딩 시간 동안 형식 호환성을 포함한 코드 유효성을 확인하지 않는다는 의미입니다. 코드가 실제로 실행될 때까지 함수와 호환되지 않는 유형을 입력합니다 (예 : 정수가 예상 될 때 함수에 문자열 전송).
이러한 이유로 Python은 입력 및 출력 인수 유형의 선언을 시행하지 않습니다. 즉, 함수를 만들 때 어떤 유형의 매개 변수가 있어야하는지 지정할 필요가 없습니다. 그러나 최근 Python 릴리스에서는 그렇게 할 수있게되었습니다. 유형 주석을 사용할 때의 주요 이점은 일부 IDE (예 : PyCharm 또는 Visual Studio Code)에서 주석을 사용하여 유형 호환성을 확인할 수 있으므로 사용자 또는 다른 사용자가 함수를 사용할 때 적절한 힌트를 얻을 수 있다는 것입니다.
또 다른 관련 이점은 IDE가 매개 변수 유형을 알고있는 경우 적절한 자동 완성 제안을 제공하여 더 빠르게 코딩 할 수 있다는 것입니다. 물론 함수에 대한 독 스트링을 작성할 때 이러한 유형 주석은 코드의 최종 개발자에게도 유익합니다.
유형 주석 (PyCharm)이있는 유용한 정보
10. 책임있는 문서
나는 좋은 문서를 책임감있는 문서와 동일시합니다. 함수가 사적인 용도로 사용되는 경우 매우 철저한 문서를 작성할 필요가 없습니다. 코드가 스토리를 명확하게 전달한다고 가정 할 수 있습니다. 어느 곳에서나 약간의 설명이 필요한 경우 코드를 재검토 할 때 자신이나 다른 독자에게 알림 역할을 할 수있는 매우 간단한 주석을 작성할 수 있습니다. 여기에서 책임있는 문서에 대한 논의는 공용 API로서의 함수의 독 스트링과 더 관련이 있습니다. 다음 측면이 포함되어야합니다.
함수의 의도 된 작업에 대한 간략한 요약입니다.이것은 매우 간결해야합니다. 대부분의 경우 요약은 한 문장 이상이어서는 안됩니다.
입력 인수 : 유형 및 설명.입력 인수의 유형과 특정 옵션을 설정하여 수행 할 수있는 작업을 지정해야합니다.
반환 값 : 유형 및 설명.입력 인수와 마찬가지로 함수의 출력을 지정해야합니다. 아무것도 반환하지 않는 경우 선택적으로없음반환 값으로.
결론
코딩 경험이 있다면 대부분의 시간이 함수 작성 및 리팩토링에 소비된다는 것을 알게 될 것입니다. 결국 데이터는 일반적으로 너무 많이 변경되지 않으며 데이터를 처리하고 조작하는 기능입니다. 데이터를 신체의 줄기라고 생각하면 기능은 사용자를 움직이는 팔과 다리입니다. 따라서 우리는 프로그램을 민첩하게 만들기 위해 좋은 함수를 작성해야합니다.


