종종 기본 설치에서 사용할 수없는 패키지와 모듈이 필요합니다. 일부 라이브러리 또는 응용 프로그램은 사용할 특정 버전의 라이브러리를 지정합니다. 이러한 경우 가상 환경이 유용합니다.
Anaconda를 사용하여 Python 배포를 사용하여 Python을 설정할 수 있습니다.
환경을 관리하려면 VS Code에서 명령 팔레트 ()에서 원하는 환경을 선택할 수 있습니다.⇧⌘P) > Python : 인터프리터 선택.
Python : 인터프리터 선택
Python 환경 선택
작업 공간
작업 공간 설정은 작업 공간 내에 저장되며 작업 공간이 열린 경우에만 적용됩니다. 전역 사용자 설정을 재정의합니다. 이러한 방식으로 각 데이터 과학 작업 영역을 사용자 지정 구성 할 수 있습니다.
Jupyter 노트북
Jupyter
그만큼Jupyter 노트북라이브 코드, 방정식, 시각화 및 설명 텍스트가 포함 된 문서를 만들고 공유 할 수있는 오픈 소스 웹 애플리케이션입니다.
REPL (Read-Evaluate-Print-Loop) 쉘을 사용하여 IPython의 후속 제품으로 개발 된 Jupyter 노트북은 데이터 과학을위한 컴퓨팅 노트북입니다.
Jupyter 확장은 현재 유지 관리되지 않으며 Microsoft의 Python 플러그인에는 공식적으로 Jupyter 노트북에 대한 기본 지원이 포함됩니다.
Jupyter 설치
다음을 사용하여 작업 공간에 Jupyter를 설치합니다.pip 설치 jupyter
새 Jupyter 노트북을 만들려면 명령 팔레트 (⇧⌘P) > 새 빈 Jupyter 노트북을 만듭니다.
새 Jupyter 노트북 열기
Jupyter 서버는 로컬로 설정되고 작업 공간 설정에 따라 Python 커널이 선택됩니다.
Jupyter 노트북 툴바
확장
확장은 개발자를위한 Visual Studio Code 환경의 필수적인 부분입니다. 시각 효과에서 다른 서비스와의 통합에 이르기까지 다양합니다. 생산성을 높이기 위해 원하는만큼 인터페이스를 수정할 수 있습니다. 예를 들어, —Bracket Pair Colorizer는 색상이있는 하나의 누락되거나 추가 된 브래킷을 찾는 데 도움이되며, 후행 공백은 Python에서 정말 도움이되는 외부 공간을 찾는 데 도움이 될 수 있습니다.
Visual Studio Code에 대한 경험을 향상시킬 수있는 확장 목록은 다음 중간 게시물이 정말 도움이된다는 것을 알았습니다.
버전 제어는 모든 개발자 또는 프로젝트에 필수적이며 팀간에 서로 다른 모듈 및 버전 작업을 용이하게합니다. 소스 코드의 변경 사항을 추적하기위한 분산 버전 제어 시스템 인 Git이 Visual Studio Code에 깔끔하게 통합되었습니다.
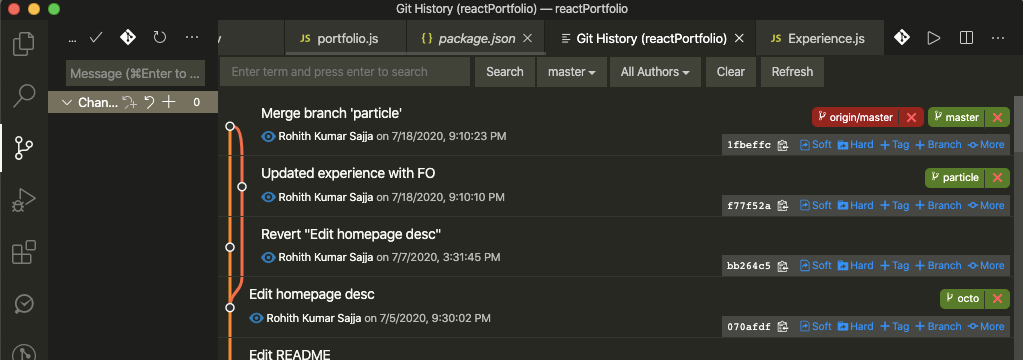
Git 기록 (git log)
VS Code에서 Git을 시작하려면 공식 확장 이름을 다운로드하여 설치하십시오.GitHub 풀 요청 및 문제. 또는 확장을 설치할 수 있습니다.GitLens. GitLens는 Git blame 주석 및 코드 렌즈를 통해 코드 작성자를 시각화하고 Git 리포지토리를 탐색 및 탐색하는 데 도움이됩니다.
Microsoft’s Visual Studio Code is arguably one of the best IDEs for developers. The same is true for Data Scientists. There are numerous tools and extensions in the VS Code that enable users with great user experience.
Often, you will require packages and modules that are not available by default installation. Some libraries or applications specify a particular version of a library to be used. Virtual environments are useful in these cases.
You can setup Python using Python distributions using Anaconda.
To manage your environment, in VS Code, you can select an environment of your choice from the Command Palette ( ⇧⌘P ) > Python: Select Interpreter.
Python: Select Interpreter
Selecting a Python environment
Workspaces
Workspace Settings are stored inside your workspace and only apply when the workspace is opened. They override the global user settings. This way each of the Data Science workspaces can be custom configured.
Jupyter Notebooks
Jupyter
The Jupyter Notebook is an open-source web application that allows you to create and share documents that contain live code, equations, visualizations and narrative text.
Developed as a successor to IPython with REPL (Read-Evaluate-Print-Loop) shell, Jupyter Notebooks are the computational notebook of choice for Data Science.
The Jupyter extension is not being maintained currently, and the Python plugin from Microsoft officially includes native support for Jupyter Notebooks.
Install Jupyter
Install Jupyter in your workspace using pip install jupyter
To create a new Jupyter notebook — use the Command Palette ( ⇧⌘P ) > Create New Blank Jupyter Notebook.
Open a new Jupyter Notebook
The Jupyter server will be set to local, and a python kernel is selected based on your workspace settings.
Jupyter Notebook toolbar
Extensions
Extensions are an integral part of the Visual Studio Code experience for developers. They range from visual effects to integration with other services. You can modify your interface as much as you wish to enhance productivity, for example —Bracket Pair Colorizer helps you find that one missing or extra bracket with colors, or Trailing spaces can help you find the extraneous spaces, which is really helpful in python.
For a list of extensions that can improve your experience on Visual Studio Code, I found the following medium post really helpful.
Version control is essential for any developer or project, helping facilitate working on different modules and versions by across teams. Git, the distributed version control system for tracking changes in your source code is neatly integrated into Visual Studio Code.
Git History (git log)
To get started with Git on VS Code, download and install the official extension names — GitHub Pull Requests and Issues. Or you can install the extension GitLens. GitLens helps you to visualize code authorship via Git blame annotations and code lens, and navigate and explore Git repositories.
프로그래밍 경험이있는 사람은 누구나다른 경우라면성명서. 기본적으로 특정 조건을 검사하여 논리적 분기를 만듭니다. 조건이 참으로 평가되면 프로그램은 다음에서 작업을 실행합니다.만약절, 그렇지 않으면그밖에절. 특히,이 두 절의 코드는 상호 배타적입니다. 즉,만약절이 실행되면그밖에절은 모두 건너 뛰고 그 반대의 경우도 마찬가지입니다.
서로 다른 언어간에 구문 세부 정보가 다양합니다. 예를 들어 Kotlin에서는 조건 평가에 괄호를 사용해야하지만 Swift와 Python에서는 괄호가 선택 사항입니다. Kotlin과 Swift 모두 각각에 중괄호를 사용합니다.만약과그밖에그러나 Python은 콜론과 들여 쓰기를 사용하여 범위를 나타냅니다. 다른 언어에는 약간의 차이가 있지만 이러한 특정 언어의 전문가가 아닌 기술에 정통한 외부인에게는 놀라운 일이 아닙니다.
이러한 대부분의 언어에서만약과그밖에절은다른 경우라면언어의 다른 곳에서는 나타나지 않습니다. 그러나 Python은 이와 관련하여 드문 경우입니다.그밖에조항. 이 기사에서 우리는 그것들이 무엇인지, 그리고 몇 가지 현실적인 예를 통해 어떻게 사용할 수 있는지 검토 할 것입니다.
"for"문
반복은 자동화를 가능하게하는 중요한 방법으로 프로그램에서 수행하는 가장 일반적인 작업 중 하나입니다. 특히, 우리는 주로...에 대한반복하고 목록, 사전, 세트 및 기타 여러 가지 반복 가능한 유형을 통해 특정 작업을 수행합니다. 가장 기본적인 형식은 다음과 같습니다.
"for"루프의 기본 형식
우리는그밖에다음 조항...에 대한고리. else 절은 어떤 조건에서 실행됩니까? 여기에 규칙이 있습니다.
의 코드그밖에절은...에 대한루프는 모든 반복을 완료합니다. 만약...에 대한루프는 break 문에 의해 조기에 중지됩니다.그밖에절도 생략됩니다.
헷갈 리게 들리나요? 당연히. 그만큼그밖에절은 문맥 외부에있을 때 실제로 까다 롭습니다.다른 경우라면성명서. 간단한 코드 예제를 통해이 사용법을 이해하겠습니다.
"For… else"문
위와 같이 주문한 상품이 준비되면그밖에절이 실행되어 그룹 순서가 가능함을 보여줍니다. 사용할 수없는 항목이있는 경우 실행은단절문 (6 행)을 사용하면그밖에절.
"while"문
그만큼동안문은 나중에 실행 중에 조건이 변경 될 때 특히 유용합니다. 특히, 조건이 참인 동안동안원인은 조건이 거짓이 될 때까지 실행됩니다. 먼저 예를 보겠습니다.
"While"진술
위와 같이동안절은 저축 잔고가 0보다 크지 않을 때까지 계속 실행됩니다. 하위 섹션 제목에서 알 수 있듯이그밖에절동안성명서. 규칙은 다음과 같습니다.
의 코드그밖에절은동안조건이 거짓으로 평가되기 때문에 루프가 정상적으로 종료됩니다. 만약동안루프는 break 문에 의해 조기에 중지됩니다.그밖에절도 생략됩니다.
혼란 스럽기도합니다. 보다 현실적인 예를 통해 더 잘 이해할 수 있습니다. 간단히 추가하겠습니다.그밖에위의 예제에 대한 절을 몇 가지 수정했습니다.
"While… else"진술
위와 같이 이제 경고 수준을 설정하고 그 아래에서 다음을 실행하여 인출 활동을 중지합니다.단절성명서. 보시다시피 경고 수준이 100으로 설정되면동안최종 잔액이 0에 도달하기 때문에 루프가 정상적으로 종료됩니다. 그러나 경고 수준이 500으로 설정되면 세 번째 출금 후 잔액이 400이되어 코드 실행이 시작됩니다.만약진술, 따라서단절성명은동안루프 실행을 조기에 중지합니다.그밖에절이 실행되지 않습니다.
"시도"진술
예외 처리는 코딩에서 까다로운 작업입니다. 그렇게하지 않으면 프로그램이 매우 취약 해집니다. 그러나 너무 많이하면 코드의 가독성이 크게 떨어집니다. 따라서 예외를 처리해야하는 양과시기에 대한 균형을 찾아야합니다. 확실히 현재 기사는 Python에서 예외를 처리하는 것에 관한 것이 아닙니다. 대신 예외 처리 기능에 대해 이야기 해 보겠습니다. 특히, 우리는시도…파이썬에서 예외를 처리하는 문. 예를 보겠습니다.
"try… except"진술의 기본 형식
위와 같이 단순히 문자열을 정수로 캐스팅하려고합니다. 문자열을 캐스트 할 수있는 경우시험절이 실행됩니다. 그러나 정수와 호환되지 않는 문자열을 캐스팅하면 예외가 발생하고외절. 아주 간단한 예외 처리 죠? 이 기사는그밖에절, 우리는 또한 사용할 수 있습니다그밖에절시도…그리고 당신은 그것에 대해 절대적으로 옳습니다. 규칙을 보겠습니다.
의 코드그밖에절은시험절은 예외없이 정상적으로 완료됩니다.
이 세 가지 중에서 이해하기 가장 쉬운 방법 일 것입니다.그밖에조항 사용법. 그럼에도 불구하고 특정 용도에 대해 다음 코드를 고려하십시오.
"Try… except… else"문
위의 코드에서 우리는인쇄원래 있던 기능시험조항에그밖에절. 이 두 함수 호출의 경우 보시다시피그밖에절은ValueError의도 된 사용법과 일치하는 예외가 발생했습니다.
특히, 코드의 최소화시험어떤 코드가 예외를 유발할 수 있는지 정확히 알려주기 때문에 절은 중요합니다.int ()함수. 그래서그밖에절은 이전 두 가지 사용법에 비해 코드를 더 깔끔하게 만드는 데 추가 된 이점이 있습니다.
결론
이 기사에서는 다른 세 가지를 검토했습니다.그밖에가장 잘 알려진 용법 외에 조항그밖에절만약성명서. 다음은 이러한 세 가지 용도에 대한 간략한 요약입니다.
때그밖에절은...에 대한과동안성명, 코드그밖에이전 절 (...에 대한또는동안) 만남 a단절성명서. 그렇지 않으면 이전 절 다음에 실행됩니다.
때그밖에절은시도…성명, 코드그밖에실행 중에 예외가 발생하면 절이 실행되지 않습니다.시험절. 때만 실행됩니다시험절은 예외를 발생시키지 않습니다.
이 세 가지 중 사람들은그밖에절시도…성명서. 다른 두 가지와 관련하여 새로운 Python 코더에게는 매우 혼란 스러울 수 있습니다. 더 노련한 기능을 사용하더라도 좋은 기능으로 사용하지 않으면 여전히 혼란 스러울 수 있습니다. 따라서 이러한 기능을 아는 것이 좋습니다. 그러면 해당 기능을 사용할 수있는 다른 사람의 코드를 읽을 수 있습니다. 이러한 기능을 직접 사용하는 경우 코드 리더 (예 : 팀 프로젝트)도 이러한 기능을 이해할 수 있는지 확인하는 것이 좋습니다.
Anyone with any programming experience should be familiar with the if…else statement. Basically, it creates a logical branch by examining a particular condition. When the condition is evaluated to be true, the program will execute the operations in the if clause, otherwise executing those in the else clause. Notably, the code in these two clauses will be mutually exclusive, which means that when the code in the if clause gets executed, the code in the else clause will be skipped altogether and vice versa.
Between different languages, there are variations in syntactical details. For example, Kotlin requires that you use parentheses for the condition evaluations, while parentheses are optional in Swift and Python. Both Kotlin and Swift use curly braces for each if and else clauses, but Python uses colons and indentations to denote the scope. Other languages have some other variances, but nothing is surprising to tech-savvy outsiders who are not experts in these particular languages.
In most of these languages, the if and else clauses only exist in the if…elsestatement, and they don’t appear anywhere else in the language. However, Python is unusual in this regard, because there are three other usages of the else clauses. In this article, we’ll review what they are and how we can use them with some realistic examples.
The “for” Statement
We know that iteration is one of the most common operations that we do in the program as an important way to enable automation. Specifically, we mostly use the for loop, and perform particular actions by going over some sort of iterables, such as lists, dictionaries, sets, and many others. The most basic format is shown below.
Basic Form of “for” Loop
We can append an else clause following the for loop. At what condition does the else clause get executed? Here’s the rule.
The code in the else clause will execute only when the for loop completes all the iterations. If the for loop is prematurely stopped by a break statement, the else clause will be skipped too.
Sounds confusing? Sure, is. The else clause is indeed tricky when it’s outside the context of the if…else statement. Let’s understand this usage with a simple code example.
“For…else” Statement
As shown above, when the ordered items are are available, the else clause gets executed, showing that the group order is possible. When any item is found to be unavailable, the execution will run into the break statement (Line 6), which will result in the skip of the else clause.
The “while” Statement
The while statement is particularly useful when a condition is subject to change at a later time during execution. Specifically, while the condition is true, the code in the while cause will execute until the condition becomes false. Let’s see an example first.
“While” Statement
As shown above, the code in the while clause continues to execute until the saving balance isn’t greater than zero. As indicated by the subsection title, we can also have an else clause with the while statement. Here’s the rule:
The code in the else clause will execute only when the while loop exits normally because the condition evaluates false. If the while loop is prematurely stopped by a break statement, the else clause will be skipped too.
I know that it’s confusing as well. It’s better understood through a more realistic example. I’ll just simply append the else clause to the above example with a few tweaks.
“While…else” Statement
As shown above, we now set an alert level, below which, we’ll stop the withdrawal activities by executing the break statement. As you can see, when the alert level is set to 100, the while loop exits normally because the final balance reaches zero. However, when the alert level is set to 500, after the third withdrawal, the balance becomes 400, which will trigger the code execution in the if statement, and thus the break statement will make the while loop stop execution prematurely, by doing which, the else clause won’t execute.
The “try” Statement
Exception handling is a tricky task in coding. When you don’t do it, your program is very fragile. However, if you do it too much, the readability of your code is severely reduced. Thus, you need to find a balance for how much and when you need to handle exceptions. Certainly, the current article isn’t about handling exceptions in Python. Instead, let’s just talk about the feature of exception handling. Specifically, we will use the try…except statement to handle an exception in Python. Let’s see an example:
Basic Form of the “try…except” Statement
As shown above, we simply try to cast a string to an integer. When a string is able to be cast, all of the code in the try clause executes. However, when we cast a string that isn’t integer compatible, the exception is raised and handled by the code in the except clause. Pretty straightforward exception handling, right? Since this article is talking about else clauses, you can bet that we can also use an else clause in the try…except statement, and you’re absolutely right about that. Let’s see the rule:
The code in the else clause will execute only when the try clause completes normally without encountering any exceptions.
This is probably the easiest one to understand among these three else clause usages. Nevertheless, consider the following code for its specific usage.
“Try…except…else” Statement
In the above code, we move the print function that was originally in the try clause to the else clause. For these two function calls, as you can see, the else clause executes only when there is no ValueError exception raised, consistent with its intended usage.
Notably, minimizing the code in the try clause is significant, because it will inform us exactly of what code can cause exceptions, in which case, it’s the int() function. Thus, the else clause has added benefits in making our code cleaner compared to the previous two usages.
Conclusions
In this article, we reviewed three other else clauses besides the most well-known usage of else clause in the if statement. Here’s a quick recap of these three usages.
When the else clause is used in the for and while statement, the code in the else clause won’t execute if the preceding clause (for or while) encounters a break statement. Otherwise, it will execute following the preceding clause.
When the else clause is used in the try…except statement, the code in the else clause won’t execute if any exception is raised during the execution of the try clause. It will only run when the try clause raises no exceptions.
Among these three, people may be the most familiar with the else clause in the try…except statement. Regarding the other two, they can be very confusing to new Python coders. Even for those more seasoned ones, if you don’t use these under appreciated features, they can still be confusing. Thus, my advice is to know these features, which will allow you to read others’ code who may happen to use them. If you’re using these features yourself, you may want to make sure that your code readers (e.g., in a team project) can appreciate these features, too.
에멋지게 쓰여진 기사,이 확장 프로그램으로 Jupyter 노트북을 바로 설정하십시오.[1], William Koerhsen이 Jupyter 노트북 확장을 사용하여 노트북 템플릿을 만들어 생산성을 향상시키는 방법을 설명합니다. 이 템플릿은 각 데이터 과학 여정의 시작점 역할을합니다. 우리는 모두 새로운 조사를 시작할 때 동일한 상용구 코드를 입력하는 것을 발견했습니다.
본질[1]Javascript 파일을 Jupyter의 nbextensions 시스템에서 사용하는 특정 폴더에 넣을 수 있으며 새 노트북이 생성 될 때마다 Jupyter에서 호출됩니다. 그의 기사에서 그는 기본적이고 일반적인 Python 상용구를 사용하여 새 노트북을 만들고 기본 "Untitled.ipynb"에서 노트북의 이름을 바꾸도록하는 후크를 활성화합니다. 그는 동반 기사가 있습니다.Jupyter 노트북 확장[2]Jupyter 노트북 확장을 설치하는 방법을 보여줍니다.
DrivenData.org에 또 다른 흥미로운 기사가 있습니다.Cookiecutter 데이터 과학[삼]데이터 과학 프로젝트에 유용한 조직을 자세히 설명합니다.
제 경우에는 제가 사용하는 노트북 템플릿이[1]과[삼]. 그것은 내가 포함해야한다는 것을 알고 있지만 종종 일회성 노트북에 추가하기에는 너무 게으르다는 코드를 추가합니다 (나는 당신에 대해 이야기하고 있습니다, unittest!) 너무 많이 나는 내가 단지 나만 할 것이라고 생각했던 프로젝트를 시작했습니다. 한 번 사용했지만 여러 번 사용했거나 처음에 생각했던 것 이상으로 프로젝트를 확장했습니다. 엉망진창을 피하기 위해 필요에 따라 채울 수있는 몇 가지 공통 구조를 갖는 것이 도움이됩니다.
노트북 확장을 파악하고 Jupyter 시작 코드를 리버스 엔지니어링하는 모든 노력이 W Koehrsen에 의해 수행되었지만, 템플릿에 각 셀을 추가하기 위해 Javascript 파일을 수동으로 편집하는 것은 다소 지루합니다. 몇 줄이 넘는 템플릿 노트북의 경우 javascript 파일에 구문 오류가 발생할 가능성이 높습니다.
이 기사 (및 해당 github 저장소의 코드)는 템플릿 Jupyter 노트북에서 main.js 파일을 (반) 자동으로 생성하여이 프로세스를 단순화합니다. 코드를 실행하기 전에 템플릿을 .py 파일로 수동으로 저장해야하므로 반자동입니다.노트북 템플릿 생성기 .ipynbJupyter와 함께.
전제 조건
아직 Jupyter Extensions가 없다면 다음 도움말을 확인하세요.[2]또는 명령 프롬프트에서 다음 코드를 실행하십시오. pip install jupyter_contrib_nbextensions && jupyter contrib nbextensions install --user 그런 다음 새 노트북 서버를 시작하고 확장 탭으로 이동). 오랫동안 보안 분야에서 일해 왔기 때문에 저는 제 컴퓨터에서 관리자로 실행하지 않기 때문에 적어도 제 경우에는 '--user'를 추가해야합니다.
에서 참조하는 GitHub 저장소에서 "setup"폴더의 복사본을 가져와야합니다.[1], 즉여기. notebook-template-generator 노트북을 실행하여 설정 디렉토리가 이동해야하는 경로를 찾을 수 있습니다. 경로가 존재하지 않으면 예상하는 경로가 표시됩니다. virtualenv를 사용하는 내 Mac에서는 다음과 같이 끝납니다. ~ / development / Python / Virtualenvs / py37 / lib / python3.7 / site-packages / jupyter_contrib_nbextensions / nbextensions / setup jupyter nbextensions를 설치할 때 "--user"옵션을 사용했기 때문에 이것은 내 홈 디렉토리에 있습니다.
notebook-template.ipynb 및 notebook-setup-generator.ipynb가있는이 기사의 GitHub 저장소는 다음과 같습니다.여기.
달리는
Jupyter로 notebook-template.ipynb 및 notebook-setup-generator.ipynb를 모두 엽니 다. 기본 Jupyter 노트북에서 원하는 내용을 포함하도록 notebook-template.ipynb를 편집합니다. 파일 메뉴에서 "다른 이름으로 다운로드…"를 선택하고 "Python (.py)"을 선택합니다. macOS에서는 ~ / Downloads 디렉토리에 notebook-template.py.html로 저장됩니다 (변경get_notebook_template_path() 다른 곳에 넣으려면).
다음으로 이동notebook-setup-generator.ipynb그리고 선택모두 실행~로부터세포메뉴. 모든 것이 잘되면 기존에 덮어 쓸 것인지 묻습니다.setup / main.js파일. 다음에 새 Jupyter 노트북을 만들면 사용중인 버전의 새 셀 사본으로 채워집니다.notebook-template.ipynb.
추가 참고 사항
가상 환경에서 Python 3.7.2를 사용하여 macOS 10.14.3에서 테스트했습니다. 파서generate_setup_javascript ()매우 기본적이므로 복잡한 notebook-template.ipynb 파일이 올바르게 구문 분석되지 않을 수 있습니다.
Koehrsen의 원래 Javascript 기능에서promptName, 새 노트북의 이름이 "제목 없음"인지 확인합니다. 그렇다면 이름을 변경하라는 메시지가 표시됩니다. 나는 그것에 주석을 달았다js_postamble문자열notebook-setup-generator.ipynb템플릿을 디버깅 할 때 고통 스럽지만 템플릿에 만족하면 다시 활성화해도됩니다.
In a nicely written article, Set Your Jupyter Notebook up Right with this Extension[1], William Koerhsen describes how to use Jupyter notebook extensions to improve productivity by creating a notebook template. This template serves as the starting point for each of your data science journeys. We have all found ourselves typing the same boilerplate code at the start of a new investigation.
The essence of [1] is that you can put a Javascript file into a particular folder used by Jupyter’s nbextensions system, and it will be called by Jupyter each time a new notebook is created. In his article, he creates a new notebook with some basic, common Python boilerplate, and also enables a hook that forces you to rename the notebook from the default “Untitled.ipynb”. He has a companion article, Jupyter Notebook Extensions[2] that shows how to install Jupyter notebook extensions.
There is another interesting article at DrivenData.org, Cookiecutter Data Science[3] that details a helpful organization for Data Science projects.
In my particular case, the notebook template that I use expands on both [1] and [3]. It adds in some code that I know I should include but am often too lazy to add in to a one-off notebook (I’m talking about you, unittest!) Too many times I have started a project that I thought I would only use once, but ended up using multiple times, or expanded the project beyond what I initially envisioned. To avoid an unruly mess, it helps me to have some common structure that I can fill in as needed.
Although all the hard work of figuring out notebook extensions and reverse engineering Jupyter startup code has been done by W Koehrsen, manually editing the Javascript file to add each cell in the template is somewhat tedious. For any template notebook more than a few lines, there is a good chance of introducing a syntax error into the javascript file.
This article (and the code in the corresponding github repository) simplifies this process by (semi-)automatically generating the main.js file from a template Jupyter notebook. It is only semi-automatic as you must manually save your template as a .py file before running the code in notebook-template-generator.ipynb with Jupyter.
Prerequisites
If you don’t yet have Jupyter Extensions, check out this article: [2] or just run the following code in a command prompt: pip install jupyter_contrib_nbextensions && jupyter contrib nbextensions install --user and then start a new notebook server and navigate to the extensions tab). Having worked in the security space for a long time, I don't run as an administrator on my machine, so adding '--user' is necessary, at least in my case.
You will need to grab a copy of the “setup” folder from the GitHub repository referenced in [1], which is here. You can find the path where the setup directory needs to go by running the notebook-template-generator notebook; if the path does not exist it will show the path where it expects it. On my Mac using virtualenv, it ends up here: ~/development/Python/Virtualenvs/py37/lib/python3.7/site-packages/jupyter_contrib_nbextensions/nbextensions/setup This is in my home directory because I used the "--user" option when I installed jupyter nbextensions.
The GitHub repository for this article with notebook-template.ipynb and notebook-setup-generator.ipynb is here.
Running
Open both notebook-template.ipynb and notebook-setup-generator.ipynb with Jupyter. Edit notebook-template.ipynb to contain whatever you would like in a basic Jupyter notebook. Under the File menu, choose “Download as…” and pick “Python (.py)”. On macOS, this will be saved as notebook-template.py.html in the ~/Downloads directory (change get_notebook_template_path() if you want to put it somewhere else).
Next, go to notebook-setup-generator.ipynb and select Run All from the Cell menu. If all goes well, it will ask you if you would like to overwrite the existing setup/main.js file. The next time you create a new Jupyter notebook, it will be populated with a fresh copy of the cells from your version of notebook-template.ipynb.
Additional Notes
I have tested this on macOS 10.14.3 with Python 3.7.2 in a virtual environment. The parser in generate_setup_javascript() is very basic, so it’s possible that complicated notebook-template.ipynb files will not be parsed correctly.
In Koehrsen’s original Javascript function promptName, it checks to see if the new notebook is called “Untitled”; if so, it prompts you to rename it. I have that commented out in the js_postamble string in notebook-setup-generator.ipynb as it is painful when debugging your template, but feel free to re-enable it when you are happy with your template.