Data Science and Data Proicessing

고급 Python : 클래스를 정의 할 때 적용 할 9 가지 모범 사례

코드를 더 읽기 쉽고 유지 관리하기 쉽게 만드는 방법

8 월 12 일 · 11최소 읽기
Image for post
~의 사진FERESHTEH AZADI의 위에Unsplash

핵심에서 Python은 객체 지향 프로그래밍 (OOP) 언어입니다. OOP 언어이기 때문에 Python은 객체 중심의 다양한 기능을 지원하여 데이터와 기능을 처리합니다. 예를 들어 데이터 구조는 일부 다른 언어에서 객체로 간주되지 않는 기본 유형 (예 : 정수 및 문자열)을 포함한 모든 객체입니다. 또 다른 예로, 함수는 모든 객체이며, 정의 된 다른 객체 (예 : 클래스 또는 모듈)의 속성 일뿐입니다.

기본 제공 데이터 유형을 사용하고 사용자 지정 클래스를 만들지 않고도 여러 함수를 작성할 수 있지만 프로젝트 범위가 커지면 코드를 유지 관리하기가 더 어려워 질 수 있습니다. 이러한 개별 부분에는 공유 된 테마가 없으며 많은 정보가 관련되어 있지만 이들 간의 연결을 관리하는 데 많은 번거 로움이 있습니다.

이러한 시나리오에서는 관련 정보를 그룹화하고 프로젝트의 구조 설계를 개선 할 수 있도록 고유 한 클래스를 정의하는 것이 좋습니다. 더 중요한 것은 코드 조각이 덜 조각 된 코드를 다루게되므로 코드베이스의 장기적인 유지 관리 가능성이 향상된다는 것입니다. 그러나 한 가지 문제가 있습니다. 이것은 사용자 정의 클래스를 정의하는 이점이 관리 오버 헤드보다 클 수 있도록 클래스 선언이 올바른 방식으로 수행 된 경우에만 해당됩니다.

이 기사에서는 사용자 정의 클래스에 적용 할 수있는 9 가지 중요한 모범 사례를 검토하고자합니다.

1. 좋은 이름

자신 만의 클래스를 정의 할 때 코드베이스에 새로운 아기를 추가하는 것입니다. 수업에 아주 좋은 이름을 지정해야합니다. 클래스 이름의 유일한 제한은 합법적 인 Python 변수의 규칙 (예 : 숫자로 시작할 수 없음)이지만 클래스 이름을 지정하는 데 선호되는 방법이 있습니다.

  • 발음하기 쉬운 명사를 사용하십시오.팀 프로젝트에서 작업하는 경우 특히 중요합니다. 그룹 프레젠테이션 중에 "이 경우에는 Zgnehst 클래스의 인스턴스를 만듭니다."라고 말하는 사람이되고 싶지 않을 것입니다. 또한 발음하기 쉽다는 것은 이름이 너무 길어서는 안된다는 의미이기도합니다. 클래스 이름을 정의하기 위해 3 개 이상의 단어를 사용해야하는 경우는 거의 생각할 수 없습니다. 한 단어가 가장 좋고 두 단어가 좋고 세 단어가 한계입니다.
  • 저장된 데이터와 의도 한 기능을 반영합니다.마치 우리의 실제 생활과 같습니다. 소년에게는 소년 이름이 주어집니다. 남자 아이 이름을 보면 아이들이 남자 일 것으로 예상합니다. 클래스 이름 (또는 일반적으로 다른 변수)에도 적용됩니다. 규칙은 간단합니다 — 사람들을 놀라게하지 마십시오. 학생의 정보를 다루는 경우 수업 이름은 Student로 지정해야합니다. KiddosAtCampus는 가장 상식적인 말이 아닙니다.
  • 명명 규칙을 따르십시오.GoodName과 같은 클래스 이름에는 대문자 낙타 스타일을 사용해야합니다. 다음은 goodName, Good_Name, good_name 및 GOodnAme와 같은 비 전통적인 클래스 이름의 불완전한 목록입니다. 명명 규칙을 따르는 것은 의도를 명확하게하는 것입니다. 사람들이 코드를 읽을 때 GoodName과 같은 이름을 가진 객체가 클래스라고 안전하게 가정 할 수 있습니다.

속성 및 함수에 적용되는 명명 규칙 및 규칙도 있습니다. 아래 섹션에서 해당되는 경우 간략하게 언급하지만 전체 원칙은 동일합니다. 유일한 경험 법칙은 간단합니다. 사람들을 놀라게하지 마십시오.

2. 명시 적 인스턴스 속성

대부분의 경우 자체 인스턴스 초기화 방법 (예 :__init__). 이 메서드에서는 새로 생성 된 클래스 인스턴스의 초기 상태를 설정합니다. 하지만 Python은 커스텀 클래스로 인스턴스 속성을 정의 할 수있는 위치를 제한하지 않습니다. 즉, 인스턴스가 생성 된 후 이후 작업에서 추가 인스턴스 속성을 정의 할 수 있습니다. 다음 코드는 가능한 시나리오를 보여줍니다.

초기화 방법

위와 같이 인스턴스를 만들 수 있습니다.학생학생의 이름과 성을 지정하여 수업. 나중에 인스턴스 메서드를 호출 할 때 (즉,verify_registration_status),학생인스턴스의 상태 속성이 설정됩니다. 그러나 이것은 원하는 패턴이 아닙니다. 전체 클래스에 다양한 인스턴스 속성을 분산하면 인스턴스 객체가 어떤 데이터를 보유하고 있는지 클래스가 명확하게 할 수 없기 때문입니다. 따라서 모범 사례는 인스턴스의 속성을__init__메소드를 사용하면 아래와 같이 코드 리더가 클래스의 데이터 구조를 알 수있는 단일 위치를 갖게됩니다.

더 나은 초기화 방법

처음에 설정할 수없는 인스턴스 속성의 경우 다음과 같은 자리 표시 자 값으로 설정할 수 있습니다.없음. 그다지 문제가되지 않지만이 변경 사항은 일부 인스턴스 메서드를 호출하여 해당 인스턴스 속성을 설정하는 것을 잊었을 때 발생할 수있는 오류를 방지하는데도 도움이됩니다.AttributeError(‘학생’개체에‘status_verified’속성이 없습니다.).

이름 지정 규칙과 관련하여 속성은 소문자를 사용하여 이름을 지정하고 뱀 케이스 스타일을 따라야합니다. 즉, 여러 단어를 사용하는 경우 밑줄로 연결해야합니다. 또한 모든 이름에는 보유한 데이터에 대한 의미있는 표시가 있어야합니다 (예 :이름~보다 낫다fn).

3. 속성 사용-그러나 간결하게

어떤 사람들은 자바와 같은 다른 OOP 언어의 기존 배경으로 Python 코딩을 배우고 인스턴스 속성에 대한 getter 및 setter를 만드는 데 사용됩니다. 이 패턴은 Python에서 속성 데코레이터를 사용하여 모방 할 수 있습니다. 다음 코드는 속성 데코레이터를 사용하여 getter 및 setter를 구현하는 기본 형식을 보여줍니다.

부동산 데코레이터

이 속성이 생성되면 내부 함수를 사용하여 구현되지만 점 표기법을 사용하여 일반 속성으로 사용할 수 있습니다.

속성 사용

아시다시피 속성 구현을 사용하는 이점에는 적절한 값 설정 (정수가 아닌 문자열이 사용되는지 확인) 및 읽기 전용 액세스 (setter 메서드를 구현하지 않음)가 포함됩니다. 그러나 속성을 간결하게 사용해야합니다. 사용자 정의 클래스가 아래와 같이 보이면 매우 산만해질 수 있습니다. 속성이 너무 많습니다!

재산 남용

대부분의 경우 이러한 속성은 인스턴스 속성으로 대체 될 수 있으므로 이러한 속성에 액세스하여 직접 설정할 수 있습니다. 논의 된대로 속성 사용의 이점 (예 : 값 확인)에 대한 특정 요구 사항이없는 경우 속성을 사용하는 것이 Python에서 속성을 만드는 것보다 선호됩니다.

4. 의미있는 문자열 표현 정의

파이썬에서는 이름 앞뒤에 이중 밑줄이있는 함수를 특수 또는 매직 메서드라고하며 어떤 사람들은이를 dunder 메서드라고합니다. 그들은 다음을 포함하여 통역사의 기본 작업에 특별한 용도가 있습니다.__init__이전에 다룬 방법입니다. 두 가지 특별한 방법,__repr____str__는 사용자 정의 클래스의 적절한 문자열 표현을 만드는 데 필수적이며 코드 판독기에게 클래스에 대한보다 직관적 인 정보를 제공합니다.

그들 사이의 주요 차이점은__repr__메소드는 문자열을 정의합니다.이를 사용하여 다음을 호출하여 객체를 다시 만들 수 있습니다.eval (repr ( "repr")), 동안__str__메소드는 더 설명적이고 더 많은 사용자 정의를 허용하는 문자열을 정의합니다. 즉, 정의 된 문자열이__repr__방법은 개발자가 보는 동안__str__방법은 일반 사용자가 볼 수 있습니다. 다음은 예를 보여줍니다.

문자열 표현의 구현

양해 해주십시오.__repr__메서드 구현 (7 행), f- 문자열은!아르 자형올바른 형식의 문자열로 인스턴스를 구성하는 데 필요하기 때문에 따옴표로 이러한 문자열을 표시합니다. ! r 형식이 없으면 문자열은학생 (John, Smith)을 구성하는 올바른 방법이 아닙니다.학생예. 이러한 구현이 문자열을 어떻게 보여 주는지 살펴 보겠습니다. 특히__repr__대화 형 인터프리터에서 개체에 액세스 할 때 메서드가 호출되고__str__메서드는 개체를 인쇄 할 때 기본적으로 호출됩니다.

문자열 표현

5. 인스턴스, 클래스 및 정적 메서드

클래스에서 우리는 인스턴스, 클래스, 정적 메서드의 세 종류의 메서드를 정의 할 수 있습니다. 관심있는 기능에 어떤 방법을 사용해야하는지 고려해야합니다. 다음은 몇 가지 일반적인 지침입니다.

예를 들어 메서드가 개별 인스턴스 개체와 관련된 경우 인스턴스의 특정 속성에 액세스하거나 업데이트해야합니다.이 경우 인스턴스 메서드를 사용해야합니다. 이러한 메서드에는 다음과 같은 서명이 있습니다.def do_something (self) :, 여기서본인인수는 메서드를 호출하는 인스턴스 개체를 참조합니다. 에 대해 더 알고본인인수, 당신은 참조 할 수 있습니다내 이전 기사이 주제에.

메서드가 개별 인스턴스 개체와 관련이없는 경우 클래스 또는 정적 메서드 사용을 고려해야합니다. 두 방법 모두 적용 가능한 데코레이터로 쉽게 정의 할 수 있습니다.classmethodstaticmethod. 이 두 가지의 차이점은 클래스 메서드를 사용하면 클래스와 관련된 속성에 액세스하거나 업데이트 할 수 있지만 정적 메서드는 인스턴스 또는 클래스 자체와 독립적이라는 것입니다. 클래스 메서드의 일반적인 예는 편리한 인스턴스화 메서드를 제공하는 반면 정적 메서드는 단순히 유틸리티 함수일 수 있습니다. 다음 코드는 몇 가지 예를 보여줍니다.

다른 종류의 방법

비슷한 방식으로 클래스 속성을 만들 수도 있습니다. 앞에서 논의한 인스턴스 속성과 달리 클래스 속성은 모든 인스턴스 객체에서 공유되며 개별 인스턴스 객체와 독립적 인 일부 특성을 반영해야합니다.

6. 개인 속성을 사용한 캡슐화

프로젝트를위한 사용자 정의 클래스를 작성할 때 특히 다른 사람들이 클래스를 사용할 것으로 예상되는 경우 캡슐화를 고려해야합니다. 클래스의 기능이 커지면 일부 함수 또는 속성은 클래스 내의 데이터 처리에만 관련됩니다. 즉, 클래스 외부에서는 이러한 함수가 호출되지 않으며 클래스의 다른 사용자는 이러한 함수의 구현 세부 사항에 대해 신경 쓰지 않습니다. 이러한 시나리오에서는 캡슐화를 고려해야합니다.

캡슐화를 적용하는 한 가지 중요한 방법은 규칙에 따라 밑줄 또는 두 개의 밑줄을 접두사로 속성 및 함수에 추가하는 것입니다. 미묘한 차이점은 밑줄이있는 항목은보호, 두 개의 밑줄이있는 항목은은밀한, 생성 후 이름 변경이 포함됩니다. 이 두 범주를 구별하는 것은이 기사의 범위를 벗어납니다.내 이전 기사 중 하나그들을 덮었습니다.

본질적으로 속성과 함수의 이름을 이렇게 지정하면 IDE (예 : PyCharm과 같은 통합 개발 환경)에 실제 개인 속성이 존재하지 않더라도 클래스 외부에서 액세스하지 않을 것임을 알립니다. 파이썬. 즉, 우리가 선택하면 여전히 액세스 할 수 있습니다.

캡슐화

위의 코드는 캡슐화의 간단한 예를 보여줍니다. 학생의 경우 평균 GPA를 아는 데 관심이있을 수 있으며 다음을 사용하여 점수를 얻을 수 있습니다.get_mean_gpa방법. 사용자는 평균 GPA가 어떻게 계산되는지 알 필요가 없습니다. 따라서 함수 이름 앞에 밑줄을 추가하여 관련 방법을 보호 할 수 있습니다.

이 모범 사례의 핵심 사항은 사용자가 코드를 사용하는 데 필요한 최소한의 공용 API 만 노출한다는 것입니다. 내부적으로 만 사용되는 경우 보호 또는 개인 방법으로 만드십시오.

7. 별도의 우려 사항 및 분리

프로젝트를 개발하면서 더 많은 데이터를 처리하고 있다는 사실을 알게되었으며, 하나의 클래스를 고수하는 경우 클래스가 번거로울 수 있습니다. 예를 들어 계속하겠습니다.학생수업. 학생들이 학교에서 점심을 먹고 각자 식사 비용을 지불하는 데 사용할 수있는 식사 계정을 가지고 있다고 가정합니다. 이론적으로는 계정 관련 데이터 및 기능을 다룰 수 있습니다.학생아래와 같이 클래스.

혼합 기능

위의 코드는 계정 잔액을 확인하고 계정에 돈을로드하는 데 대한 의사 코드를 보여줍니다. 둘 다학생수업. 분실 된 카드 일시 중지, 계정 통합과 같이 계정과 관련 될 수있는 더 많은 작업이 있다고 상상해보십시오. 이러한 작업을 모두 구현하면학생클래스가 점점 커지면서 점차 유지하기가 더 어려워집니다. 대신 이러한 책임을 분리하고학생이러한 계정 관련 기능에 대해 무책임한 클래스 — 다음과 같은 디자인 패턴디커플링.

분리 된 우려

위의 코드는 추가로 데이터 구조를 설계하는 방법을 보여줍니다.계정수업. 보시다시피 모든 계정 관련 작업을계정수업. 학생의 계정 정보를 검색하려면학생클래스는 정보를 검색하여 기능을 처리합니다.계정수업. 클래스와 관련된 더 많은 기능을 구현하려면 간단히 업데이트 할 수 있습니다.계정수업 만.

디자인 패턴의 주요 요점은 개별 수업에 별도의 문제가 있기를 원한다는 것입니다. 이러한 책임을 분리하면 더 작은 코드 구성 요소를 다루게되므로 클래스가 더 작아지고 향후 변경이 더 쉬워집니다.

8. 최적화를 위해 __slots__ 고려

클래스가 데이터 만 저장하기위한 데이터 컨테이너로 주로 사용되는 경우__ 슬롯 __수업의 성능을 최적화합니다. 속성 액세스 속도를 높일뿐만 아니라 메모리도 절약하므로 수천 개 이상의 인스턴스 객체를 만들어야하는 경우 큰 이점이 될 수 있습니다. 그 이유는 일반 클래스의 경우 인스턴스 속성이 내부적으로 관리되는 사전을 통해 저장되기 때문입니다. 대조적으로,__ 슬롯 __, 인스턴스 속성은 내부적으로 C를 사용하여 구현 된 어레이 관련 데이터 구조를 사용하여 저장되며 성능은 훨씬 더 높은 효율성으로 최적화됩니다.

클래스 정의에서 __slots__ 사용

위의 코드는 우리가 어떻게 구현하는지에 대한 간단한 예를 보여줍니다.__ 슬롯 __수업에서. 특히 모든 속성을 시퀀스로 나열하면 더 빠른 액세스와 적은 메모리 소비를 위해 데이터 저장소에서 일대일 일치가 생성됩니다. 방금 언급했듯이 일반 클래스는 속성 액세스를 위해 사전을 사용하지만__ 슬롯 __구현되었습니다. 다음 코드는 그러한 사실을 보여줍니다.

__slots__ 클래스에 __dict__ 없음

사용에 대한 자세한 설명__ 슬롯 __에 대한 좋은 답변에서 찾을 수 있습니다.스택 오버플로, 그리고 당신은 공식에서 더 많은 정보를 찾을 수 있습니다선적 서류 비치. 더 빠른 액세스와 절약 된 메모리의 이점에 관해서는최근 매체 기사아주 좋은 시연이 있습니다. 여기에 대해 자세히 설명하지 않겠습니다. 그러나 한 가지 주목할 점은__ 슬롯 __부작용이 있습니다. 이는 추가 속성을 동적으로 생성하지 못하게합니다. 어떤 사람들은 클래스의 속성을 제어하는 ​​메커니즘으로이를 제안하지만 디자인 방식이 아닙니다.

9. 문서

마지막으로, 수업 문서에 대해 이야기해야합니다. 가장 중요한 것은 문서 작성이 코드를 대체하는 것이 아니라는 점을 이해해야한다는 것입니다. 수많은 문서를 작성한다고해서 코드의 성능이 향상되는 것은 아니며 반드시 코드를 더 읽기 쉽게 만드는 것도 아닙니다. 코드를 명확히하기 위해 독 스트링에 의존해야하는 경우 코드에 문제가있을 가능성이 큽니다. 나는 당신의 코드가 그 자체로 모든 것을 말해야한다고 진정으로 믿습니다. 다음 코드는 일부 프로그래머가 할 수있는 실수를 보여줍니다. 불필요한 주석을 사용하여 잘못된 코드를 보완합니다 (즉,이 경우 의미없는 변수 이름). 반대로 좋은 이름을 가진 좋은 코드는 주석이 필요하지 않습니다.

잘못된 댓글 예

댓글과 독 스트링 작성에 반대한다는 말은 아니지만 실제로 사용 사례에 따라 다릅니다. 여러 사람이 코드를 사용하거나 두 번 이상 사용하는 경우 (예 : 코드에 액세스하는 유일한 사람이지만 여러 번) 좋은 댓글 작성을 고려해야합니다. 자신이나 팀원이 코드를 읽는 데 도움을 줄 수 있지만, 코드가 주석에서 말한대로 정확하게 작동한다고 가정해서는 안됩니다. 즉, 좋은 코드를 작성하는 것이 항상 명심해야 할 최우선 순위입니다.

최종 사용자가 코드의 특정 부분을 사용하는 경우 해당 사용자가 관련 코드베이스에 익숙하지 않기 때문에 독 스트링을 작성하는 것이 좋습니다. 그들이 알고 싶은 것은 관련 API를 사용하는 방법 뿐이며, docstring은 도움말 메뉴의 기초를 형성합니다. 따라서 프로그램 사용 방법에 대한 명확한 지침을 제공하는 것은 프로그래머의 책임입니다.

결론

이 기사에서는 자신의 클래스를 정의 할 때 고려해야 할 중요한 요소를 검토했습니다. Python이나 일반적인 프로그래밍을 처음 접한다면 지금까지 논의한 모든 측면을 완전히 이해하지 못할 수도 있습니다. 괜찮습니다. 더 많이 코딩할수록 클래스를 정의하기 전에 이러한 원칙을 염두에 두는 것의 중요성을 더 많이 알게 될 것입니다. 좋은 디자인은 나중에 개발 시간을 많이 절약 할 수 있기 때문에 클래스 작업을 할 때 이러한 지침을 계속해서 연습하십시오.

Advanced Python: 9 Best Practices to Apply When You Define Classes

How to make your code more readable and maintainable

Aug 12 · 11 min read
Image for post
Photo by FERESHTEH AZADI on Unsplash

At its core, Python is an object-oriented programming (OOP) language. Being an OOP language, Python handles data and functionalities by supporting various features centered around objects. For instance, data structures are all objects, including primitive types (e.g., integers and strings) which aren’t considered objects in some other languages. For another instance, functions are all objects, and they are merely attributes of other objects where they are defined (e.g., class or module).

Although you can use built-in data types and write a bunch of functions without creating any custom classes, chances are that your code can become harder and harder to maintain when the project’s scope grows. These separate pieces have no shared themes, and there will be lots of hassles to manage connections between them, although much of the information is related.

In these scenarios, it’s worth defining your own classes, which will allow you to group related information and improve the structural design of your project. More importantly, the long-term maintainability of your codebase will be improved, because you’ll be dealing with less pieced code. However, there is a catch — this is only true when your class declaration is done in the right way such that the benefits of defining custom classes can outweigh the overhead of managing them.

In this article, I’d like to review nine important best practices that you should consider applying to your custom classes.

1. Good Names

When you’re defining your own class, you’re adding a new baby to your codebase. You should give the class a very good name. Although the only limit of your class name is the rules of a legal Python variable (e.g., can’t start with a number), there are preferred ways to give class names.

  • Use nouns that are easy to pronounce. It’s especially important if you work on a team project. During a group presentation, you probably don’t want to be the person to say, “in this case, we create an instance of the Zgnehst class.” In addition, being easy to pronounce also means the name shouldn’t be too long. I can barely think of cases when you need to use more than three words to define a class name. One word is best, two words are good, and three words are the limit.
  • Reflect its stored data and intended functionalities. It’s like in our real life — boys are given boy names. When we see boy names, we expect the kids are boys. It applies to class names too (or any other variables in general). The rule is simple — Don’t surprise people. If you’re dealing with the students’ information, the class should be named Student. KiddosAtCampus isn’t making the most common sense.
  • Follow naming conventions. We should use upper-case camel style for class names, like GoodName. The following is an incomplete list of unconventional class names: goodName, Good_Name, good_name, and GOodnAme. Following naming conventions is to make your intention clear. When people read your code, they can safely assume that an object with names like GoodName is a class.

There are also naming rules and conventions that apply to attributes and functions. In the below sections, I’ll briefly mention them where applicable, but the overall principles are the same. The only rule of thumb is simple: Don’t surprise people.

2. Explicit Instance Attributes

In most cases, we want to define our own instance initialization method (i.e., __init__). In this method, we set the initial state of our newly created instances of the class. However, Python doesn’t restrict where you can define instance attributes with custom classes. In other words, you can define additional instance attributes in later operations after the instance has been created. The following code shows you a possible scenario.

Initialization Method

As shown above, we can create an instance of the Student class by specifying a student’s first and last names. Later, when we call the instance method (i.e., verify_registration_status), the Student instance’s status attribute will be set. However, this isn’t the desired pattern, because if you spread various instance attributes throughout the entire class, you’re not making the class clear what data an instance object holds. Thus, the best practice is to place an instance’s attributes in the __init__ method, such that your code’s reader has a single place to get to know your class’s data structure, as shown below.

Better Initialization Method

For those instance attributes that you can’t set initially, you can set them with placeholder values, such as None. Although it’s of less concern, this change also helps prevent the possible error when you forget to call some instance methods to set the applicable instance attributes, causing AttributeError (‘Student’ object has no attribute ‘status_verified’).

In terms of the naming rules, the attributes should be named using lower cases and follow the snake case style, which means that if you use multiple words, connect them with underscores. Moreover, all the names should have meaningful indication regarding what data it holds (e.g., first_name is better than fn).

3. Use Properties — But Parsimoniously

Some people learn Python coding with an existing background of other OOP languages, such as Java, and they’re used to creating getters and setters for attributes of the instances. This pattern can be mimicked with the use of the property decorator in Python. The following code shows you the basic form of using the property decorator to implement getters and setters.

Property Decorator

Once this property is created, we can use it as regular attributes using the dot notation, although it’s implemented using functions under the hood.

Use Properties

As you may know, the advantages of using property implementations include verification of proper value settings (check a string is used, not an integer) and read-only access (by not implementing the setter method). However, you should use properties parsimoniously. It can be very distracting if your custom class looks like the below — there are too many properties!

Abuse of Properties

In most cases, these properties can be replaced with instance attributes, and thus we can access them and set them directly. Unless you have specific needs for the benefits of using properties as discussed (e.g., value verification), using attributes is preferred over creating properties in Python.

4. Define Meaningful String Representations

In Python, functions that have double underscores before and after the name are referred to as special or magic methods, and some people call them dunder methods. They have special usages for basic operations by the interpreter, including the __init__ method that we’ve covered previously. Two special methods, __repr__ and __str__, are essential for creating proper string representations of your custom class, which will give the code readers more intuitive information about your classes.

Between them, the major difference is that the __repr__ method defines the string, using which you can re-create the object by calling eval(repr(“the repr”)), while the __str__ method defines the string that is more descriptive and allows more customization. In other words, you can think that the string defined in the __repr__ method is to be viewed by developers while that used in the __str__ method is to be viewed by regular users. The following shows you an example.

Implementation of String Representations

Please note that in the __repr__ method’s implementation (Line 7), the f-string uses !r which will show these strings with quotation marks, because they’re necessary to construct the instance with strings properly formatted. Without the !r formatting, the string will be Student(John, Smith), which isn’t the correct way to construct a Student instance. Let’s see how these implementations show the strings for us. Specifically, the __repr__ method is called when you access the object in the interactive interpreter, while the __str__ method is called by default when you print the object.

String Representations

5. Instance, Class, and Static Methods

In a class, we can define three kinds of methods: instance, class, and static methods. You need to consider what methods you should use for the functionalities of concern. Here are some general guidelines.

If the methods are concerned with individual instance objects, for example, you need to access or update particular attributes of an instance, in which cases, you should use instance methods. These methods have a signature like this: def do_something(self):, in which the self argument refers to the instance object that calls the method. To know more about the self argument, you can refer to my previous article on this topic.

If the methods are not concerned with individual instance objects, you should consider using class or static methods. Both methods can be easily defined with applicable decorators: classmethod and staticmethod. The difference between these two is that class methods allow you to access or update attributes related to the class, while static methods are independent of any instance or the class itself. A common example of a class method is providing a convenience instantiation method, while a static method can be simply a utility function. The following code shows you some examples.

Different Kinds of Methods

In a similar fashion, you can also create class attributes. Unlike instance attributes that we discussed earlier, class attributes are shared by all instance objects, and they should reflect some characteristics independent of individual instance objects.

6. Encapsulation Using Private Attributes

When you write custom classes for your project, you need to take into account encapsulation, especially if you’re expecting that others will use your classes too. When the functionalities of the class grow, some functions or attributes are only relevant for data processing within the class. In other words, outside the class, these functions won’t be called and other users of your class won’t even care about the implementation details of these functions. In these scenarios, you should consider encapsulation.

One important way to apply encapsulation is to prefix attributes and functions with an underscore or two underscores, as a convention. The subtle difference is that those with an underscore are considered protected, while those with two underscores are considered private, which involves name-mangling after its creation. Differentiating these two categories is beyond the scope of the present article, and one of my previous articles have covered them.

In essence, by naming attributes and functions this way, you’re telling the IDEs (i.e., integrated development environment, such as PyCharm) that they’re not going to be accessed outside the class, although true private attributes don’t exist in Python. In other words, they’re still accessible if we choose so.

Encapsulation

The above code shows you a trivial example of encapsulation. For a student, we may be interested in knowing their average GPA, and we can get the point using the get_mean_gpa method. The user doesn’t need to know how the mean GPA is calculated, such that we can make related methods protected by placing an underscore prefixing the function names.

The key takeaway for this best practice is that you expose only the minimal number of public APIs that are relevant for the users to use your code. For those that are used only internally, make them protected or private methods.

7. Separate Concerns and Decoupling

With the development of your project, you find out that you’re dealing with more data, your class can become cumbersome if you’re sticking to one single class. Let’s continue with the example of the Student class. Suppose that students have lunch at school, and each of them has a dining account that they can use to pay for meals. Theoretically, we can deal with account-related data and functionalities within the Student class, as shown below.

Mixed Functionalities

The above code shows you some pseudocode on checking account balance and loading money to the account, both of which are implemented in the Student class. Imagine that there are more operations that can be related to the account, such as suspending a lost card, consolidating accounts — to implement all of them will make the Student class larger and larger, which make it gradually more difficult to maintain. Instead, you should isolate these responsibilities and make your Student class irresponsible for these account-related functionalities — a design pattern termed as decoupling.

Separated Concerns

The above code shows you how we can design the data structures with an additional Account class. As you can see, we move all account-related operations into the Account class. To retrieve the account information for the student, the Student class will handle the functionality by retrieving information from the Account class. If we want to implement more functions related to the class, we can simply update the Account class only.

The main takeaway for the design pattern is that you want your individual classes to have separate concerns. By having these responsibilities separated, your classes become smaller, which makes future changes easier, because you’ll be dealing with smaller code components.

8. Consider __slots__ For Optimization

If your class is used mostly as data containers for storing data only, you can consider using __slots__ to optimize the performance of your class. It doesn’t only increase the speed of attribute accessing but also saves memory, which can be a big benefit if you need to create thousands or many more instance objects. The reason is that for a regular class, instance attributes are stored through an internally managed dictionary. By contrast, with the use of the __slots__, instance attributes will be stored using array-related data structures implemented using C under the hood, and their performance is optimized with much higher efficiency.

Use of __slots__ in Class Definition

The above code shows you a trivial example of how we implement the __slots__ in a class. Specifically, you list all the attributes as a sequence, which will create a one-to-one match in data storage for faster access and less memory consumption. As just mentioned, regular classes use a dictionary for attribute accessing but not for those with __slots__ implemented. The following code shows you such a fact.

No __dict__ in Classes With __slots__

A detailed discussion of using __slots__ can be found in a nice answer on Stack Overflow, and you can find more information from the official documentation. Regarding the gained benefits of faster access and saved memory, a recent Medium article has a very good demonstration, and I’m not going to expand on this. However, one thing to note is that using __slots__ will have a side effect — it prevents you from dynamically creating additional attributes. Some people propose it as a mechanism for controlling what attributes your class has, but it’s not how it was designed.

9. Documentation

Last, but not least, we have to talk about documentation of your class. Most importantly, we need to understand that writing documents isn’t replacing any code. Writing tons of documents doesn’t improve your code’s performance, and it doesn’t necessarily make your code more readable. If you have to rely on docstrings to clarify your code, it’s very likely that your code has problems. I truly believe that your code should speak all by itself. The following code just shows you a mistake that some programmers can make — using unnecessary comments to compensate for bad code (i.e., meaningless variable names in this case). By contrast, some good code with good names doesn’t even need comments.

Bad Comment Examples

I’m not saying that I’m against writing comments and docstrings, but it really depends on your use cases. If your code is used by more than one person or more than one occasion (e.g., you’re the only one accessing the code but for multiple times), you should consider writing some good comments. They can help yourself or your teammates read your code, but no one should assume that your code does exactly what’s said in the comments. In other words, writing good code is always the top priority that you need to keep in mind.

If particular portions of your code are to be used by end users, you want to write docstrings, because those people aren’t familiar with the relevant codebase. All they want to know is how to use the pertinent APIs, and the docstrings will form the basis for the help menu. Thus, it’s your responsibility as the programmer to make sure that you provide clear instructions on how to use your programs.

Conclusions

In this article, we reviewed important factors that you need to consider when you define your own classes. If you’re new to Python or programming in general, you may not fully understand every aspect that we’ve discussed, which is OK. The more you code, the more you’ll find the importance of having these principles in mind before you define your classes. Practice these guidelines continuously when you work with classes because a good design will save much of your development time later.

자습서 : 명령 줄에서 Jupyter 노트북 실행 중지

독립형 웹 앱으로 Jupyter Notebook 실행

Image for post
Justin Jairam 님이 찍은 사진뿡 빵뀨(허가)

Jupyter Notebook은 코드, 방정식, 분석 및 설명이 포함 된 사람이 읽을 수있는 문서를 생성 할 수있는 훌륭한 플랫폼을 제공합니다. 일부는 NBDev와 결합 할 때 강력한 개발이라고 생각합니다. 이러한 통합 도구의 경우 즉시 시작하는 것이 최선이 아닙니다. 사용할 때마다 명령 줄에서 Jupyter 웹 애플리케이션을 시작하고 토큰 또는 비밀번호를 입력해야합니다. 전체 웹 애플리케이션은 열려있는 해당 터미널 창에 의존합니다. 일부는 프로세스를 "악화"한 다음안돼터미널에서 분리 할 수 ​​있지만 가장 우아하고 유지 관리가 쉬운 솔루션은 아닙니다.

우리에게 Jupyter는 지속 가능한 웹 애플리케이션으로 실행되고 사용자 인증이 내장 된 Jupyter Notebook의 확장을 출시함으로써 이미이 문제에 대한 해결책을 제시했습니다. 맨 위에 체리를 추가하려면 Docker를 통해 관리하고 유지하여 격리 된 개발 환경을 허용 할 수 있습니다.

이 게시물이 끝날 때까지 JupyterHub의 기능을 활용하여 터미널없이 네트워크 내의 여러 장치에서 액세스 할 수있는 Jupyter Notebook 인스턴스 및보다 사용자 친화적 인 인증 방법에 액세스 할 것입니다.

전제 조건

Docker 및 명령 줄에 대한 기본 지식이 있으면이를 설정하는 데 도움이됩니다.

가지고있는 가장 강력한 장치와 하루 종일 켜져있는 장치에서이 작업을 수행하는 것이 좋습니다. 이 설정의 장점 중 하나는 네트워크의 모든 장치에서 Jupyter Notebook을 사용할 수 있지만 구성한 장치에서 모든 계산이 수행된다는 것입니다.

Jupyter 허브 란?

JupyterHub는 사용자 그룹에 노트북의 강력한 기능을 제공합니다. JupyterHub의 아이디어는 Jupyter 노트북의 사용을 기업, 강의실 및 대규모 사용자 그룹으로 확장하는 것이 었습니다. 그러나 Jupyter Notebook은 단일 개발자가 단일 노드에서 로컬 인스턴스로 실행해야합니다. 안타깝게도 JupyterHub의 유용성 및 확장 성과 로컬 Jupyter 노트북 실행의 단순성을 가질 수있는 중간 지점이 없었습니다. 즉, 지금까지입니다.

JupyterHub에는 기술적 복잡성의 오버 헤드가 거의 또는 전혀없이 단일 노트북을 생성하는 데 활용할 수있는 사전 빌드 된 Docker 이미지가 있습니다. Docker와 JupyterHub의 조합을 사용하여 언제 어디서나 동일한 URL에서 Jupyter Notebook에 액세스 할 것입니다.

건축물

JupyterHub 서버의 아키텍처는 JupyterHub 및 JupyterLab의 2 가지 서비스로 구성됩니다. JupyterHub는 진입 점이되고 모든 사용자에 대한 JupyterLab 인스턴스를 생성합니다. 이러한 각 서비스는 호스트에서 Docker 컨테이너로 존재합니다.

Image for post
JupyterLab 아키텍처 다이어그램 (작성자 별 이미지)

Docker 이미지 빌드

To build our at-home JupyterHub server we will use the pre-built Docker images of JupyterHub & JupyterLab.

Dockerfiles

JupyterHub Docker 이미지는 간단합니다.

FROM jupyterhub/jupyterhub:1.2# Copy the JupyterHub configuration in the container
COPY jupyterhub_config.py .
# Download script to automatically stop idle single-user servers
COPY cull_idle_servers.py .
# Install dependencies (for advanced authentication and spawning)
RUN pip install dockerspawner

사전 구축 된 JupyterHub Docker Image를 사용하고 자체 구성 파일을 추가하여 유휴 서버를 중지합니다.cull_idle_servers.py. 마지막으로 Docker를 통해 JupyterLab 인스턴스를 생성하기 위해 추가 패키지를 설치합니다.

Docker 작성

모든 것을 하나로 모으기 위해docker-compose.yml배포 및 구성을 정의하는 파일입니다.

version: '3'services:
# Configuration for Hub+Proxy
jupyterhub:
build: . # Build the container from this folder.
container_name: jupyterhub_hub # The service will use this container name.
volumes: # Give access to Docker socket.
- /var/run/docker.sock:/var/run/docker.sock
- jupyterhub_data:/srv/jupyterlab
environment: # Env variables passed to the Hub process.
DOCKER_JUPYTER_IMAGE: jupyter/tensorflow-notebook
DOCKER_NETWORK_NAME: ${COMPOSE_PROJECT_NAME}_default
HUB_IP: jupyterhub_hub
ports:
- 8000:8000
restart: unless-stopped
# Configuration for the single-user servers
jupyterlab:
image: jupyter/tensorflow-notebook
command: echo
volumes:
jupyterhub_data:

주목할 주요 환경 변수는 다음과 같습니다.DOCKER_JUPYTER_IMAGEDOCKER_NETWORK_NAME. JupyterHub는 환경 변수에 정의 된 이미지로 Jupyter Notebook을 만듭니다. Jupyter 이미지 선택에 대한 자세한 내용은 다음 Jupyter를 참조하세요.선적 서류 비치.

DOCKER_NETWORK_NAME서비스에서 사용하는 Docker 네트워크의 이름입니다. 이 네트워크는 Docker Compose에서 자동 이름을 가져 오지만 허브는 Jupyter 노트북 서버를 여기에 연결하기 위해이 이름을 알아야합니다. 네트워크 이름을 제어하기 위해 약간의 해킹을 사용합니다. 환경 변수 COMPOSE_PROJECT_NAME을 Docker Compose에 전달하고 _default를 추가하여 네트워크 이름을 얻습니다.

라는 파일을 만듭니다..env같은 디렉토리에docker-compose.yml파일을 열고 다음 내용을 추가하십시오.

COMPOSE_PROJECT_NAME=jupyter_hub

유휴 서버 중지

이것이 홈 설정이므로 유휴 인스턴스를 중지하여 시스템의 메모리를 보존 할 수 있기를 원합니다. JupyterHub에는 함께 실행할 수있는 서비스가 있으며 그중 하나는jupyterhub-idle-culler. 이 서비스는 장기간 유휴 상태 인 모든 인스턴스를 중지합니다.

이 서비스를 추가하려면 다음 이름의 새 파일을 만드십시오.cull_idle_servers.py내용을 복사하십시오.jupyterhub-idle-culler 프로젝트그것에.

`cull_idle_servers.py`가 Dockerfile과 동일한 폴더에 있는지 확인합니다.

JupyterHub 서비스에 대해 자세히 알아 보려면 공식선적 서류 비치그들에.

Jupyterhub 구성

마무리하려면 JupyterHub 인스턴스에 대한 볼륨 마운트, Docker 이미지, 서비스, 인증 등과 같은 구성 옵션을 정의해야합니다.

아래는 간단합니다jupyterhub_config.py내가 사용하는 구성 파일.

import os
import sys
c.JupyterHub.spawner_class = 'dockerspawner.DockerSpawner'
c.DockerSpawner.image = os.environ['DOCKER_JUPYTER_IMAGE']
c.DockerSpawner.network_name = os.environ['DOCKER_NETWORK_NAME']
c.JupyterHub.hub_connect_ip = os.environ['HUB_IP']
c.JupyterHub.hub_ip = "0.0.0.0" # Makes it accessible from anywhere on your network
c.JupyterHub.admin_access = Truec.JupyterHub.services = [
{
'name': 'cull_idle',
'admin': True,
'command': [sys.executable, 'cull_idle_servers.py', '--timeout=42000']
},
]
c.Spawner.default_url = '/lab'notebook_dir = os.environ.get('DOCKER_NOTEBOOK_DIR') or '/home/jovyan/work'
c.DockerSpawner.notebook_dir = notebook_dir
c.DockerSpawner.volumes = {
'/home/sidhu': '/home/jovyan/work'
}

다음 구성 옵션에 유의하십시오.

  • '명령': [sys.executable, 'cull_idle_servers.py', '--timeout = 42000']: 제한 시간은 유휴 Jupyter 인스턴스가 종료 될 때까지의 시간 (초)입니다.
  • c.Spawner.default_url = '/ lab': Jupyter Notebook 대신 Jupyterlab을 사용합니다. Jupyter Notebook을 사용하려면이 줄을 주석 처리하십시오.
  • '/ home / sidhu': '/ home / jovyan / work': 데스크탑에있는 모든 프로젝트와 노트북에 액세스 할 수 있도록 홈 디렉토리를 JupyterLab 홈 디렉토리에 마운트했습니다. 이를 통해 새 노트북을 생성하고 로컬 머신에 저장하고 Jupyter 노트북 Docker 컨테이너를 삭제해도 삭제되지 않는 경우에도 지속성을 확보 할 수 있습니다.

홈 디렉토리를 마운트하지 않으려면이 줄을 제거하고 변경하는 것을 잊지 마십시오.시두사용자 이름에.

서버 시작

서버를 시작하려면 다음을 실행하십시오.도커 구성 -d, 로 이동localhost : 8000브라우저에서 JupyterHub 방문 페이지를 볼 수 있습니다.

Image for post
JupyterHub 랜딩 페이지 스크린 샷 (작성자 별 이미지)

va 노트북, iPad 등과 같은 네트워크의 다른 장치에서 액세스하려면 다음을 실행하여 호스트 컴퓨터의 IP를 식별하십시오.ifconfig on Unix machines & ipconfigWindows에서.

Image for post
Ipconfig (작성자 별 이미지)

다른 장치에서 포트 8000에서 찾은 IP로 이동합니다.http : // IP : 8000JupyterHub 방문 페이지가 표시됩니다!

인증 중

그러면 서버에 인증하는 마지막 작업이 남습니다. LDAP 서버 또는 OAuth를 설정하지 않았으므로 JupyterHub는 PAM (Pluggable Authentication Module) 인증을 사용하여 사용자를 인증합니다. 즉, JupyterHub는 호스트 시스템의 사용자 이름과 비밀번호를 사용하여 인증합니다.

이를 활용하려면 JupyterHub Docker 컨테이너에 사용자를 만들어야합니다. 컨테이너에 스크립트를 배치하고 컨테이너를 시작할 때 실행하는 것과 같은 다른 방법이 있지만 연습으로 수동으로 수행합니다. 컨테이너를 해체하거나 다시 빌드하는 경우 사용자를 다시 만들어야합니다.

사용자 자격 증명을 스크립트 또는 Dockerfile에 하드 코딩하지 않는 것이 좋습니다.

1) JupyterLab 컨테이너 ID를 찾습니다.도커 ps -a

Image for post
JupyterLab 컨테이너 ID (작성자 별 이미지)

2) 컨테이너에 "SSH":docker exec -it $ YOUR_CONTAINER_ID bash

3) 사용자를 만들고 터미널 프롬프트에 따라 암호를 만듭니다.useradd $ YOUR_USERNAME

4) 자격 증명으로 로그인하면 설정이 완료됩니다!

이제 모든 장치에서 손 안에서 액세스 할 수있는 Jupyter Notebook 서버를 사용할 준비가되었습니다. 행복한 코딩!

피드백

내 게시물과 튜토리얼에 대한 모든 피드백을 환영합니다. 나에게 메시지를 보낼 수 있습니다.트위터또는 sidhuashton@gmail.com으로 이메일을 보내주십시오.

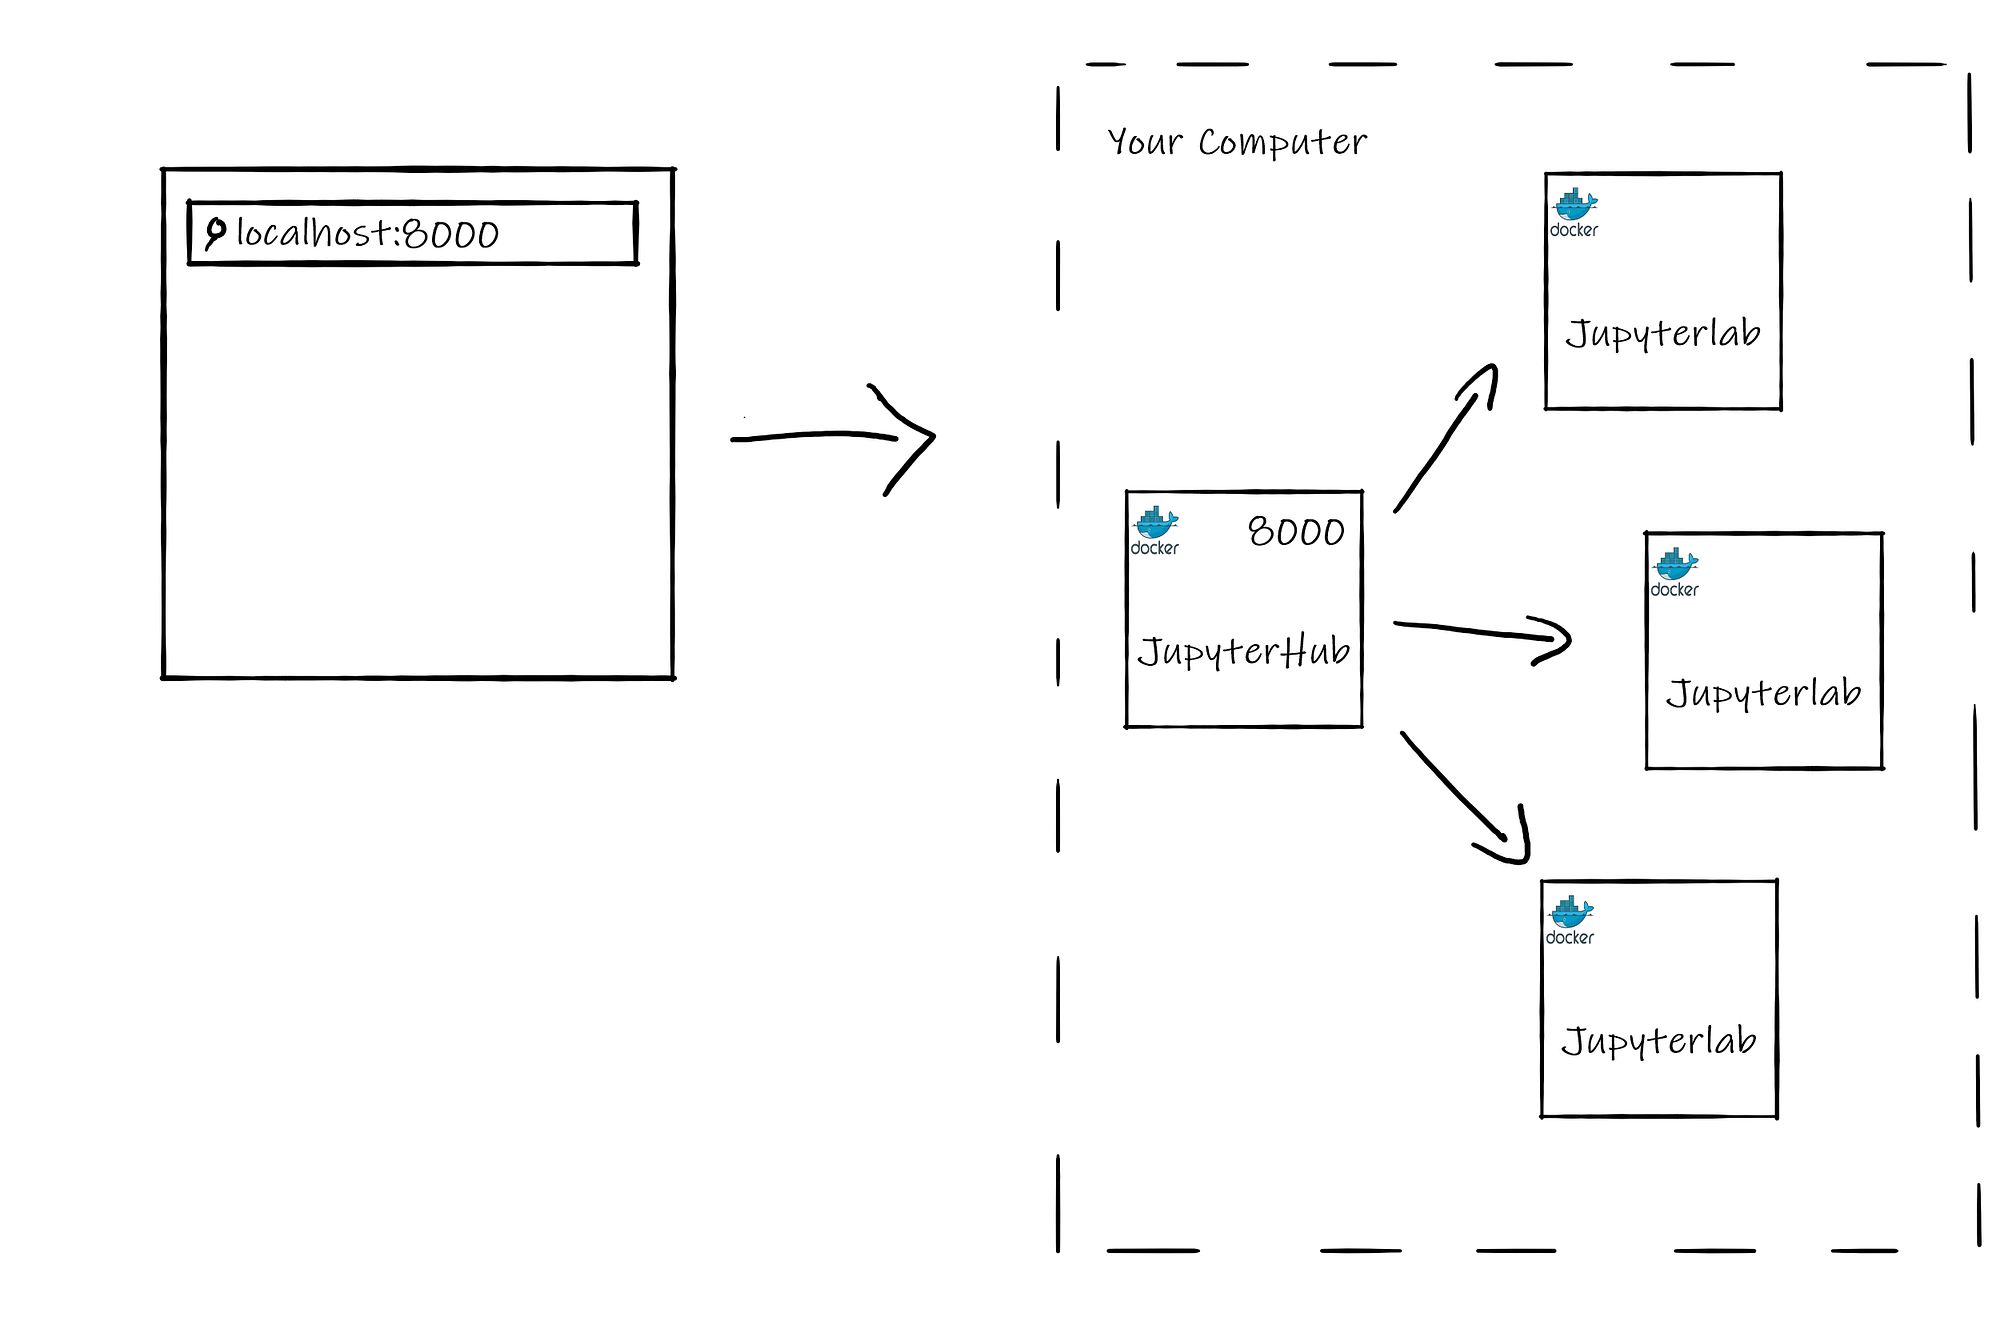
Tutorial: Stop Running Jupyter Notebooks from your Command Line

Run your Jupyter Notebook as a stand alone web app

Image for post
Photo taken by Justin Jairam from @jusspreme (with permission)

Jupyter Notebook provides a great platform to produce human-readable documents containing code, equations, analysis, and their descriptions. Some even consider it a powerful development when combining it with NBDev. For such an integral tool, the out of the box start up is not the best. Each use requires starting the Jupyter web application from the command line and entering your token or password. The entire web application relies on that terminal window being open. Some might “daemonize” the process and then use nohup to detach it from their terminal, but that’s not the most elegant and maintainable solution.

Lucky for us, Jupyter has already come up with a solution to this problem by coming out with an extension of Jupyter Notebooks that runs as a sustainable web application and has built-in user authentication. To add a cherry on top, it can be managed and sustained through Docker allowing for isolated development environments.

By the end of this post we will leverage the power of JupyterHub to access a Jupyter Notebook instance which can be accessed without a terminal, from multiple devices within your network, and a more user friendly authentication method.

Prerequisites

A basic knowledge of Docker and the command line would be beneficial in setting this up.

I recommend doing this on the most powerful device you have and one that is turned on for most of the day, preferably all day. One of the benefits of this setup is that you will be able to use Jupyter Notebook from any device on your network, but have all the computation happen on the device we configure.

What is Jupyter Hub

JupyterHub brings the power of notebooks to groups of users. The idea behind JupyterHub was to scale out the use of Jupyter Notebooks to enterprises, classrooms, and large groups of users. Jupyter Notebook, however, is supposed to run as a local instance, on a single node, by a single developer. Unfortunately, there was no middle ground to have the usability and scalability of JupyterHub and the simplicity of running a local Jupyter Notebook. That is, until now.

JupyterHub has pre-built Docker images that we can utilize to spawn a single notebook on a whim, with little to no overhead in technical complexity. We are going to use the combination of Docker and JupyterHub to access Jupyter Notebooks from anytime, anywhere, at the same URL.

Architecture

The architecture of our JupyterHub server will consist of 2 services: JupyterHub and JupyterLab. JupyterHub will be the entry point and will spawn JupyterLab instances for any user. Each of these services will exist as a Docker container on the host.

Image for post
JupyterLab Architecture Diagram (Image by Author)

Building the Docker Images

To build our at-home JupyterHub server we will use the pre-built Docker images of JupyterHub & JupyterLab.

Dockerfiles

The JupyterHub Docker image is simple.

FROM jupyterhub/jupyterhub:1.2# Copy the JupyterHub configuration in the container
COPY jupyterhub_config.py .
# Download script to automatically stop idle single-user servers
COPY cull_idle_servers.py .
# Install dependencies (for advanced authentication and spawning)
RUN pip install dockerspawner

We use the pre-built JupyterHub Docker Image and add our own configuration file to stop idle servers, cull_idle_servers.py. Lastly, we install additional packages to spawn JupyterLab instances via Docker.

Docker Compose

To bring everything together, let’s create a docker-compose.yml file to define our deployments and configuration.

version: '3'services:
# Configuration for Hub+Proxy
jupyterhub:
build: . # Build the container from this folder.
container_name: jupyterhub_hub # The service will use this container name.
volumes: # Give access to Docker socket.
- /var/run/docker.sock:/var/run/docker.sock
- jupyterhub_data:/srv/jupyterlab
environment: # Env variables passed to the Hub process.
DOCKER_JUPYTER_IMAGE: jupyter/tensorflow-notebook
DOCKER_NETWORK_NAME: ${COMPOSE_PROJECT_NAME}_default
HUB_IP: jupyterhub_hub
ports:
- 8000:8000
restart: unless-stopped
# Configuration for the single-user servers
jupyterlab:
image: jupyter/tensorflow-notebook
command: echo
volumes:
jupyterhub_data:

The key environment variables to note are DOCKER_JUPYTER_IMAGE and DOCKER_NETWORK_NAME. JupyterHub will create Jupyter Notebooks with the images defined in the environment variable.For more information on selecting Jupyter images you can visit the following Jupyter documentation.

DOCKER_NETWORK_NAME is the name of the Docker network used by the services. This network gets an automatic name from Docker Compose, but the Hub needs to know this name to connect the Jupyter Notebook servers to it. To control the network name we use a little hack: we pass an environment variable COMPOSE_PROJECT_NAME to Docker Compose, and the network name is obtained by appending _default to it.

Create a file called .env in the same directory as the docker-compose.yml file and add the following contents:

COMPOSE_PROJECT_NAME=jupyter_hub

Stopping Idle Servers

Since this is our home setup, we want to be able to stop idle instances to preserve memory on our machine. JupyterHub has services that can run along side it and one of them being jupyterhub-idle-culler. This service stops any instances that are idle for a prolonged duration.

To add this servive, create a new file called cull_idle_servers.py and copy the contents of jupyterhub-idle-culler project into it.

Ensure `cull_idle_servers.py` is in the same folder as the Dockerfile.

To find out more about JupyterHub services, check out their official documentation on them.

Jupyterhub Config

To finish off, we need to define configuration options such, volume mounts, Docker images, services, authentication, etc. for our JupyterHub instance.

Below is a simple jupyterhub_config.py configuration file I use.

import os
import sys
c.JupyterHub.spawner_class = 'dockerspawner.DockerSpawner'
c.DockerSpawner.image = os.environ['DOCKER_JUPYTER_IMAGE']
c.DockerSpawner.network_name = os.environ['DOCKER_NETWORK_NAME']
c.JupyterHub.hub_connect_ip = os.environ['HUB_IP']
c.JupyterHub.hub_ip = "0.0.0.0" # Makes it accessible from anywhere on your network
c.JupyterHub.admin_access = Truec.JupyterHub.services = [
{
'name': 'cull_idle',
'admin': True,
'command': [sys.executable, 'cull_idle_servers.py', '--timeout=42000']
},
]
c.Spawner.default_url = '/lab'notebook_dir = os.environ.get('DOCKER_NOTEBOOK_DIR') or '/home/jovyan/work'
c.DockerSpawner.notebook_dir = notebook_dir
c.DockerSpawner.volumes = {
'/home/sidhu': '/home/jovyan/work'
}

Take note of the following configuration options:

  • 'command': [sys.executable, 'cull_idle_servers.py', '--timeout=42000'] : Timeout is the number of seconds until an idle Jupyter instance is shut down.
  • c.Spawner.default_url = '/lab': Uses Jupyterlab instead of Jupyter Notebook. Comment out this line to use Jupyter Notebook.
  • '/home/sidhu': '/home/jovyan/work': I mounted my home directory to the JupyterLab home directory to have access to any projects and notebooks I have on my Desktop. This also allows us to achieve persistence in the case we create new notebooks, they are saved to our local machine and will not get deleted if our Jupyter Notebook Docker container is deleted.

Remove this line if you do not wish to mount your home directory and do not forget to change sidhu to your user name.

Start the Server

To start the server, simply run docker-compose up -d, navigate to localhost:8000 in your browser and you should be able to see the JupyterHub landing page.

Image for post
JupyterHub Landing Page Screenshot (Image by Author)

To access it on other devices on your network such asva laptop, an iPad, etc, identify the IP of the host machine by running ifconfig on Unix machines & ipconfig on Windows.

Image for post
Ipconfig (Image by Author)

From your other device, navigate to the IP you found on port 8000: http://IP:8000 and you should see the JupyterHub landing page!

Authenticating

That leaves us with the last task of authenticating to the server. Since we did not set up a LDAP server or OAuth, JupyterHub will use PAM (Pluggable Authentication Module) authentication to authenticate users. This means JupyterHub uses the user name and passwords of the host machine to authenticate.

To make use of this, we will have to create a user on the JupyterHub Docker container. There are other ways of doing this such as having a script placed on the container and executed at container start up but we will do it manually as an exercise. If you tear down or rebuild the container you will have to recreate users.

I do not recommend hard coding user credentials into any script or Dockerfile.

1) Find the JupyterLab container ID: docker ps -a

Image for post
JupyterLab Container ID (Image by Author)

2) “SSH” into the container: docker exec -it $YOUR_CONTAINER_ID bash

3) Create a user and follow the terminal prompts to create a password: useradd $YOUR_USERNAME

4) Sign in with the credentials and you’re all set!

You now have a ready to go Jupyter Notebook server that can be accessed from any device, in the palm of your hands! Happy Coding!

Feedback

I welcome any and all feedback about any of my posts and tutorials. You can message me on twitter or e-mail me at sidhuashton@gmail.com.

알아야 할 7 가지 파이썬 트릭

유용한 팁과 요령으로 친구들에게 깊은 인상을 남기세요

Image for post
~의 사진마이클지지 치의 위에Unsplash

유용한 Python 도움말과 유용한 정보가 온라인에 있습니다. 다음은 Python 게임을 강화하는 데 사용할 수있는 재미 있고 멋진 트릭입니다.동시에 친구들에게 깊은 인상을 남기십시오. 한 돌로 두 마리의 새를 죽이십시오.

더 이상 고민하지 않고 바로 시작하겠습니다.

1. YouTube-DL로 YouTube 동영상 다운로드

YouTube 동영상 (다른 많은 웹 사이트의 동영상) 사용유튜브 -dl Python의 모듈.

먼저 pip를 사용하여 모듈을 설치하겠습니다.

pip install youtube-dl

설치가 완료되면 다음 한 줄 명령을 사용하여 터미널 또는 명령 프롬프트에서 직접 비디오를 다운로드 할 수 있습니다.

youtube-dl <Your video link here>

또는 이후유튜브 -dlPython에 대한 바인딩이 있으면 프로그래밍 방식으로 동일한 작업을 수행하는 Python 스크립트를 만들 수 있습니다.

모든 링크가 포함 된 목록을 만들고 아래의 빠르고 더러운 스크립트를 사용하여 비디오를 다운로드 할 수 있습니다.

Sample code to create a list with all the links and download the videos using the youtube-dl module
작성자 별 이미지

이 모듈을 사용하면 비디오뿐만 아니라 전체 재생 목록, 메타 데이터, 섬네일, 자막, 주석, 설명, 오디오 등을 쉽게 다운로드 할 수 있습니다.

이를 달성하는 가장 쉬운 방법은 이러한 매개 변수를 사전에 추가하고이를 사전에 전달하는 것입니다.YoutubeDL객체 생성자.

아래 코드에서 사전을 만들었습니다.ydl_options, 일부 매개 변수와 함께 생성자에 전달했습니다.

Sample code to use youtube-dl with a number of parameters passed as options
작성자 별 이미지
1. 'format':'bestvideo+bestaudio' #Dowloads the video in the best available video and audio format.2. 'writethumbnail':'writethumbnail' #Downloads the thumbnail image of the video.3. 'writesubtitles':'writesubtitles' #Downloads the subtitles, if any.4. 'writedescription':'writedescription' #Writes the video description to a .description file.

노트 :터미널이나 명령 프롬프트에서 직접 모든 작업을 수행 할 수 있지만 Python 스크립트를 사용하는 것이 유연성 / 재사용 가능성으로 인해 더 좋습니다.

여기에서 모듈에 대한 자세한 내용을 찾을 수 있습니다.Github : youtube-dl.

2. Pdb로 코드 디버그

Python에는 pdb라는 자체 내장 디버거가 있습니다. 디버거는 프로그래머가 변수와 프로그램 실행을 한 줄씩 검사하는 데 도움이되는 매우 유용한 도구입니다. 디버거는 프로그래머가 코드에서 성가신 문제를 찾으려고 노력할 필요가 없음을 의미합니다.

pdb의 좋은 점은 표준 Python 라이브러리에 포함되어 있다는 것입니다. 결과적으로이 아름다움은 Python이 설치된 모든 컴퓨터에서 사용할 수 있습니다. 이것은 바닐라 Python 설치 위에 추가 기능을 설치하는 데 제한이있는 환경에서 유용합니다.

pdb 디버거를 호출하는 방법에는 여러 가지가 있습니다.

In-line breakpoint
pdb.set_trace()
In Python 3.7 and later
breakpoint()
pdb.py can also be invoked as a script to debug other scripts
python3 -m pdb myscript.py

다음은 다음을 사용하여 pdb를 호출하는 Python 3.8의 샘플 코드입니다.중단 점 ()함수:

Image for post
작성자의 이미지

다음은 디버깅 모험에 도움이되는 몇 가지 유용한 명령입니다.

  • : 현재 함수의 다음 줄에 도달하거나 반환 될 때까지 실행을 계속합니다.
  • : 목록 코드
  • j <line>: 줄로 이동
  • b <line>: breakpoint () 설정
  • : 중단 점까지 계속
  • : 종료

노트 :일단 pdb에 있으면,,,, 및예약 된 키워드가됩니다. 마지막 변수는 이름이 변수 인 경우 pdb를 종료합니다.귀하의 코드에서.

여기에서 자세한 내용을 확인할 수 있습니다.pdb — 파이썬 디버거

3. PyInstaller를 사용하여 Python 코드를 실행 파일로 만들기

많은 사람들이 이것을 아는 것은 아니지만 Python을 변환 할 수 있습니다. 스크립트를 독립 실행 형 실행 파일로 변환합니다. 이것에 대한 가장 큰 이점은 Python 스크립트 / 애플리케이션이 Python (및 필요한 타사 패키지)이 설치되지 않은 컴퓨터에서 작동 할 수 있다는 것입니다.

PyInstaller는 Windows, GNU / Linux, Mac OS X, FreeBSD, Solaris 및 AIX를 포함한 거의 모든 주요 플랫폼에서 작동합니다.

설치하려면 pip에서 다음 명령을 사용하십시오.

pip install pyinstaller

그런 다음 프로그램이있는 디렉토리로 이동하여 다음을 실행하십시오.

pyinstaller myscript.py

그러면 실행 파일이 생성되어 다음과 같은 하위 디렉토리에 저장됩니다.dist.

PyInstaller는 사용자 정의를위한 다양한 옵션을 제공합니다.

pyinstaller --onefile --icon [icon file] [script file]# Using the --onefile option bundles everything in a single executable file instead of having a bunch of other files. 
# Using the --icon option adds a custom icon (.ico file) for the executable file

Pyinstaller는 Django, NumPy, Matplotlib, SQLAlchemy, Pandas, Selenium 등 대부분의 타사 패키지와 호환됩니다.

Pyinstaller가 제공하는 모든 기능과 다양한 옵션에 대해 알아 보려면 Github의 해당 페이지를 방문하십시오.Pyinstaller.

4. Tqdm으로 진행률 표시 줄 만들기

TQDM 라이브러리를 사용하면 Python 및 CLI에 대한 빠르고 확장 가능한 진행률 표시 줄을 만들 수 있습니다.

먼저 pip를 사용하여 모듈을 설치해야합니다.

pip install tqdm

몇 줄의 코드로 Python 스크립트에 스마트 진행률 표시 줄을 추가 할 수 있습니다.

tqdm working directly inside Terminal
작성자 별 GIF

TQDM은 Linux, Windows, Mac, FreeBSD, NetBSD, Solaris / SunOS와 같은 모든 주요 플랫폼에서 작동합니다. 뿐만 아니라 모든 콘솔, GUI 및 IPython / Jupyter 노트북과 원활하게 통합됩니다.

tqdm working in Jupiter notebooks
의 GIFTQDM

tqdm의 모든 트릭에 대한 자세한 내용을 보려면 여기 공식 페이지를 방문하십시오.tqdm.

5. Colorama를 사용하여 콘솔 출력에 색상 추가

Colorama는 콘솔 출력에 색상을 추가하는 멋진 크로스 플랫폼 모듈입니다. pip를 사용하여 설치해 보겠습니다.

pip install colorama

Colorama는 다음과 같은 서식 상수를 제공합니다.

Fore: BLACK, RED, GREEN, YELLOW, BLUE, MAGENTA, CYAN, WHITE, RESET.
Back: BLACK, RED, GREEN, YELLOW, BLUE, MAGENTA, CYAN, WHITE, RESET.
Style: DIM, NORMAL, BRIGHT, RESET_ALL

다음은 Colorama를 사용하는 샘플 코드입니다.

Sample code to color the console output using Colorama
작성자 별 이미지

위의 코드는 다음 출력을 생성합니다.

Image for post
작성자 별 이미지

스타일 .RESET_ALL전경, 배경 및 밝기를 명시 적으로 재설정합니다. 그러나 Colorama는 프로그램 종료시이 재설정을 자동으로 수행합니다.

Colorama에는 여기에서 찾을 수있는 다른 기능이 있습니다.Colorama 웹 사이트.

6. Tabulate를 사용하여 예쁜 2D 목록 인쇄

종종 Python에서 표 형식의 출력을 처리하는 것은 고통입니다. 그 때의표로 만들다구조하러 온다. "출력이 나에게 상형 문자처럼 보입니까?"에서 출력을 변환 할 수 있습니다. "와, 예쁘 네요!" 음, 마지막 부분은 약간 과장된 것일 수도 있지만 출력의 가독성을 향상시킵니다.

먼저 pip를 사용하여 설치합니다.

pip install tabulate

다음은 tabulate를 사용하여 2D 목록을 표로 인쇄하는 간단한 스 니펫입니다.

Image for post
작성자 별 이미지

아래 GIF는 위 코드의 출력이 표로 표시되거나 표시되지 않는 모습을 보여줍니다. 두 출력 중 어느 것이 더 읽기 쉬운 지 추측하는 것에 대한 보상은 없습니다!

Image for post
작성자 별 GIF

Tabulate는 다음 데이터 유형을 지원합니다.

1. list of lists or another iterable of iterables
2.
list or another iterable of dicts (keys as columns)
3. dict of iterables (keys as columns)
4. two-dimensional NumPy array
5. NumPy record arrays (names as columns)
6. pandas.DataFrame
Source: https://pypi.org/project/tabulate/

다음은 사전에서 작동하는 예입니다.

Image for post
작성자 별 이미지

이것은 사전을 예쁘게 인쇄합니다.

+-------+-----+
| item | qty |
+-------+-----+
| spam | 42 |
| eggs | 451 |
| bacon | 0 |
+-------+-----+

여기에서 라이브러리에 대한 자세한 내용을 찾을 수 있습니다.표로 만들다.

7. Ptpython을 사용하여 표준 Python 셸 꾸미기

내 Python 셸이 내 Python 셸보다 섹시한 이유가 궁금한 경우 사용자 지정 Python 셸을 사용하고 있기 때문입니다. 이 껍질,ptpython, 표준 Python 셸에 비해 많은 개선 사항이 있습니다. 기본적으로 표준 Python 셸과 ptpython이 쌍둥이 인 경우 후자는 두 형제 중 더 예쁘고 더 성공적 일 것입니다.

pip를 통해 ptpython을 설치할 수 있습니다.

pip install ptpython

설치되면 다음을 입력하여 호출 할 수 있습니다.ptpython표준 셸에서.

표준 셸에 비해 몇 가지 기능이 있습니다.

1. Code indentation
2. Syntax highlighting
3. Autocompletion
4. Multiline editing
5. Support for color schemes
... and many other things

아래 GIF에서 작동중인 기능 1 ~ 3을 볼 수 있습니다.

Image for post
작성자 별 GIF

기능에 대해 자세히 알아 보려면 다음 웹 사이트를 방문하십시오.ptpython.

기사를 즐겁게 읽고 그 과정에서 새로운 것을 배웠기를 바랍니다.

멋진 파이썬 트릭이 있습니까? 의견에 귀하의 의견을 들려주세요.

7 Python Tricks You Should Know

Impress your friends with these useful tips and tricks

Image for post
Photo by Michael Dziedzic on Unsplash

There’s a treasure trove of useful Python tips and tricks online. Here are some fun, cool tricks you can use to beef up your Python game and impress your friends at the same time — kill two birds with one stone.

Without further ado, let’s jump right into it.

1. Download YouTube Videos With YouTube-Dl

You can easily download YouTube videos (and videos from many other websites) using the youtube-dl module in Python.

First, let’s install the module using pip:

pip install youtube-dl

Once installed, you can download videos directly from terminal or command prompt by using the following one-line command:

youtube-dl <Your video link here>

Alternatively, since youtube-dl has bindings for Python, you can create a Python script to do the same thing programmatically.

You can create a list with all the links and download the videos using the quick-and-dirty script below.

Sample code to create a list with all the links and download the videos using the youtube-dl module
Image by Author

With this module, you can not only easily download videos, but entire playlists, metadata, thumbnails, subtitles, annotations, descriptions, audio, and much more.

The easiest way to achieve this is by adding a bunch of these parameters to a dictionary and passing it to the YoutubeDL object constructor.

In the code below I created a dictionary, ydl_options, with some parameters, and passed it on to the constructor:

Sample code to use youtube-dl with a number of parameters passed as options
Image by Author
1. 'format':'bestvideo+bestaudio' #Dowloads the video in the best available video and audio format.2. 'writethumbnail':'writethumbnail' #Downloads the thumbnail image of the video.3. 'writesubtitles':'writesubtitles' #Downloads the subtitles, if any.4. 'writedescription':'writedescription' #Writes the video description to a .description file.

Note: You can do everything directly within the terminal or a command prompt, but using a Python script is better due to the flexibility/reusability it offers.

You can find more details about the module here: Github:youtube-dl.

2. Debug Your Code With Pdb

Python has its own in-built debugger called pdb. A debugger is an extremely useful tool that helps programmers to inspect variables and program execution, line by line. A debugger means programmers don’t have to pull their hair out trying to find pesky issues in their code.

The good thing about pdb is that it is included with the standard Python library. As a result, this beauty can be used on any machine where Python is installed. This comes in handy in environments with restrictions on installing any add-on on top of the vanilla Python installation.

There are several ways to invoke the pdb debugger:

In-line breakpoint
pdb.set_trace()
In Python 3.7 and later
breakpoint()
pdb.py can also be invoked as a script to debug other scripts
python3 -m pdb myscript.py

Here’s a sample code on Python 3.8 that invokes pdb using the breakpoint() function:

Image for post
Image from Author

Here are some of the most useful commands to aid you in your debugging adventure:

  • n: To continue execution until the next line in the current function is reached or it returns.
  • l: list code
  • j <line>: jump to a line
  • b <line>: set breakpoint()
  • c: continue until breakpoint
  • q: quit

Note: Once you are in pdb, n, l, b, c, and q become reserved keywords. The last one will quit pdb if you have a variable named q in your code.

You can find more details about this here: pdb — The Python Debugger

3. Make Your Python Code Into an Executable File Using PyInstaller

Not a lot of people know this, but you can convert your Python scripts into standalone executables. The biggest benefit to this is that your Python scripts/applications can then work on machines where Python (and any necessary third-party packages) are not installed.

PyInstaller works on pretty much all the major platforms, including Windows, GNU/Linux, Mac OS X, FreeBSD, Solaris and AIX.

To install it, use the following command in pip:

pip install pyinstaller

Then, go to the directory where your program is located and run:

pyinstaller myscript.py

This will generate the executable and place it in a subdirectory called dist.

PyInstaller provides many options for customization:

pyinstaller --onefile --icon [icon file] [script file]# Using the --onefile option bundles everything in a single executable file instead of having a bunch of other files. 
# Using the --icon option adds a custom icon (.ico file) for the executable file

Pyinstaller is compatible with most of the third-party packages — Django, NumPy, Matplotlib, SQLAlchemy, Pandas, Selenium, and many more.

To learn about all the features and the myriad of options Pyinstaller provides, visit its page on Github: Pyinstaller.

4. Make a Progress Bar With Tqdm

The TQDM library will let you create fast, extensible progress bars for Python and CLI.

You’d need to first install the module using pip:

pip install tqdm

With a few lines of code, you can add smart progress bars to your Python scripts.

tqdm working directly inside Terminal
GIF by Author

TQDM works on all major platforms like Linux, Windows, Mac, FreeBSD, NetBSD, Solaris/SunOS. Not only that, but it also integrates seamlessly with any console, GUI, and IPython/Jupyter notebooks.

tqdm working in Jupiter notebooks
GIF from TQDM

To get more details on all the tricks tqdm has up its sleeve, visit its official page here: tqdm.

5. Add Color to Your Console Output With Colorama

Colorama is a nifty little cross-platform module that adds color to the console output. Let’s install it using pip:

pip install colorama

Colorama provides the following formatting constants:

Fore: BLACK, RED, GREEN, YELLOW, BLUE, MAGENTA, CYAN, WHITE, RESET.
Back: BLACK, RED, GREEN, YELLOW, BLUE, MAGENTA, CYAN, WHITE, RESET.
Style: DIM, NORMAL, BRIGHT, RESET_ALL

Here’s a sample code to use Colorama:

Sample code to color the console output using Colorama
Image by Author

The code above yields the following output:

Image for post
Image by Author

Style.RESET_ALL explicitly resets the foreground, background, and brightness — although, Colorama also performs this reset automatically on program exit.

Colorama has other features that you can find here: Colorama Website.

6. Pretty Print 2D Lists Using Tabulate

Often, dealing with tabular output in Python is a pain. That’s when tabulate comes to the rescue. It can transform your output from “The output looks like hieroglyphs to me?” to “Wow, that looks pretty!”. Well, maybe that last part is a slight exaggeration, but it will improve the readability of your output.

First, install it using pip:

pip install tabulate

Here’s a simple snippet to print a 2D list as a table using tabulate:

Image for post
Image by Author

The GIF below shows how the output of the code above looks with and without tabulate. No prizes for guessing which of the two outputs is more readable!

Image for post
GIF by Author

Tabulate supports the following data types:

1. list of lists or another iterable of iterables
2.
list or another iterable of dicts (keys as columns)
3. dict of iterables (keys as columns)
4. two-dimensional NumPy array
5. NumPy record arrays (names as columns)
6. pandas.DataFrame
Source: https://pypi.org/project/tabulate/

Here’s an example that works on a dictionary:

Image for post
Image by Author

This pretty-prints the dictionary:

+-------+-----+
| item | qty |
+-------+-----+
| spam | 42 |
| eggs | 451 |
| bacon | 0 |
+-------+-----+

You can find more details about the library here: tabulate.

7. Spruce Up Your Standard Python Shell With Ptpython

In case you’re wondering why my Python shell is sexier than yours, it’s because I’ve been using a custom Python shell. This shell, ptpython, has a lot of enhancements over the standard Python shell. Basically, if the standard Python shell and ptpython were twins, the latter would be the prettier (and more successful) of the two siblings.

You can install ptpython through pip:

pip install ptpython

Once installed, you can invoke it by typing ptpython in your standard shell.

It has several features over the standard shell:

1. Code indentation
2. Syntax highlighting
3. Autocompletion
4. Multiline editing
5. Support for color schemes
... and many other things

In the GIF below, you can see features 1–3 in action:

Image for post
GIF by Author

To learn more about its features, visit its website here: ptpython.

I hope you enjoyed the article and learned something new in the process.

Do you have any cool Python tricks? Chime in with yours in the comments.

고급 Python : Python 함수를 정의 할 때 고려할 10 가지 요소

Python의 함수 선언, 특히 공용 API에 대한 모범 사례

8 월 26 일 · 12최소 읽기
Image for post
~의 사진리카르도 프란츠의 위에Unsplash

프로그래밍 언어가 사용하는 구현 메커니즘에 관계없이 모두 기능을위한 예약 된 자리를 가지고 있습니다. 함수는 데이터 준비 및 처리와 사용자 인터페이스 요소 구성을 담당하므로 모든 코드 프로젝트의 필수 부분입니다. 예외없이 Python은 객체 지향 프로그래밍 언어로 자리를 잡았지만 데이터 관련 작업을 수행하는 함수에 의존합니다. 따라서 좋은 함수를 작성하는 것은 탄력적 인 코드 기반을 구축하는 데 중요합니다.

작은 프로젝트에서 몇 가지 간단한 기능을 정의하는 것은 간단합니다. 프로젝트 범위가 확대됨에 따라 기능이 훨씬 더 복잡해질 수 있으며 더 많은 기능에 대한 필요성이 기하 급수적으로 증가합니다. 모든 기능을 혼동없이 함께 작동시키는 것은 숙련 된 프로그래머에게도 골칫거리가 될 수 있습니다. 프로젝트 범위가 커짐에 따라 함수 선언에 모범 사례를 적용하는 것이 더욱 중요해집니다. 이 기사에서는 함수 선언에 대한 모범 사례, 즉 수년간 코딩을 통해 쌓아온 지식에 대해 이야기하고 싶습니다.

1. 일반 지침

이러한 일반 지침에 익숙 할 수 있지만 많은 프로그래머가 인정하지 않는 높은 수준의 우수 사례이므로 먼저 논의하고 싶습니다. 개발자가 이러한 지침을 따르지 않으면 대가를 지불해야합니다. 코드를 유지 관리하기가 매우 어렵습니다.

기능에 의미있는 이름을 부여해야합니다. 아시다시피 함수는 파이썬의 객체이기도하므로 함수를 정의 할 때 기본적으로 함수 유형의 변수를 만듭니다. 따라서 변수 이름 (즉, 함수 이름)은 수행하는 작업을 반영해야합니다.

현대 코딩에서는 가독성이 더욱 강조되었지만 대부분 주석과 관련하여 논의되고 있으며 코드 자체와 관련하여 논의되는 빈도는 훨씬 적습니다. 따라서 함수를 설명하기 위해 광범위한 주석을 작성해야하는 경우 함수에 좋은 이름이 없을 가능성이 큽니다. 긴 함수 이름에 대해 걱정하지 마십시오. 거의 모든 최신 IDE에는 뛰어난 자동 완성 힌트가 있으므로 전체 긴 이름을 입력하지 않아도됩니다.

기능 명

좋은 명명 규칙은 함수의 인수와 함수 내의 모든 지역 변수에도 적용되어야합니다. 주목해야 할 또 다른 점은 함수가 클래스 또는 모듈 내에서 사용되도록 의도 된 경우 이름 앞에 밑줄을 붙여야 할 수 있다는 것입니다 (예 :def _internal_fun () :)는 이러한 함수가 비공개 용도이며 공개 API가 아님을 나타냅니다.

작고 단일 목적

기능은 작게 유지해야 관리하기 쉽습니다. 집을 짓고 있다고 상상해보십시오 (저택이 아님). 그러나 사용중인 벽돌은 1 미터 큐브입니다. 사용하기 쉽습니까? 아마 아닐 것입니다. 너무 큽니다. 기능에도 동일한 원칙이 적용됩니다. 기능은 프로젝트의 벽돌입니다. 기능의 크기가 모두 방대하다면 건설이 원활하게 진행되지 않습니다. 크기가 작 으면 다양한 장소에 더 쉽게 맞출 수 있으며 필요에 따라 이동합니다.

또한 기능이 단일 목적을 수행하는 것이 중요하므로 기능을 작게 유지하는 데 도움이됩니다. 단일 목적 함수의 또 다른 이점은 이러한 함수의 이름을 훨씬 쉽게 지정할 수 있다는 것입니다. 의도 된 단일 목적에 따라 함수의 이름을 간단하게 지정할 수 있습니다. 다음은 함수를 리팩토링하여 각 함수가 각각 하나의 목적에만 사용되도록하는 방법입니다. 주목해야 할 또 다른 사항은 모든 함수 이름이 이야기를 전달하기 때문에 작성해야하는 주석을 최소화 할 수 있다는 것입니다.

단일 목적

필요한 모든 작업에 대해 함수를 작성하는 데 무제한의 에너지와 시간이 필요하지 않으므로 표준 라이브러리의 공통 함수에 익숙해지는 것이 중요합니다. 자신의 기능을 정의하기 전에 특정 비즈니스 요구가 일반적인 것인지 생각해보십시오. 그렇다면 이러한 특정 및 관련 요구가 이미 해결되었을 가능성이 높습니다.

예를 들어 CSV 형식의 데이터로 작업하는 경우 다음에서 기능을 살펴볼 수 있습니다.CSV 모듈. 또는팬더 라이브러리CSV 파일을 정상적으로 처리 할 수 ​​있습니다. 또 다른 예로, 목록의 요소를 계산하려면 다음을 고려해야합니다.카운터이러한 작업을 위해 특별히 설계된 collections 모듈의 클래스입니다.

2. 기본 인수

함수를 처음 정의 할 때 일반적으로 특정 목적에 사용됩니다. 그러나 프로젝트에 더 많은 기능을 추가하면 밀접하게 관련된 일부 기능이 병합 될 수 있음을 알 수 있습니다. 유일한 차이점은 병합 된 함수의 호출에는 때때로 다른 인수를 전달하거나 약간 다른 인수를 설정해야한다는 것입니다. 이 경우 인수에 기본값을 설정하는 것을 고려할 수 있습니다.

또 다른 일반적인 시나리오는 함수를 선언 할 때 함수가 차등 매개 변수를 사용하는 함수 호출과 함께 여러 목적을 제공 할 것으로 예상하는 반면 일부 다른 매개 변수는 약간의 변형이 필요하다는 것입니다. 기본값을 덜 가변적 인 인수로 설정하는 것을 고려해야합니다.

기본 인수 설정의 이점은 간단합니다. 대부분의 경우 불필요한 인수 설정을 처리 할 필요가 없습니다. 그러나 이러한 매개 변수를 함수 시그니처에 유지할 수 있으므로 필요할 때 함수를 더 유연하게 사용할 수 있습니다. 예를 들어, 내장정렬 됨 ()함수를 호출하는 방법에는 여러 가지가 있지만 대부분의 경우 기본 형식 만 사용합니다.정렬 됨 (the_iterable), 오름차순 사전 순으로 iterable을 정렬합니다. 그러나 오름차순이나 기본 사전 순서를 변경하려는 경우 다음을 지정하여 기본 설정을 재정의 할 수 있습니다.역전인수.

우리 자신의 함수 선언에 동일한 방법을 적용해야합니다. 어떤 값을 설정해야하는지에 관해서는 대부분의 함수 호출에 사용할 기본값을 선택해야합니다. 이것은 선택적 인수이기 때문에 귀하 (또는 귀하의 API 사용자)는 대부분의 상황에서이를 설정하고 싶지 않습니다. 다음 예를 고려하십시오.

기본 인수

기본 인수를 설정하는 방법이 있습니다. 인수가 변경 가능한 객체 인 경우 기본 생성자를 사용하여 설정하지 않는 것이 중요합니다. 함수는 Python의 객체이며 정의 될 때 생성되기 때문입니다. 부작용은 함수 선언시 기본 인수가 평가되므로 기본 가변 객체가 생성되고 함수의 일부가된다는 것입니다. 기본 개체를 사용하여 함수를 호출 할 때마다 기본적으로 함수와 연결된 동일한 변경 가능한 개체에 액세스하게됩니다.하지만 의도적으로 새로운 개체를 만드는 함수가있을 수 있습니다. 다음 코드 스 니펫은 기본 변경 가능 인수 설정의 원치 않는 부작용을 보여줍니다.

기본 변경 가능 개체

위에서 볼 수 있듯이 두 개의 개별 쇼핑 목록을 만들려고했지만 두 번째 함수 호출은 여전히 ​​동일한 기본 개체에 액세스하여축구동일한 목록 개체에 추가 된 항목. 문제를 해결하려면 다음 구현을 사용해야합니다. 구체적으로는없음변경 가능한 인수의 기본값으로 :

변경 가능한 인수의 기본값으로 없음

3. 여러 값 반환 고려

함수가 복잡한 작업을 수행 할 때 이러한 작업이 두 개 이상의 개체를 생성 할 수 있으며,이 모든 개체는 후속 데이터 처리에 필요합니다. 이론적으로는 함수가 클래스 인스턴스를 출력으로 반환 할 수 있도록 이러한 객체를 래핑하는 클래스를 만들 수 있습니다. 그러나 Python에서는 함수가 여러 값을 반환 할 수 있습니다. 보다 정확하게 말하면 이러한 여러 값은 튜플 객체로 반환됩니다. 다음 코드는 간단한 예를 보여줍니다.

여러 반환 값

위에 표시된 것처럼 반환 된 값은 쉼표로 구분됩니다. 기본적으로 튜플 객체를 생성합니다.유형()함수.

한 가지 주목할 점은 Python 함수가 여러 값을 반환 할 수 있지만이 기능을 남용해서는 안된다는 것입니다. 하나의 값 (함수가 명시 적으로 아무것도 반환하지 않으면 실제로없음모든 것이 간단하고 대부분의 사용자는 일반적으로 함수가 하나의 값만 반환하기를 기대하기 때문입니다. 경우에 따라 두 개의 값을 반환하는 것이 좋으며 세 개의 값을 반환하는 것도 괜찮지 만 네 개의 값을 반환하지 마십시오. 어떤 사용자에게 많은 혼란을 줄 수 있습니다. 이런 일이 발생하면 함수를 리팩토링해야 함을 나타내는 좋은 표시입니다. 함수는 여러 용도로 사용되며 더 많은 전용 책임이있는 작은 함수를 만들어야합니다.

4. Try… Except 사용

함수를 공개 API로 정의 할 때 사용자가 원하는 매개 변수를 함수에 설정했다고 항상 가정 할 수는 없습니다. 우리가 직접 함수를 사용하더라도 일부 매개 변수가 우리의 통제를 벗어나 생성되어 우리의 함수와 호환되지 않을 수 있습니다. 이 경우 함수 선언에서 무엇을해야합니까?

첫 번째 고려 사항은시도…일반적인 예외 처리 기술입니다. 잘못 될 수있는 코드 (예 : 특정 예외 발생)를시험절과 가능한 예외는절.

다음 시나리오를 살펴 보겠습니다. 특정 비즈니스 요구 사항은 함수가 파일 경로를 사용하고 파일이 존재하고 성공적으로 읽힌 경우 함수가 파일에 대해 일부 데이터 처리 작업을 수행하고 결과를 반환하고 그렇지 않으면 반환하는 것입니다.-1. 이러한 요구를 구현하는 방법에는 여러 가지가 있습니다. 아래 코드는 가능한 솔루션을 보여줍니다.

시도… 문 제외

즉, 함수 사용자가 코드에서 예외를 발생시키는 일부 인수를 설정할 수 있다고 예상하는 경우 이러한 가능한 예외를 처리하는 함수를 정의 할 수 있습니다. 그러나 예에 표시된 기능의 일부가 아닌 한 사용자에게 명확하게 전달해야합니다 (return-1파일을 읽을 수없는 경우).

5. 인수 유효성 검사 고려

사용하는 이전 기능시도…선언문은 EAFP (허가보다 용서를 쉽게 구하기) 코딩 스타일이라고도합니다. LBYL (Look Before You Leap)이라는 또 다른 코딩 스타일이 있는데, 특정 코드 블록을 실행하기 전에 온 전성 검사를 강조합니다.

앞의 예에 따라 LBYL을 함수 선언에 적용 할 때 다른 고려 사항은 함수의 인수를 확인하는 것입니다. 인수 유효성 검사의 일반적인 사용 사례 중 하나는 인수가 올바른 데이터 유형인지 확인하는 것입니다. 우리 모두 알다시피 Python은 동적 유형 언어로 유형 검사를 시행하지 않습니다. 예를 들어 함수의 인수는 정수 또는 부동 소수점 숫자 여야합니다. 그러나 문자열 (호출 자체)을 설정하여 함수를 호출하면 함수가 실행될 때까지 오류 메시지가 표시되지 않습니다.

다음 코드는 코드를 실행하기 전에 인수의 유효성을 검사하는 방법을 보여줍니다.

인수 검증

EAFP 및 LBYL은 함수 인수를 처리하는 것 이상으로 적용될 수 있습니다. 기능의 어느 곳에 나 적용 할 수 있습니다. EAFP는 Python 세계에서 선호되는 코딩 스타일이지만 사용 사례에 따라 EAFP 스타일로 얻는 일반적인 기본 제공 오류 메시지보다 더 사용자 친화적 인 함수 별 오류 메시지를 제공 할 수있는 LBYL 사용을 고려해야합니다. .

6. Lambda 함수를 대안으로 고려

일부 함수는 특정 작업을 수행하기 위해 다른 함수 (또는 일반적인 용어로 호출 가능)를 사용할 수 있습니다. 예를 들어정렬 됨 ()기능에는더 많은 사용자 지정 정렬 동작을 정의 할 수있는 인수입니다. 다음 코드 스 니펫은 사용 사례를 보여줍니다.

함수를 사용한 맞춤 정렬

특히sorting_grade함수는 한 번만 사용되었으며 간단한 함수입니다.이 경우 람다 함수 사용을 고려할 수 있습니다.

람다 함수에 익숙하지 않은 경우 다음은 간단한 설명입니다. 람다 함수는 lambda 키워드를 사용하여 선언 된 익명 함수입니다. 0 개 이상의 인수가 필요하며 다음 형식의 적용 가능한 작업에 대해 하나의 표현식이 있습니다.람다 인수 : 표현식. 다음 코드는 람다 함수를 사용하는 방법을 보여줍니다.정렬 됨 ()위의 솔루션보다 약간 깔끔해 보이는 함수 :

Lambda를 사용한 사용자 지정 정렬

많은 데이터 과학자와 관련된 또 다른 일반적인 사용 사례는 Pandas 라이브러리로 작업 할 때 람다 함수를 사용하는 것입니다. 다음 코드는 간단한 예입니다.람다함수는 다음을 사용하여 데이터 조작을 지원합니다.지도()팬더의 각 항목을 작동하는 함수시리즈목적:

데이터 조작지도()람다

7. 데코레이터 고려

데코레이터는 핵심 기능에 영향을주지 않고 다른 기능의 동작을 수정하는 기능입니다. 즉, 장식적인 수준에서 장식 된 기능을 수정합니다. 데코레이터에 대해 잘 모르시 겠다면 이전 기사를 참조하십시오 (1,2, 및). 다음은 데코레이터가 Python에서 작동하는 방식에 대한 간단한 예입니다.

기본 데코레이터

표시된대로 데코레이터 함수는 단순히 데코 레이팅 된 함수를 두 번 실행합니다. 데코레이터를 사용하려면 데코레이터 함수 이름을 데코 레이팅 된 함수 위에@접두사. 알 수 있듯이 데코 레이팅 된 함수는 두 번 호출되었습니다.

예를 들어 유용한 데코레이터 중 하나는 사용자 정의 클래스에서 사용할 수있는 속성 데코레이터입니다. 다음 코드는 작동 방식을 보여줍니다. 본질적으로@특성데코레이터는 인스턴스 메서드를 변환하여 점 표기법을 사용하는 액세스를 허용하는 일반 속성처럼 작동하도록합니다.

데코레이터 : 속성

데코레이터의 또 다른 사소한 사용 사례는 시간 로깅 데코레이터로, 함수의 효율성이 중요한 경우 특히 유용 할 수 있습니다. 다음 코드는 이러한 사용법을 보여줍니다.

로깅 시간

8. * args와 ** kwargs를 사용하라 — 그러나 간결하게

이전 섹션에서* args** kwargs데코레이터 함수를 정의 할 때 데코레이터 함수를 사용하여 모든 함수를 데코레이션 할 수 있습니다. 본질적으로 우리는* args모든 (또는 더 일반적으로 결정되지 않은 수의) 위치 인수를 캡처하는 동안** kwargs모든 (또는 더 일반적으로 결정되지 않은 수의) 키워드 인수를 캡처합니다. 특히 위치 인수는 함수 호출에서 전달 된 인수의 위치를 ​​기반으로하는 반면, 키워드 인수는 매개 변수를 특별히 명명 된 함수 인수로 설정하는 것을 기반으로합니다.

이러한 용어에 익숙하지 않은 경우 여기에서 기본 제공의 서명을 간단히 살펴볼 수 있습니다.정렬 됨 ()함수:정렬 됨 (반복 가능,*,key = 없음,reverse = 거짓). 그만큼반복 가능인수는 위치 인수이고역전인수는 키워드 인수입니다.

사용의 주요 이점* args** kwargs동일한 문제에 대해 함수 선언을 깨끗하게하거나 덜 시끄럽게 만드는 것입니다. 다음 예는 다음의 합법적 인 사용을 보여줍니다.* arg함수 선언에서 함수가 임의의 수의 위치 인수를 허용하도록합니다.

* args 사용

다음 코드는 합법적 인 사용을 보여줍니다.** kwargs함수 선언에서. 마찬가지로** kwargs사용자가 원하는 수의 키워드 인수를 설정하여 함수를보다 유연하게 만들 수 있습니다.

** kwargs 사용

그러나 대부분의 경우 사용할 필요가 없습니다.* args또는** kwargs. 선언을 좀 더 깔끔하게 만들 수 있지만 함수의 서명을 숨 깁니다. 즉, 함수 사용자는 함수가 취하는 매개 변수를 정확히 파악해야합니다. 그러니 제 충고는 필요하지 않으면 사용하지 않는 것입니다. 예를 들어 사전 인수를 사용하여** kwargs? 마찬가지로 목록 또는 튜플 객체를 사용하여* args? 대부분의 경우 이러한 대안은 문제없이 작동합니다.

9. 인수에 대한 유형 주석

앞서 언급했듯이 Python은 동적 형식의 프로그래밍 언어이자 해석 언어이며, 이는 Python이 코딩 시간 동안 형식 호환성을 포함한 코드 유효성을 확인하지 않는다는 의미입니다. 코드가 실제로 실행될 때까지 함수와 호환되지 않는 유형을 입력합니다 (예 : 정수가 예상 될 때 함수에 문자열 전송).

이러한 이유로 Python은 입력 및 출력 인수 유형의 선언을 시행하지 않습니다. 즉, 함수를 만들 때 어떤 유형의 매개 변수가 있어야하는지 지정할 필요가 없습니다. 그러나 최근 Python 릴리스에서는 그렇게 할 수있게되었습니다. 유형 주석을 사용할 때의 주요 이점은 일부 IDE (예 : PyCharm 또는 Visual Studio Code)에서 주석을 사용하여 유형 호환성을 확인할 수 있으므로 사용자 또는 다른 사용자가 함수를 사용할 때 적절한 힌트를 얻을 수 있다는 것입니다.

또 다른 관련 이점은 IDE가 매개 변수 유형을 알고있는 경우 적절한 자동 완성 제안을 제공하여 더 빠르게 코딩 할 수 있다는 것입니다. 물론 함수에 대한 독 스트링을 작성할 때 이러한 유형 주석은 코드의 최종 개발자에게도 유익합니다.

Image for post
유형 주석 (PyCharm)이있는 유용한 정보

10. 책임있는 문서

나는 좋은 문서를 책임감있는 문서와 동일시합니다. 함수가 사적인 용도로 사용되는 경우 매우 철저한 문서를 작성할 필요가 없습니다. 코드가 스토리를 명확하게 전달한다고 가정 할 수 있습니다. 어느 곳에서나 약간의 설명이 필요한 경우 코드를 재검토 할 때 자신이나 다른 독자에게 알림 역할을 할 수있는 매우 간단한 주석을 작성할 수 있습니다. 여기에서 책임있는 문서에 대한 논의는 공용 API로서의 함수의 독 스트링과 더 관련이 있습니다. 다음 측면이 포함되어야합니다.

  • 함수의 의도 된 작업에 대한 간략한 요약입니다.이것은 매우 간결해야합니다. 대부분의 경우 요약은 한 문장 이상이어서는 안됩니다.
  • 입력 인수 : 유형 및 설명.입력 인수의 유형과 특정 옵션을 설정하여 수행 할 수있는 작업을 지정해야합니다.
  • 반환 값 : 유형 및 설명.입력 인수와 마찬가지로 함수의 출력을 지정해야합니다. 아무것도 반환하지 않는 경우 선택적으로없음반환 값으로.

결론

코딩 경험이 있다면 대부분의 시간이 함수 작성 및 리팩토링에 소비된다는 것을 알게 될 것입니다. 결국 데이터는 일반적으로 너무 많이 변경되지 않으며 데이터를 처리하고 조작하는 기능입니다. 데이터를 신체의 줄기라고 생각하면 기능은 사용자를 움직이는 팔과 다리입니다. 따라서 우리는 프로그램을 민첩하게 만들기 위해 좋은 함수를 작성해야합니다.

이 기사가 코딩에 사용할 수있는 유용한 정보를 전달했으면합니다.

읽어 주셔서 감사합니다.

Advanced Python: Consider These 10 Elements When You Define Python Functions

Best practices for function declarations in Python — particularly public APIs

Aug 26 · 12 min read
Image for post
Photo by Ricardo Frantz on Unsplash

No matter what implementation mechanisms programming languages use, all of them have a reserved seat for functions. Functions are essential parts of any code project because they’re responsible for preparing and processing data and configuring user interface elements. Without exception, Python, while positioned as an object-oriented programming language, depends on functions to perform data-related operations. So, writing good functions is critical to building a resilient code base.

It’s straightforward to define a few simple functions in a small project. With the growth of the project scope, the functions can get far more complicated and the need for more functions grows exponentially. Getting all the functions to work together without any confusion can be a headache, even to experienced programmers. Applying best practices to function declarations becomes more important as the scope of your project grows. In this article, I’d like to talk about best practices for declaring functions — knowledge I have accrued over years of coding.

1. General Guidelines

You may be familiar with these general guidelines, but I’d like to discuss them first because they’re high-level, good practices that many programmers don’t appreciate. When developers don’t follow these guidelines, they pay the price — the code is very hard to maintain.

We have to give meaningful names to our functions. As you know, functions are also objects in Python, so when we define a function, we basically create a variable of the function type. So, the variable name (i.e. the name of the function) has to reflect the operation it performs.

Although readability has become more emphasized in modern coding, it’s mostly talked about in regards to comments — it’s much less often discussed in relation to code itself. So, if you have to write extensive comments to explain your functions, it’s very likely that your functions don’t have good names. Don’t worry about having a long function name — almost all modern IDEs have excellent auto-completion hints, which will save you from typing the entire long names.

Function Names

Good naming rules should also apply to the arguments of the function and all local variables within the function. Something else to note is that if your functions are intended to be used within your class or module, you may want to prefix the name with an underscore (e.g., def _internal_fun():) to indicate that these functions are for private usages and they’re not public APIs.

Small and Single Purpose

Your functions should be kept small, so they’re easier to manage. Imagine that you’re building a house (not a mansion). However, the bricks you’re using are one meter cubed. Are they easy to use? Probably not — they’re too large. The same principle applies to functions. The functions are the bricks of your project. If the functions are all enormous in size, your construction won’t progress as smoothly as it could. When they’re small, they’re easier to fit into various places and moved around if the need arises.

It’s also key for your functions to serve single purposes, which can help you keep your functions small. Another benefit of single-purpose functions is that you’ll find it much easier to name such functions. You can simply name your function based on its intended single purpose. The following is how we can refactor our functions to make each of them serve only one purpose each. Another thing to note is that by doing that, you can minimize the comments that you need to write — because all the function names tell the story.

Single Purposes

You don’t have unlimited energy and time to write functions for every operation you need, so it’s essential to be familiar with common functions in standard libraries. Before you define your own functions, think about whether the particular business need is common — if so, it’s likely that these particular and related needs have already been addressed.

For instance, if you work with data in the CSV format, you can look into the functionalities in the CSV module. Alternatively, the pandas library can handle CSV files gracefully. For another instance, if you want to count elements in a list, you should consider the Counter class in the collections module, which is designed specifically for these operations.

2. Default Arguments

When we first define a function, it usually serves one particular purpose. However, when you add more features to your project, you may realize that some closely related functions can be merged. The only difference is that the invocation of the merged function sometimes involves passing another argument or setting slightly different arguments. In this case, you can consider setting a default value to the argument.

The other common scenario is that when you declare a function, you already expect that your function serves multiple purposes, with function calls using differential parameters while some other parameters requiring few variations. You should consider setting a default value to the less varied argument.

The benefit of setting default arguments is straightforward — you don’t need to deal with setting unnecessary arguments in most cases. However, the availability of keeping these parameters in your function signature allows you to use your functions more flexibly when you need to. For instance, for the built-in sorted() function, there are several ways to call the function, but in most cases, we just use the basic form: sorted(the_iterable), which will sort the iterable in the ascending lexicographic order. However, when you want to change the ascending order or the default lexicographic order, we can override the default setting by specifying the reverse and key arguments.

We should apply the same practice to our own function declaration. In terms of what value we should set, the rule of thumb is you should choose the default value that is to be used for most function calls. Because this is an optional argument, you (or the users of your APIs) don’t want to set it in most situations. Consider the following example:

Default Arguments

There is a catch for setting the default argument. If your argument is a mutable object, it’s important that you don’t set it using the default constructor — because functions are objects in Python and they’re created when they’re defined. The side effect is that the default argument is evaluated at the time of function declaration, so a default mutable object is created and becomes part of the function. Whenever you call the function using the default object, you’re essentially accessing the same mutable object associated with the function, although your intention may be having the function to create a brand new object for you. The following code snippet shows you the unwanted side effect of setting a default mutable argument:

Default Mutable Object

As shown above, although we intended to create two distinct shopping lists, the second function call still accessed the same underlying object, which resulted in the Soccer item added to the same list object. To solve the problem, we should use the following implementation. Specifically, you should use None as the default value for a mutable argument:

None As the Default Value for Mutable Argument

3. Consider Returning Multiple Values

When your function performs complicated operations, the chances are that these operations can generate two or more objects, all of which are needed for your subsequent data processing. Theoretically, it’s possible that you can create a class to wrap these objects such that your function can return the class instance as its output. However, it’s possible in Python that a function can return multiple values. More precisely speaking, these multiple values are returned as a tuple object. The following code shows you a trivial example:

Multiple Return Values

As shown above, the returned values are simply separated by a comma, which essentially creates a tuple object, as checked by the type() function.

One thing to note is that although Python functions can return multiple values, you should not abuse this feature. One value (when a function doesn’t explicitly return anything, it actually returns None implicitly) is best — because everything is straightforward and most users usually expect a function to return only one value. In some cases, returning two values is fine, returning three values is probably still OK, but please don’t ever return four values. It can create a lot of confusion for the users over which are which. If it happens, this is a good indication that you should refactor your functions — your functions probably serve multiple purposes and you should create smaller ones with more dedicated responsibilities.

4. Use Try…Except

When you define functions as public APIs, you can’t always assume that the users set the desired parameters to the functions. Even if we use the functions ourselves, it’s possible that some parameters are created out of our control and they’re incompatible with our functions. In these cases, what should we do in our function declaration?

The first consideration is to use the try…except statement, which is the typical exception handling technique. You embed the code that can possibly go wrong (i.e., raise certain exceptions) in the try clause and the possible exceptions are handled in the except clause.

Let’s consider the following scenario. Suppose that the particular business need is that your function takes a file path and if the file exists and is read successfully, your function does some data processing operations with the file and returns the result, otherwise returns -1. There are multiple ways to implement this need. The code below shows you a possible solution:

Try…Except Statement

In other words, if you expect that users of your functions can set some arguments that result in exceptions in your code, you can define functions that handle these possible exceptions. However, this should be communicated with the users clearly, unless it’s part of the feature as shown in the example (return -1 when the file can’t be read).

5. Consider Argument Validation

The previous function using the try…except statement is sometimes referred to as the EAFP (Easier to Ask Forgiveness than Permission) coding style. There is another coding style called LBYL (Look Before You Leap), which stresses the sanity check before running particular code blocks.

Following the previous example, in terms of applying LBYL to function declaration, the other consideration is to validate your function’s arguments. One common use case for argument validation is to check whether the argument is of the right data type. As we all know, Python is a dynamically-typed language, which doesn’t enforce type checking. For instance, your function’s arguments should be integers or floating-point numbers. However, calling the function by setting strings — the invocation itself — won’t prompt any error messages until the function is executed.

The following code shows how to validate the arguments before running the code:

Argument Validation

It should be noted that both EAFP and LBYL can be applied to more than just dealing with function arguments. They can be applied anywhere in your functions. Although EAFP is a preferred coding style in the Python world, depending on your use case, you should also consider using LBYL which can provide more user-friendly function-specific error messages than the generic built-in error messages you get with the EAFP style.

6. Consider Lambda Functions As Alternatives

Some functions can take another function (or are callable, in general terms) to perform particular operations. For instance, the sorted() function has the key argument that allows us to define more custom sorting behaviors. The following code snippet shows you a use case:

Custom Sorting Using Function

Notably, the sorting_grade function was used just once and it’s a simple function — in which case, we can consider using a lambda function.

If you’re not familiar with the lambda function, here’s a brief description. A lambda function is an anonymous function declared using the lambda keyword. It takes zero to more arguments and has one expression for applicable operations with the form: lambda arguments: expression. The following code shows you how we can use a lambda function in the sorted() function, which looks a little cleaner than the solution above:

Custom Sorting Using Lambda

Another common use-case that’s relevant to many data scientists is the use of lambda functions when they work with the pandas library. The following code is a trivial example how a lambda function assists data manipulation using the map() function, which operates each item in a pandas Series object:

Data Manipulation With map() and Lambda

7. Consider Decorators

Decorators are functions that modify the behavior of other functions without affecting their core functionalities. In other words, they provide modifications to the decorated functions at the cosmetic level. If you don’t know too much about decorators, please feel free to refer to my earlier articles (1, 2, and 3). Here’s a trivial example of how decorators work in Python.

Basic Decorator

As shown, the decorator function simply runs the decorated function twice. To use the decorator, we simply place the decorator function name above the decorated function with an @ prefix. As you can tell, the decorated function did get called twice.

For instance, one useful decorator is the property decorator that you can use in your custom class. The following code shows you how it works. In essence, the @property decorator converts an instance method to make it behave like a regular attribute, which allows the access of using the dot notation.

Decorators: Property

Another trivial use case of decorators is the time logging decorator, which can be particularly handy when the efficiency of your functions is of concern. The following code shows you such a usage:

Logging Time

8. Use *args and **kwargs — But Parsimoniously

In the previous section, you saw the use of *args and **kwargs in defining our decorator function, the use of which allows the decorator function to decorate any functions. In essence, we use *args to capture all (or an undetermined number of, to be more general) position arguments while **kwargs to capture all (or an undetermined number of, to be more general) keyword arguments. Specifically, position arguments are based on the positions of the arguments that are passed in the function call, while keyword arguments are based on setting parameters to specifically named function arguments.

If you’re unfamiliar with these terminologies, here’s a quick peek to the signature of the built-in sorted() function: sorted(iterable, *, key=None, reverse=False). The iterable argument is a position argument, while the key and reverse arguments are keyword arguments.

The major benefit of using *args and **kwargs is to make your function declaration looks clean, or less noisy for the same matter. The following example shows you a legitimate use of *arg in function declaration, which allows your function to accept any number of position arguments.

Use of *args

The following code shows you a legitimate use of **kwargs in function declaration. Similarly, the function with **kwargs allows the users to set any number of keyword arguments, to make your function more flexible.

Use of **kwargs

However, in most cases, you don’t need to use *args or **kwargs. Although it can make your declaration a bit cleaner, it hides the function’s signature. In other words, the users of your functions have to figure out exactly what parameters your functions take. So my advice is to avoid using them if you don’t have to. For instance, can I use a dictionary argument to replace the **kwargs? Similarly, can I use a list or tuple object to replace *args? In most cases, these alternatives should work without any problems.

9. Type Annotation for Arguments

As mentioned previously, Python is a dynamically-typed programming language as well as an interpreted language, the implication of which is that Python doesn’t check code validity, including type compatibility, during coding time. Until your code actually executes, will type incompatibility with your function (e.g., send a string to a function when an integer is expected) emerge.

For these reasons, Python doesn’t enforce the declaration of the type of input and output arguments. In other words, when you create your functions, you don’t need to specify what types of parameters they should have. However, it has become possible to do that in recent Python releases. The major benefit of having type annotation is that some IDEs (e.g., PyCharm or Visual Studio Code) could use the annotations to check the type compatibility for you, so that when you or other users use your functions you can get proper hints.

Another related benefit is that if the IDEs know the type of parameter, it can give proper auto-completion suggestions to help you code faster. Certainly, when you write docstrings for your functions, these type annotations will also be informative to the end developers of your code.

Image for post
Helpful Information With Type Annotation (PyCharm)

10. Responsible Documentation

I equate good documentation with responsible documentation. If your functions are for private uses, you don’t have to write very thorough documentation — you can make the assumption that your code tells the story clearly. If anywhere requires some clarification, you can write a very brief comment that can serve as a reminder for yourself or other readers when your code is revisited. Here, the discussion of responsible documentation is more concerned with the docstrings of your function as public APIs. The following aspects should be included:

  • A brief summary of the intended operation of your function. This should be very concise. In most cases, the summary shouldn’t be more than one sentence.
  • Input arguments: Type and explanation. You need to specify what type of your input arguments should be and what they can do by setting particular options.
  • Return Value: Type and explanation. Just as with input arguments, you need to specify the output of your function. If it doesn’t return anything, you can optionally specify None as the return value.

Conclusions

If you’re experienced with coding, you’ll find out that most of your time is spent on writing and refactoring functions. After all, your data usually doesn’t change too much itself— it’s the functions that process and manipulate your data. If you think of data as the trunk of your body, functions are the arms and legs that move you around. So, we have to write good functions to make our programs agile.

I hope that this article has conveyed some useful information that you can use in your coding.

Thanks for reading.

데이터 과학,기계 학습

ROCKET : 빠르고 정확한 시계열 분류

Python을 사용한 시계열 분류를위한 최신 알고리즘

이미지OpenClipart- 벡터...에서pixabay
  • ROCKET의 작동 원리 설명
  • Python 코드 예제 제공

대안은 무엇입니까?

시계열 분류를위한 다른 방법은 일반적으로 모양, 빈도 또는 분산과 같은 특정 시리즈 표현에 의존합니다. ROCKET의 컨볼 루션 커널은이 엔지니어링 된 기능 추출을 동일한 기능을 많이 캡처 할 수있는 단일 메커니즘으로 대체합니다.

시계열 분류 조사

시계열 변환은 시계열 분류의 기본 아이디어입니다.많은 시계열 특정 알고리즘은 변환 된 시계열과 기존 분류 알고리즘의 구성입니다., scikit-learn에있는 것과 같은.

경쟁 SOTA 방법

다음 방법은에 설명 된 알고리즘의 속도와 정확성을 개선하기 위해 노력합니다.서베이위.

  • TS-CHIEF사전 기반 및 간격 기반 분할 기준을 사용하여 Proximity Forest를 확장합니다.
  • InceptionTimeInception 아키텍처를 기반으로하는 5 개의 deep CNN의 앙상블입니다.
  • 미스터 씰시계열 (SAX, SFA)의 기호 표현으로 추출 된 특징에 선형 분류기를 적용합니다.
  • cBOSS 또는 계약 가능한 BOSS는 SFA 변환을 기반으로하는 사전 기반 분류기입니다.
  • catch22분류기에 전달할 수있는 22 개의 미리 선택된 시계열 변환 집합입니다.

ROCKET은 어떻게 작동합니까?

ROCKET은 먼저 컨볼 루션 커널을 사용하여 시계열을 변환하고 두 번째는 변환 된 데이터를 선형 분류기에 전달합니다.

컨볼 루션 커널

컨벌루션 신경망에서 발견 된 것과 동일한 컨볼 루션 커널은 임의의 길이, 가중치, 편향,팽창, 패딩. 보다종이랜덤 매개 변수가 샘플링되는 방법에 대해 설명합니다. ROCKET의 일부이며 샘플링을 조정할 필요가 없습니다. 보폭은 항상 하나입니다. ROCKET은 결과 기능에 ReLU와 같은 비선형 변환을 적용하지 않습니다.

컨볼 루션 커널 변환

각 커널은 각 시계열과 컨볼 루션되어 기능 맵을 생성합니다. 커널의 기능 맵은 통합되어 커널 당 두 가지 기능을 생성합니다.최대 값양수 값의 비율.

Image for post
zi는 회선 연산의 출력입니다.

선형 분류

더 작은 데이터 세트의 경우, 저자는능선 회귀 분류기정규화 매개 변수의 빠른 교차 검증과 다른 초 매개 변수가 없기 때문입니다.

ROCKET을 Python과 함께 사용하는 방법은 무엇입니까?

ROCKET 변환은sktime파이썬 패키지.

import numpy as np
from sklearn.linear_model import RidgeClassifierCV
from sktime.datasets import load_arrow_head # univariate dataset
from sktime.transformers.series_as_features.rocket import Rocket
X_train, y_train = load_arrow_head(split="test", return_X_y=True)
X_test, y_test = load_arrow_head(split="train", return_X_y=True)
print(X_train.shape, X_test.shape)
>> (175, 1) (36, 1)
Image for post
rocket = Rocket(num_kernels=10,000, random_state=111) 
rocket.fit(X_train)
X_train_transform = rocket.transform(X_train)
X_train_transform.shape
>> (175, 20000)
classifier = RidgeClassifierCV(alphas=np.logspace(-3, 3, 10), normalize=True)
classifier.fit(X_train_transform, y_train)
X_test_transform = rocket.transform(X_test)
classifier.score(X_test_transform, y_test)
>> 0.9167

소환

Dempster, A., Petitjean, F. & Webb, G.I. ROCKET : 랜덤 컨볼 루션 커널을 사용한 매우 빠르고 정확한 시계열 분류.데이터 최소 지식 디스크 34,1454–1495 (2020).https://doi.org/10.1007/s10618-020-00701-z

Data Science, Machine Learning

ROCKET: Fast and Accurate Time Series Classification

State-of-the-art algorithm for time series classification with python

Image by OpenClipart-Vectors at pixabay
  • Explain how ROCKET works
  • Provide a python code example

What are the alternatives?

Other methods for time series classification usually rely on specific representations of series, such as shape, frequency, or variance. The convolutional kernels of ROCKET replace this engineered feature extraction with a single mechanism that can capture many of the same features.

Survey of time series classification

Time series transformation is a foundational idea of time series classification. Many time-series specific algorithms are compositions of transformed time series and conventional classification algorithms, such as those in scikit-learn.

Competing SOTA methods

The following methods strive to improve upon the speed and accuracy of the algorithms described in the Survey above.

  • TS-CHIEF extends Proximity Forest by using dictionary-based and interval-based splitting criteria.
  • InceptionTime is an ensemble of 5 deep CNN’s based on the Inception architecture.
  • Mr-SEQL applies a linear classifier to features extracted by symbolic representations of time series (SAX, SFA).
  • cBOSS, or contractable BOSS, is a dictionary-based classifier based on the SFA transform.
  • catch22 is a set of 22 pre-selected time series transformations that can be passed to a classifier.

How does ROCKET work?

ROCKET first transforms a time series using convolutional kernels and second passes the transformed data to a linear classifier.

Convolutional Kernels

The convolutional kernels, the same as those found in convolutional neural networks, are initialized with random length, weights, bias, dilation, and padding. See the paper for how the random parameters are sampled — they are part of ROCKET and the sampling does not need to be tuned. The stride is always one. ROCKET does not apply non-linear transforms, such as ReLU, on the resulting features.

The Convolutional Kernel Transform

Each kernel is convolved with each time series to produce a feature map. The kernel’s feature map is aggregated to produce two features per kernel: the maximum value and proportion of positive values.

Image for post
zi is the output of the convolution operation

Linear Classification

For smaller datasets, the authors recommend a ridge regression classifier due to fast cross-validation of the regularization parameter and no other hyperparameters.

How to use ROCKET with Python?

The ROCKET transform is implemented in the sktime python package.

import numpy as np
from sklearn.linear_model import RidgeClassifierCV
from sktime.datasets import load_arrow_head # univariate dataset
from sktime.transformers.series_as_features.rocket import Rocket
X_train, y_train = load_arrow_head(split="test", return_X_y=True)
X_test, y_test = load_arrow_head(split="train", return_X_y=True)
print(X_train.shape, X_test.shape)
>> (175, 1) (36, 1)
Image for post
rocket = Rocket(num_kernels=10,000, random_state=111) 
rocket.fit(X_train)
X_train_transform = rocket.transform(X_train)
X_train_transform.shape
>> (175, 20000)
classifier = RidgeClassifierCV(alphas=np.logspace(-3, 3, 10), normalize=True)
classifier.fit(X_train_transform, y_train)
X_test_transform = rocket.transform(X_test)
classifier.score(X_test_transform, y_test)
>> 0.9167

Citation

Dempster, A., Petitjean, F. & Webb, G.I. ROCKET: exceptionally fast and accurate time series classification using random convolutional kernels. Data Min Knowl Disc 34, 1454–1495 (2020). https://doi.org/10.1007/s10618-020-00701-z

+ Recent posts